Инструкция для VITEK VT-3404 BK

(скачивание инструкции бесплатно)
Формат файла: PDF
Доступность: Бесплатно как и все руководства на сайте. Без регистрации и SMS.
Дополнительно: Чтение инструкции онлайн
background image

4

 ENGLISH

–  Wash the attachments that will contact products with 

warm  water  and  a  neutral  detergent  and  dry  them 
thoroughly before use.

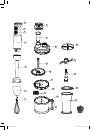
–  Wipe the motor unit (4), whisk gear (6) and geared lid 

of the processor (10) with a soft slightly damp cloth.

Attention! 

–  Do not immerse the motor unit (4), whisk gear (6), 

processing  bowl  geared  lid  (10),  power  cord  and 
power plug into water or any other liquids.

–  Do  not  put  the  attachments  and  bowls  in  a  dish-

washing machine.

OPERATION TIME

Continuous operation time while working with attachments 
(5, 7) should not exceed 1 minute. Operation time of the 
processor  should  not  exceed  20-30  seconds.  Make  at 
least a two-minute break between operation cycles.


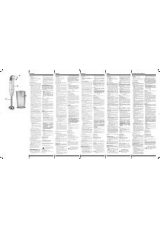
USING THE BLENDER ATTACHMENT

Warning: 

–  Before assembling, make sure that the power plug 

is not inserted into the mains socket.


Insert the blender attachment (5) into the motor unit 
(4), and turn it counterclockwise until bumping. 


Insert the power plug into the mains socket.


Immerse  the  blender  attachment  (5)  into  the  bowl 
with  products  that  you  want  to  chop/mix;  you  can 
use the measuring cup (22) for it.

Note: When using the measuring cup (22) for chop-
ping/mixing  products,  the  amount  of  ingredients 
should  not  exceed  200  ml.  Otherwise  the  mixed 
products can splash out.


To switch the blender on, press and hold the button 
(2). Set the required operation speed from 1 to 20 
using the control knob (1). Use this operation mode 
for mixing liquid products.


If  you  press  and  hold  the  button  (3),  the  unit  will 
operate at maximum rotation speed. Use this oper-
ation  mode  for  combined  processing  of  liquid  and 
hard products.

Notes:

–   Products should be put into the bowl before the unit 

is switched on. 

–  Before starting to chop/mix, we recommend to peel 

fruit, remove inedible parts, such as bones, and cut 
fruit into cubes approximately 2х2 cm in size.


After you finish using the unit, take the power plug 
out  of  the  socket  and  remove  the  blender  attach-
ment (5), turning it clockwise.

Attention! 

–  Do  not  remove  the  blender  attachment  (5)  during 

operation.

–  In order not to damage the blades, do not process 

too hard products such as cereals, rice, spices, cof-
fee beans, ice, cheese, frozen food. 

–  If the products are difficult to process, add some liq-

uid into the bowl. 

USING THE WHISK

Use the whisk attachment (7) only to beat cream, make 
biscuit dough or for mixing ready desserts.

Warning: 

–  Before assembling, make sure that the power plug 

is not inserted into the mains socket.


Insert the whisk (7) into the gear (6).


Insert the whisk gear (6) into the motor unit (4), and 
turn it counterclockwise until bumping.


Insert the power plug into the mains socket.


Sink the whisk (7) into the bowl with products.


Set the required operation speed from 1 to 20 using 
the control knob (1).


To  switch  the  blender  on,  press  and  hold  the  button 
(2). Use this operation mode for mixing liquid products.


If  you  press  and  hold  the  button  (3),  the  unit  will 
operate at maximum rotation speed.


After you finish using the unit, take the power plug 
out of the socket, disconnect the whisk (7) from the 
gear (6) and disconnect the gear (6) from the motor 
unit (4) by turning it clockwise.

Attention!

–  Do not use the whisk (7) to make tight dough.
–  Products for beating/mixing should be put into the 

bowl before the unit is switched on.

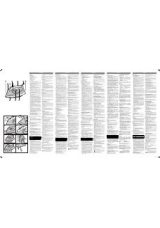
USING THE CHOPPING KNIFE 

Attention!

–  Do not chop very hard products, such as nutmegs, 

coffee beans and cereals.

Before you start chopping:

–  remove bones, sinews and cartilage from meat.
–  cut  meat,  onion,  garlic,  carrots  etc.  into  approxi-

mately equal pieces;

–  when chopping greens, remove stems of herbs.

Chopping 
Warning: 

–  Before assembling, make sure that the power plug 

is not inserted into the mains socket.

–  Do not overload the processing bowl!

Caution: the blades are very sharp!


Set the driving shaft (20) on the axis of the process-
ing bowl (17).


Remove the plastic protective cover from the blades 
of the knife (19) and set the knife (19) on the splines 
of the driving shaft (20).


Put the products into the processing bowl (17).


Install the geared lid (10) on the bowl (17).


Press  the  lock  button  (16)  and  turn  the  geared  lid 
(10) counterclockwise to the position  “

” , release 

the lock button (16) and make sure that the geared 
lid (10) is fixed properly.


Place the motor unit (4) on the geared lid (10) and 
rotate it clockwise until fixing.


Insert the power plug into the mains socket.

VT-3404.indd   4

30.10.2013   10:10:49

1
2
3
4
5
6
7
8
9
10
11
12
13
14
15
16
17
18
19
20
21
22
23
24
25
26
27
28
29
30
31
32
33
34
35
36
37
38
39
40
41
42
43
44
Оглавление инструкции
  • Страница 1 из 45
    VT-3404 BK Hand blender set Блендерный набор 3 7 12 17 21 25 29 34 39 1 VT-3404.indd 1 30.10.2013 10:10:47
  • Страница 2 из 45
    1 8 2 3 9 4 18 10 19 11 5 12 20 13 21 14 6 15 16 7 22 17 рис. 1 VT-3404.indd 2 30.10.2013 10:10:48
  • Страница 3 из 45
    ENGLISH •• If rotation of the chopping knife is hindered, unplug BLENDER SET The blender set is intended for chopping, mixing and beating products. the unit and carefully remove products that prevent blade rotation. •• Remove products and pour out liquids from the bowl only after complete stop of
  • Страница 4 из 45
    ENGLISH – – Wash the attachments that will contact products with warm water and a neutral detergent and dry them thoroughly before use. Wipe the motor unit (4), whisk gear (6) and geared lid of the processor (10) with a soft slightly damp cloth. USING THE WHISK Use the whisk attachment (7) only to
  • Страница 5 из 45
    ENGLISH •• Set the required speed from 1 to 20 using the con- Warning: – Before assembling, make sure that the power plug is not inserted into the mains socket. •• Open the locks (14), set the knife (12) on the cubic attachment (13) and fix it with the locks (14). •• Match the groove on the cubic
  • Страница 6 из 45
    ENGLISH •• While possessing products with strong dyeing prop- TECHNICAL SPECIFICATIONS Power supply: 220-240 V ~ 50/60 Hz Maximal power consumption: 1000 W erties (for instance carrot or beet-root) the bowls and attachments can get colored, wipe them with a cloth dampened in vegetable oil. The
  • Страница 7 из 45
    DEUTSCH •• Vergewissern Sie sich vor der Inbetriebnahme des Geräts, dass alle Teile richtig aufgestellt sind. •• Stellen Sie den Behälter auf einer ebenen standfesten Oberfläche auf. •• Legen Sie die Nahrungsmittel in den Behälter vor der Einschaltung des Geräts ein. •• Es ist nicht gestattet, den
  • Страница 8 из 45
    DEUTSCH •• Besondere Vorsichtsmaßnahmen sind in den Fällen angesagt, wenn sich Kinder unter 8 Jahren oder behinderte Personen in der Nähe vom laufenden Gerät aufhalten. •• Dieses Gerät ist nicht für den Gebrauch von Kindern unter 8 Jahren geeignet. •• Dieses Gerät darf von Kindern ab 8 Jahren und
  • Страница 9 из 45
    DEUTSCH •• Stecken Sie den Netzstecker in die Steckdose. •• Tauchen Sie den Schlagbesen (7) in den Behälter mit Nahrungsmitteln. •• Stellen Sie die gewünschte Drehgeschwindigkeit von 1 bis 20 mit dem Regler (1) ein. •• Um das Gerät einzuschalten, drücken und halten Sie die Taste (2). Nutzen Sie
  • Страница 10 из 45
    DEUTSCH •• •• •• •• •• Nach der Nutzung des Geräts ziehen Sie den Netzstecker aus der Steckdose heraus, trennen Sie den Motorblock (4) vom Getriebedeckel (10) ab, indem Sie ihn entgegen dem Uhrzeigersinn drehen. •• Dann nehmen Sie den Getriebedeckel (10) vom Behälter (17) ab, indem Sie die
  • Страница 11 из 45
    DEUTSCH Gewährleistung Ausführliche Bedingungen der Gewährleistung kann man beim Dealer, der diese Geräte verkauft hat, bekommen. Bei beliebiger Anspruchserhebung soll man während der Laufzeit der vorliegenden Gewährleistung den Check oder die Quittung über den Ankauf vorzulegen.
  • Страница 12 из 45
    русский •• Перед первым применением устройства тща- БЛЕНДЕРНЫЙ НАБОР Блендерный набор предназначен для измельчения, смешивания и взбивания продуктов. тельно промойте все съёмные детали, которые будут контактировать с продуктами. •• Прежде чем начать пользоваться устройством, убедитесь в том, что
  • Страница 13 из 45
    русский •• Не разрешайте детям младше 8 лет прикасаться УСТРОЙСТВО ПРЕДНАЗНАЧЕНО ТОЛЬКО ДЛЯ ДОМАШНЕГО ИСПОЛЬЗОВАНИЯ ИСПОЛЬЗОВАНИЕ НАСАДКИ-БЛЕНДЕРА Предупреждение: – Перед сборкой убедитесь в том, что вилка сетевого шнура не вставлена в электрическую розетку. •• Вставьте насадку-блендер (5) в
  • Страница 14 из 45
    русский •• Нажмите на клавишу-фиксатор (16) и поверните Предупреждение: – Перед сборкой убедитесь в том, что вилка сетевого шнура не вставлена в электрическую розетку. •• Вставьте венчик (7) в редуктор (6). •• Вставьте редуктор венчика (6) в моторный блок (4) и поверните его против часовой стрелки
  • Страница 15 из 45
    русский •• При нажатии кнопки (3) диск будет вращаться с •• •• •• •• •• •• •• Для включения устройства нажмите и удержи- максимальными оборотами. Поместите продукты в горловину крышки (10), для подачи продуктов используйте толкатель (9). Нажимайте на толкатель с незначительным усилием для подачи
  • Страница 16 из 45
    русский •• Не обматывайте моторный блок сетевым шну- ТЕХНИЧЕСКИЕ ХАРАКТЕРИСТИКИ Напряжение питания: 220-240 В ~ 50/60 Гц Максимальная потребляемая мощность: 1000 Вт ром. •• Храните блендерный набор в сухом прохладном месте, недоступном для детей. Производитель оставляет за собой право изменять
  • Страница 17 из 45
    Қазақша •• Әрқашан жұмысты бастау алдында барлық БЛЕНДЕРЛІК ЖИНАҚ Блендерлік жинақ тағамдарды ұсату, араластыру немесе бұлғау үшін арналған. бөлшектер дұрыс орнатылғанын тексеріңіз. •• Тостағанды тегіс тұрақты бетке орналастырыңыз. •• Өнімдер құрылғыны қосқанға дейін тостағанға Сипаттамасы 1.
  • Страница 18 из 45
    Қазақша жұмыс жылдамдығын орнатып алыңыз. Бұл жұмыс режимін сұйық өнімдерді араластыру үшін пайдаланыңыз. •• Түймені (3) басып, ұстап тұрған кезде құрылғы максималды айналымға қосылады. Берілген жұмыс режимін сұйық және қатты тағамдарды бірге өңдеу үшін пайдаланыңыз. жауапты адамдардың
  • Страница 19 из 45
    Қазақша – •• Барлық пайдаланылатын бөлшектерді жұмыс істеп Бұлғауға/араластыруға арналған азық-түлік ыдысқа аспап іске қосылғанға дейін ыдысқа салынады. болғаннан кейін бірден тазалаңыз, жуыңыз және кептіріңіз. •• Пышақты (19) пластик қорғаныш қапқа салыңыз. Назар аудараңыз! Үздіксіз жұмыс істеу
  • Страница 20 из 45
    Қазақша •• Бекіткіштерді (14) ашыңыз, пышақты (12) текшелеп •• Тұзды немесе қышқыл өнімдерді турағаннан турайтын саптамаға (13) орнатыңыз және оны бекіткіштердің (14) көмегімен бекітіңіз. •• Текшелеп турайтын саптамадағы ойықты (13) процессор тостағаны (17) ішіндегі дөңеске (тостаған тұтқасы
  • Страница 21 из 45
    romÂnĂ/ Moldovenească •• Lama cuţitului pentru mărunţire este foarte ascuţite şi SET BLENDER Set blender este destinat pentru tocarea alimentelor, amestecarea sau baterea. poate prezenta pericol Manipulaţi cu grijă cuţitul pentru tocare în timpul utilizării! •• Dacă cuţitul pentru mărunţire se
  • Страница 22 из 45
    romÂnĂ/ Moldovenească PREGĂTIREA PENTRU UTILIZARE Remarcă: După transportarea sau păstrarea aparatului la temperaturi scăzute acesta trebuie ţinut la temperatura camerei cel puţin două ore. – Înainte de a utiliza aparatul spălaţi accesoriile care vor contacta cu alimentele în apă caldă cu un agent
  • Страница 23 из 45
    romÂnĂ/ Moldovenească •• După utilizarea aparatului scoateţi fişa cablului de Atenţie: lamele cuţitului sunt foarte ascuţite! •• Instalaţi arborele motor (20) pe axul bolului procesorului (17). •• Scoateţi protecţia de plastic de pe lamele cuţitului (19) şi instalaţi cuţitul (19) în şliţurile
  • Страница 24 из 45
    romÂnĂ/ Moldovenească •• Scoateţi cu prudenţă accesoriul (13). •• Scoateţi alimentele mărunţite din bolul procesoru- CONŢINUT PACHET Bloc motor – 1 buc. Accesoriu blender – 1 buc. Reductorul telului – 1 buc. Tel – 1 buc. Capac-reductor – 1 buc. Cuţit pentru tocare – 1buc. Bol procesor – 1 buc. Disc
  • Страница 25 из 45
    Český •• Používejte přístroj vždy na rovném stabilním povrchu. •• Vkládejte potraviny do nádoby před zapnutím pří- STOLNÍ MIXÉR Stolní mixér je určena pro změlnění, míchání a šlehání potravin. stroje. •• Nepřekračujte množství surovin ani hladinu tekutin Popis 1. Regulátor rychlosti rotace 2.
  • Страница 26 из 45
    Český •• Nezapínejte prázdnou přístroj bez potravin. •• Aby nedošlo k poškození přepravujte přístroj pouze Poznámky: Potraviny vkládejte do nádoby před zapnutím přístroje. – Než začnete s drcením/mícháním, doporučujeme sundat s ovoce slupku, odstranit nejedlé části například pecky – a nakrájet
  • Страница 27 из 45
    Český Než začnete drcení: – odstraňte kosti, šlachy a chrupavky z masa; – nakrájejte maso, cibule, česnek, mrkev atp. na kousky přibližně stejné velikosti; – při drcení zeleniny odstraňte stonky bylin. •• •• •• Změlčení Varování: – Před montováním přístroje se přesvědčte, že síťová vidlice není
  • Страница 28 из 45
    Český •• Zapojte síťovou vidlici do elektrické zásuvky. •• Regulátorem (1) nastavte požadovanou rychlost •• •• •• •• •• •• •• •• •• Při zpracování silně barvicích surovin (například mrkve nebo červené řepy) se nástavce a nádoby mohou obarvit. Utřete je hadříkem namočeným v rostlinném oleji. od 1 do
  • Страница 29 из 45
    УКРАЇНЬСКа •• Перед першим вживанням пристрою ретельно промийте всі знімні деталі, які контактуватимуть з продуктами. •• Перш ніж почати користуватися приладом, переконайтеся в тому, що всі деталі встановлені правильно. •• Встановлюйте чашу на рівній стійкій поверхні. •• Продукти поміщаються в чашу
  • Страница 30 из 45
    УКРАЇНЬСКа •• Не дозволяйте дітям до 8 років торкатися до корпусу моторного блоку, до мережевого шнура або до вилки мережевого шнура під час роботи пристрою. •• Не дозволяйте дітям молодше 8 років використовувати пристрій як іграшку. •• Будьте особливо уважні, якщо поблизу від працюючого пристрою
  • Страница 31 из 45
    УКРАЇНЬСКа •• Вставте віночок (7) в редуктор (6). •• Вставте редуктор віночка (6) в моторний блок (4) і оберніть його проти годинникової стрілки до упору. •• Вставте мережеву вилку в електричну розетку. •• Опустите віночок (7) в посуд з продуктами. •• Регулювальником (1) встановите бажану швидкість
  • Страница 32 из 45
    УКРАЇНЬСКа •• Після використання пристрою витягніть вилку мережевого шнура з електричної розетки, від’єднайте моторний блок (4) від кришкиредуктора (10), обернувши її проти годинникової стрілки. •• Потім зніміть кришку-редуктор (10) з чаші (17), натискуючи на клавішу-фіксатор (16) і обернувши
  • Страница 33 из 45
    УКРАЇНЬСКа Термін служби пристрою – 3 роки КОМПЛЕКТ ПОСТАЧАННЯ Моторний блок – 1 шт. Насадка-блендер – 1 шт. Редуктор віночка – 1 шт. Віночок – 1 шт. Кришка-редуктор – 1 шт. Ніж-подрібнювач - 1шт. Чаша процесора – 1 шт. Диск для терки/шинкування 1 шт. Мірний стакан – 1 шт. Інструкція – 1 шт.
  • Страница 34 из 45
    Беларуская •• Перад першым ужываннем прылады старанна БЛЭНДАРНЫ НАБОР Блэндарны набор прызначаны для драбнення, змешвання і ўзбівання прадуктаў. прамыйце ўсе здымныя дэталі, якія будуць кантактаваць з прадуктамі. •• Перш чым пачаць карыстацца прыладой, пераканайцеся ў тым, што ўсе дэталі ўсталяваны
  • Страница 35 из 45
    Беларуская •• Не дазваляйце дзецям, малодшым за 8 гадоў, •• •• •• •• •• •• •• ВЫКАРЫСТАННЕ НАСАДКІ-БЛЭНДАРА Папярэджанне: – Перад зборкай пераканайцеся ў тым, што вілка сеткавага шнура не ўстаўлена ў электрычную разетку. •• Устаўце насадку-блэндар (5) у маторны блок (4) і павярніце яе супраць
  • Страница 36 из 45
    Беларуская •• Націсніце на клавішу-фіксатар (16) і павярніце Папярэджанне: – Перад зборкай пераканайцеся ў тым, што вілка сеткавага шнура не ўстаўлена ў электрычную разетку. •• Устаўце венца (7) ў рэдуктар (6). •• Устаўце рэдуктар венца (6) ў маторны блок (4) і павярніце яго супраць гадзіннікавай
  • Страница 37 из 45
    Беларуская •• Пры націску кнопкі (3) дыск будзе круціцца з •• •• •• •• •• •• •• Устаўце сеткавую вілку ў электрычную разетку. •• Рэгулятарам (1) усталюйце жаданую хуткасць максімальнымі зваротамі. Змясціце прадукты ў гарлавіну вечка (10), для падачы прадуктаў выкарыстоўвайце штурхач (9). Націскайце
  • Страница 38 из 45
    Беларуская ЗАХОЎВАННЕ •• Перад тым, як прыбраць прыладу на працяглае захоўванне, правядзіце чыстку насадак і добра іх прасушыце. •• Не абмотвайце маторны блок сеткавым шнуром. •• Захоўвайце блэндарны набор у сухім прахалодным месцы, недаступным для дзяцей. ТЭХНІЧНЫЯ ХАРАКТАРЫСТЫКІ Напруга
  • Страница 39 из 45
    O’zbekcha •• Mаydаlаgich pichоqning аylаnishi qiyinlаshib qоlsа BLЕNDЕR TO’PLАMI Blеndеr to’plаmi mаsаlliqni mаydаlаsh, аrаlаshtirish yoki ko’pirtirishgа ishlаtilаdi. •• Аsоsiy qismlаri 1. Аylаnish tеzligini o’zgаrtirаdigаn murvаt 2. Ishlаtish tugmаsi «I» 3. Turbо hоlаtidа ishlаtish tugmаsi «II» 4.
  • Страница 40 из 45
    O’zbekcha – – Ishlаtishdаn оldin jihоzning mаsаlliqqа tеgаdigаn qismlаrini mo’’tаdil yuvish vоsitаsi sоlingаn iliq suvdа yuving. Mоtоr blоki (4), ko’pirtirgich rеduktоri (6) vа prоsеssоr rеduktоr qоpqоg’ini (10) yumshоq nаm mаtо bilаn аrting. – Ishlаyotgаndа аylаnishi qiyinlаshsа mаsаlliqqа bir оz
  • Страница 41 из 45
    O’zbekcha •• Ishlаtib o’tkаzib qo’ying, mаhkаmlаgich tugmаni (16) qo’yib yubоring, rеduktоr qоpqоq (10) mаhkаm turgаnini tеkshirib ko’ring. •• Mоtоr blоkini (4) rеduktоr qоpqоqqа (10) biriktiring vа mаhkаmlаngunchа sоаt mili tоmоngа burаng. •• Elеktr vilkаsini rоzеtkаgа ulаng. •• Murvаtini (1)
  • Страница 42 из 45
    O’zbekcha •• Оlinаdigаn qismlаrini mo’’tаdil yuvish vоsitаsi sоlingаn •• •• •• •• •• •• Ko’pirtirgich – 1 dоnа. Rеduktоr qоpqоq – 1 dоnа. Mаydаlаgich pichоq – 1 dоnа. Prоsеssоr idishi – 1 dоnа. Qirg’ich/to’g’rаgich gаrdish – 1 dоnа. O’lchоv bаrdоg’i – 1 dоnа. Qo’llаnmа – 1 dоnа. iliq suvdа yuvishni
  • Страница 43 из 45
    gb A production date of the item is indicated in the serial number on the technical data plate. A serial number is an eleven-unit number, with the first four figures indicating the production date. For example, serial number 0606ххххххх means that the item was manufactured in June (the sixth month)
  • Страница 44 из 45
    © ООО ГОЛДЕР-ЭЛЕКТРОНИКС, 2013 © GOLDER-ELECTRONICS LLC, 2013 VT-3404.indd 44 30.10.2013 10:10:52
  • Страница 45 из 45