5
ENGLISH
•
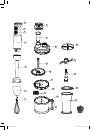
Set the required speed from 1 to 20 using the con-
trol knob (1).
•
To switch the unit on, press and hold the button (2).
•
When the button (3) is pressed, the knife rotates at
maximal rotation speed.
•
Hold the motor unit (4) with one hand and the bowl
(17) with the other during operation.
•
After using the unit, remove the power plug from the
mains socket, disconnect the motor unit (4) from the
geared lid (10) by turning it counterclockwise.
•
Then remove the geared lid (10) from the bowl (17),
pressing the lock button (16) and turning the geared
lid (10) clockwise.
•
Carefully remove the knife (19) holding the upper
part of the driving shaft (20).
•
Take the chopped products out of the processing
bowl (17).
•
Clean, wash and dry all the used parts immediately
after operation .
•
Put the knife (19) into the plastic protective cover.
Attention!
Continuous operation time of the unit should
not exceed 20-30 seconds.
USING THE DISC (SHREDDING/SLICING)
•
Set the driving shaft (20) on the axis of the bowl (17).
•
Set the disc (18) on the driving shaft (20).
•
Install the geared lid (10) on the bowl (17).
•
Press the lock button (16) and turn the geared lid
(10) counterclockwise to the position “
” , release
the lock button (16) and make sure that the geared
lid (10) is fixed properly.
•
Place the motor unit (4) on the geared lid (10) and
rotate it clockwise until fixing.
•
Insert the power plug into the mains socket.
•
Set the required speed from 1 to 20 using the con-
trol knob (1).
•
To switch the unit on, press and hold the button (2).
•
When the button (3) is pressed, the disc rotates at
maximal rotation speed.
•
Place the products into the chute of the lid (10),
use the pusher (9) for products feeding. Press the
pusher gently while feeding products.
•
After using the unit, remove the power plug from the
mains socket, disconnect the motor unit (4) from the
geared lid (10) by turning it counterclockwise.
•
Then remove the geared lid (10) from the bowl (17),
pressing the button (16) and turning the lid clockwise.
•
Carefully remove the disc.
•
Take the chopped products out of the processing
bowl (17).
•
Clean, wash and dry all the used parts immediately
after operation .
USING THE CUBIC ATTACHMENT
Use the cubic attachment for cutting fruit and boiled
vegetables.
Attention!
– Do not process hard ingredients and frozen food. It
can damage the cubic attachment.
Warning:
– Before assembling, make sure that the power plug
is not inserted into the mains socket.
•
Open the locks (14), set the knife (12) on the cubic
attachment (13) and fix it with the locks (14).
•
Match the groove on the cubic attachment (13) with
the ledge inside the processing bowl (17) (in the
handle area) and install the attachment in the bowl
(17) (Pic. 1).
•
Set the driving shaft (11) into the attachment (13).
Note:
Check whether the attachment (13) is set prop-
erly, otherwise the processor geared lid (10) will not
close.
•
Install the geared lid (10) on the bowl (17).
•
Press the lock button (16) and turn the geared lid
(10) counterclockwise to the position “
” , release
the lock button (16) and make sure that the geared
lid (10) is fixed properly.
•
Place the motor unit (4) on the geared lid (10) and
rotate it clockwise until fixing.
•
Insert the power plug into the mains socket.
•
Set the required speed from 1 to 20 using the con-
trol knob (1).
•
To switch the unit on, press and hold the button (2).
•
When the button (3) is pressed, the knife rotates at
maximal rotation speed.
•
Place the products into the chute of the lid (10),
use the pusher (9) for products feeding. Press the
pusher gently while feeding products.
•
After using the unit, remove the power plug from the
mains socket, disconnect the motor unit (4) from the
geared lid (10) by turning it counterclockwise.
•
Then remove the geared lid (10) from the bowl (17),
pressing the button (16) and turning the lid clockwise.
•
Carefully remove the attachment (13).
•
Take the chopped products out of the processing
bowl (17).
•
Clean, wash and dry all the used parts immediately
after operation .
CLEANING THE UNIT
•
Always switch the unit off and unplug it after opera-
tion or before cleaning.
•
Clean, wash and dry all the used parts immediately
after operation .
•
It is recommended to wash all removable parts in
warm water with neutral detergent. You can wash the
disc in the dishwasher.
•
For easy cleaning of cubic grid (15), take it out of the
attachment (13) and remove the remaining products
using the pusher (8).
•
After processing salty or sour products, rinse the
used attachments with water immediately.
•
Clean the motor unit (4) with a damp cloth.
•
Do not use coarse sponges, abrasives and solvents
to clean the unit.
•
Do not immerse the motor unit (4), whisk gear (6),
processor bowl geared lid (10) into water or any
other liquids, do not wash them in a dishwashing
machine.
VT-3404.indd 5
30.10.2013 10:10:49