24
ME-007_v01
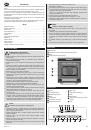
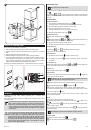
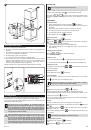
CLOCK SETTING FUNCTIONS
General Instructions
After a clock function has been selected, the corresponding icon flashes for approx.
●
5 seconds. During this time, the desired times can be set or modified using the
or
button
.
When the desired times has been set, the icon continues to flash for approx. 5 seconds.
●
After this the
icon lights up, and the set time begins to count down.
The time set for Cook time
●
and End time
begins to count down after the
selected function starts.
Countdown
This mode is used to count down time. After the time is up, you will hear a sound signal.
This function does not affect the operation of the oven.
1
Press the
Clock button repeatedly until the icon for Countdown
flashes.
2
Set the desired Countdown time using the
or
button (max. 99.00
minutes).
After approx. 5 seconds the display will show the remaining time.
The Countdown icon
lights up.
When the set time has elapsed, you will hear a sound signal for 2 minutes.
“0.00”lights up and the
icon for Countdown flashes.
Press any button to turn the sound signal off.
Cooking Time
This function is used to set how long the oven is going to be in use.
1
Select oven function and using
or
button select temperature.
2
Press the Clock Functions
button repeatedly until the
icon for Clock time
flashes.
3
Using the
or
button set the desired cooking time.
The oven switches itself on. The icon for Cook time
lights up.
By repeatedly pressing the Clock Functions
button, the current time can be
called up.
When the set time has elapsed, you will hear a sound signal for 2 minutes.
The oven switches itself off.
“0.00”is displayed and the icon for Cook time
flashes.
Press any button to turn the sound signal off.
End Time
This function is used to program when the oven should turn off.
1
Select oven function and using
or
button select temperature.
2
Press the
Clock Functions button repeatedly until the
icon for End time
flashes.
3
Using the
or
button set the desired end time.
The icons for End time
and Cook time
light up.
The oven switches itself on.
By repeatedly pressing the
Clock Functions button, the current time can be
called up.
When the set time has elapsed, you will hear a sound signal for 2 minutes. The oven
switches itself off.
“0.00” is displayed and the
icon for Cook time flashes.
Press any button to turn the sound signal off.
Time
This function is to set, change or check the time (see SETTING TIME).
Cook Time
and End Time
Combined
Cook time
and End time
can be used simultaneously, if the oven is to be
switched on and off automatically at a later time.
1
Select oven mode and temperature.
2
Using the
Cook time
function, set the time in which the dish needs to be
cooked, e.g. 1 hour.
3
Using the End time
function, set the time at which the dish is to be ready, e.g. at
14:05.
The icons for Cook time
and End time
light up.
The oven switches on automatically at the calculated time, e.g. at 13:05.
When the time has elapsed, you will hear a sound signal for 2 minutes. The oven switches
itself off, e.g. at 14:05.
ADDITIONAL FUNCTIONS
Switching off the display
You can save energy by switching off the display.
Switching off the display
1
If required, switch off the appliance using the On/Off
button.
.
2
Press the Clock Functions
button and the
button at the same time until
the display goes out.
As soon as the appliance is switched on again, the display comes on automatically.
When the appliance is switched off next time, the display goes out again.
Switching on the display
1
If required, switch off the appliance using the On/Off
button.
2
Press the Clock Functions
button and the
button at the same time until
the display goes out.
Children Safety Lock
As soon as the children safety lock is active, the appliance can no longer be switched on.
Activating the children safety lock
1
If required, switch on the appliance using the On/Off
button.
Do not select any other oven modes.
2
Press and hold the
button until the icon appears in the display.
The children safety lock is now activated.
Deactivating the children safety lock
1
Switch appliance on using the On/Off
button.
2
Press and hold the
button until the icon disappears in the display.
The children safety lock is now deactivated, and the oven is ready to work.
Button Sound Signals
Deactivating button sound signals
1
Switch appliance off using the On/Off
button.
2
Press and hold
and
buttons at the same time until you hear a sound
signal (approx. 2 seconds).
Button sound signals have been deactivated.
Activating button sound signals
1
Press and hold
and
buttons at the same time until you hear a sound
signal (approx. 2 seconds).
Button sound signals have been again activated.
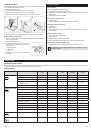
Cleaning and Maintenance
CLEANING
Before cleaning your oven or performing maintenance, disconnect it from the mains.
To extend the life of your oven, you have to clean it frequently, and keep in mind that:
The enameled or stainless steel parts should be washed with lukewarm water without
●
using any abrasive powders or corrosive substances which could ruin them. Stains
may appear on stainless steel. If these stains are difficult to remove, use special
products available on the market. After cleaning the surface, it is advisable to rinse it
thoroughly dry.
The inside of the oven should preferably be cleaned immediately after use, when it is
●
still warm, with hot water and soap. The soap should be rinsed away, and the interior
dried thoroughly. Avoid using abrasive detergents (e.g. cleaning powders, etc) and
abrasive sponges for dishes or acids (such as lime scale removers, etc) as these could
damage the enamel. If any grease spots and dirt are particularly tough to remove, use
a special product for oven cleaning, following the instructions provided on the label.
Never use a steam cleaner for cleaning the oven interior.
If you use your oven for an extended period of time, condensation may form. Dry it
●
using a soft cloth.
There is a seal surrounding the oven opening which guarantees its correct functioning.
●
Check its condition on regular basis. Should it become damaged, please contact your
nearest after-sales service center.
We recommend you avoid using the oven until it has been repaired.
●
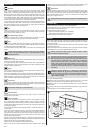
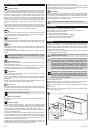
Never cover the oven bottom with aluminum foil, as the consequent accumulation of
●
heat could compromise the cooking, and even damage the enamel.
Clean the glass oven doors using non-abrasive products or sponges, and dry it with
●
a soft cloth.