Инструкция для ARISTON CI3V P67

(скачивание инструкции бесплатно)
Формат файла: PDF
Доступность: Бесплатно как и все руководства на сайте. Без регистрации и SMS.
Дополнительно: Чтение инструкции онлайн
background image

GB

19

PIZZA OVEN MODE
• Use a light aluminium pizza pan. Place it on the rack

provided.

For a crispy crust, do not use the dripping pan as it

prevents the crust from forming by extending the total
cooking time.

• If the pizza has a lot of toppings, we recommend

adding the mozzarella cheese on top of the pizza
halfway through the cooking process.

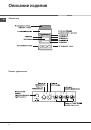
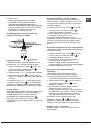
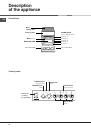
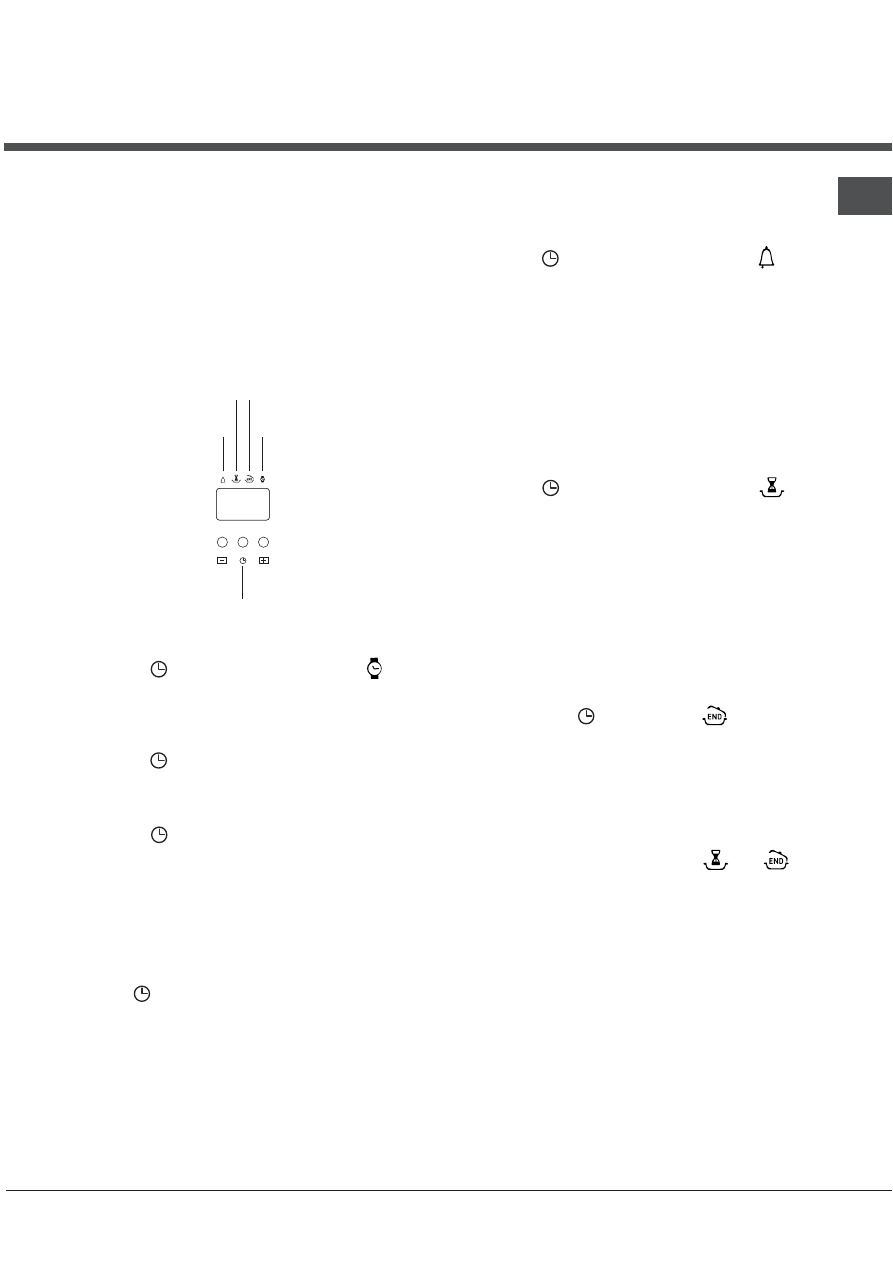
Planning cooking with the electronic

programmer*

End cooking
time setting

Clock
time setting

Selector
button

Cooking

time setting

Count down

time setting

To set the clock

!

 This may be set while the oven is switched off or

while it is switched on.

1. Press the 

 button several times until the   icon

and the first two numerical digits on the display
start to flash.

2. Use the “+” and “-” buttons to adjust the hour

value.

3. Press the 

 button again so that the other two

numerical digits on the display begin to flash.

4. Use the “+” and “-” buttons to adjust the minute

value.

5. Press the 

 button again to confirm.

!

 If none of the buttons are pressed, the settings will

be confirmed automatically after 10 seconds have
passed.

Manual Mode

The programmer after the Power up and the Clock
time setting will be in ‘Manual Mode’ and shall be
possible to engage the other programmer functions
using the 

 selector.

The oven will be driven directly by the user by
means of the knobs present on the control panel.

To set the timer countdown

!

 This function does not interrupt cooking and does

not affect the oven; it is simply used to activate the
buzzer when the set amount of time has elapsed.

1. Press the 

 button several times until the 

 icon

and the first two numerical digits on the display
start to flash.

2. Follow steps 2 to 5 “to set the clock” as detailed

above.

The countdown will then be displayed; at the end of
this period of time the buzzer will sound (this may
be stopped by pressing any of the buttons, or it will
stop of its own accord after one minute).

Programming the duration cooking

!

 A cooking mode must be selected before

programming can take place.

1. Press the 

 button several times until the 

icon and the first digit on the display flash.

2. Follow steps 2 to 5 “to set the clock” as detailed

above.

• For example: it is 9:00 a.m. and a time of 1 hour

and 15 minutes is programmed. The programme
will stop automatically at 10:15 a.m.

Programming delayed cooking

!

 A cooking duration must be selected before

delayed programming can take place.
1. Follow istruction “programming the duration

cooking” as detailed above.

2. Then press the 

 button until the 

 icon and

the two digits on the display flash.

3. Follow steps 2 to 5 “to set the clock” as detailed

above.

• For example: it is 9:00 a.m. and a time of 1 hour

and 15 minutes is programmed and the end time
is set to 12:30. The programme will start
automatically at 11:15 a.m.

Programming has been set when the 

 and 

icons are illuminated. The TIME display shows the
cooking end time and the cooking duration
alternately.

To cancel a previous setting

Press button “-” up until 00000:00

00

00

00

00.

1
2
3
4
5
6
7
8
9
10
11
12
13
14
15
16
17
18
19
20
21
22
23
24
Оглавление инструкции
  • Страница 1 из 25
    Руководство по эксплуатации RS РУССКИЙ,1 GB English, 12 КУХОННАЯ ПЛИТА С ДУХОВЫМ ШКАФОМ Содержание Монтаж, 2-3 Расположение и нивелировка Электрическое подсоединение Технические данные Описание изделия, 4 Общии вид Панель управления Порядок эксплуатации духового шкафа, 5-8 CI 3V P67 RU /HA
  • Страница 2 из 25
    Установка ! Важно сохранить данное руководство для его последующих консультации. В случае продажи, передачи или переезда проверьте, чтобы данное руководство сопровождало изделие. регуляционные ножки* по (см. рисунок). Прилагающиеся ножки* вставляются под основание кухоннои плиты. ! Внимательно
  • Страница 3 из 25
    6. закроите крышку зажимнои коробки, закрутив винт V. Подсоединение кабеля к сети электропитания Установите на кабель электропитания нормализованную штепсельную вилку, расчитанную на нагрузку, указанную на заводскои табличке изделия. В случае прямого подключения к сети электропитания между кухоннои
  • Страница 4 из 25
    Описание изделия RS Общии вид Панель управления 4
  • Страница 5 из 25
    Включение и эксплуатация ! При первом включении духового шкафа рекомендуем прокалить его примерно в течение 30 минут при максимальнои температуре с закрытои дверцеи. Затем выключите духовои шкаф, откроите дверцу и проветрите помещение. Запах, которыи вы можете почувствовать, вызван испарением
  • Страница 6 из 25
    RS Программы приготовления ! Для всех программ можно задать температуру от 50°C до МАКС кроме: • ГРИЛЬ и ДВОИНОИ ГРИЛЬ (рекомендуется устанавливать только МАКС. температуру); • ДВОИНОИ ВЕНТИЛИРОВАННЫИ ГРИЛЬ (рекомендуется не превышать температуру 200°C). a Программа СТАТИЧЕСКАЯ ДУХОВКА Включаются
  • Страница 7 из 25
    Функция пицца • Используите противень из легкого алюминия, устанавливая его на прилагающуюся решетку. При использовании противеня время выпечки удлиняется, что затрудняет получение хрустящеи пиццы. • В случае выпечки пиццы с обильнои начинкои рекомендуется положить на пиццу сыр моццарелла в
  • Страница 8 из 25
    Таблица приготовления в духовом шкафу RS Программы Традициональная духовка Функиця кондитерская выпечка Функция Пицца Мультиприготовление Гриль Двойной гриль Gratin (Подрумянивание) 8 Продукты Вес (кг) Уровень Время нагревания (мин.) 15 15 15 15 15 15 15 15 15 15 15 Рекомендуемая температура 200
  • Страница 9 из 25
    Стеклокерамическая варочная панель ! На стеклянной поверхности варочной панели могут быть видны сальные следы от клея, нанесенного на прокладки Перед началом эксплуатации изделия следует удалить следы клея при помощи специального неабразивного моющего средства. В первые часы работы вы можете
  • Страница 10 из 25
    Предосторожности и рекомендации RS ! Изделие спроектировано и изготовлено в соответствии с международными нормативами по безопасности. Необходимо внимательно прочитать настоящие предупреждения, составленные в целях вашеи безопасности. Общие требования к безопасности • Стеклокерамическая варочная
  • Страница 11 из 25
    Техническое обслуживание и уход Отключение электропитания Перед началом какои-либо операции по обслуживанию или чистке отсоедините изделие от сети электропитания. ! Никогда не используйте паровые чистящие агрегаты или агрегаты под высоким давлением для чистки изделия. Чистка духового шкафа •
  • Страница 12 из 25
    RS Мы заботимся о своих покупателях и стараемся сделать сервисное обслуживание наиболее качественным. Мы постоянно совершенствуем наши продукты, чтобы сделать Ваше общение с техникой простым и приятным. Уход за техникой Продлите срок эксплуатации и снизьте вероятность поломки техники.
  • Страница 13 из 25
    Operating Instructions COOKER AND OVEN RS Русский, 1 GB Contents Installation, 14-15 English, 12 Positioning and levelling Electrical connection Table of characteristics Description of the appliance, 16 Overall view Control panel Start-up and use, 17-20 CI 3V P67 RU /HA Using the oven Cooking modes
  • Страница 14 из 25
    Installation ! Before operating your new appliance please read this instruction booklet carefully. It contains important information concerning the safe installation and operation of the appliance. Levelling If it is necessary to level the appliance, screw the adjustable feet into the places
  • Страница 15 из 25
    to each other; jumper 4-5 is located in the lower area of the terminal board. 3. Position the wires N and 6 as shown in the diagram (see figure) and proceed with the connection process, tightening the terminal screws as far as possible. 4. Position the remaining wires on terminals 1-2-3 and tighten
  • Страница 16 из 25
    Description of the appliance GB Overall view Glass ceramic hob GUIDE RAILS for the sliding racks position 5 position 4 position 3 position 2 position 1 Control panel GRILL rack DRIPPING PAN Adjustable foot Adjustable foot Control panel THERMOSTAT indicator light THERMOSTAT knob SELECTOR knob
  • Страница 17 из 25
    Start-up and use ! The first time you use your appliance, heat the empty oven with its door closed at its maximum temperature for at least half an hour. Ensure that the room is well ventilated before switching the oven off and opening the oven door. The appliance may emit a slightly unpleasant
  • Страница 18 из 25
    GB Cooking modes ! A temperature value can be set for all cooking modes between 50°C and Max, except for • GRILL, DOUBLE GRILL (recommended: set only to MAX power level); 2 DOUBLE GRILL mode This provides a larger grill than the normal grill setting and has an innovative design that improves
  • Страница 19 из 25
    PIZZA OVEN MODE • Use a light aluminium pizza pan. Place it on the rack provided. For a crispy crust, do not use the dripping pan as it prevents the crust from forming by extending the total cooking time. • If the pizza has a lot of toppings, we recommend adding the mozzarella cheese on top of the
  • Страница 20 из 25
    GB Cooking advice table for the oven C ooking m odes C onvection O ven B aking m ode Pizza M ode M ulti-cooking G rill D ouble G rill G ratin 20 Foods D uc k R oas t veal or beef R oas t pork Bisc uits (s hortcrust pastry) Tarts Tarts Fruit cakes Sponge cake m ade with yoghurt Sponge cake Stuffed
  • Страница 21 из 25
    Using the glass ceramic hob ! The glue applied on the gaskets leaves traces of grease on the glass. Before using the appliance, we recommend you remove these with a special nonabrasive cleaning product. During the first few hours of use there may be a smell of rubber which will disappear very
  • Страница 22 из 25
    Precautions and tips GB ! This appliance has been designed and manufactured in compliance with international safety standards. The following warnings are provided for safety reasons and must be read carefully. General safety • The vitreous china hob is resistant to temperature fluctuations and
  • Страница 23 из 25
    Care and maintenance Switching the appliance off scratch the surface beyond repair. Disconnect your appliance from the electricity supply before carrying out any work on it. • It is usually sufficient simply to wash the hob using a damp sponge and dry it with absorbent kitchen roll. • If the hob is
  • Страница 24 из 25
    05/2011 - 195085197.02 XEROX FABRIANO GB 24
  • Страница 25 из 25