Доступность: Бесплатно как и все руководства на сайте. Без регистрации и SMS.
Дополнительно: Чтение инструкции онлайн
04307092
- ISASC7388/7387s.n.
Страница: (24 из 24)
навигация
1
2
3
4
5
6
7
8
9
10
11
12
13
14
15
16
17
18
19
20
21
22
23
24
Оглавление инструкции
Страница 1 из 25 INSTRUCTIONS FOR INSTALLATION AND USE MONTAGE- UND GEBRAUCHSANWEISUNG INSTRUCTIONS POUR L'INSTALLATION ET L’UTILISATION ISTRUZIONI PER L'INSTALLAZIONE E L’USO INSTRUCCIONES PARA INSTALACIÓN Y USO INSTRUÇÕES DE INSTALAÇÃO Y UTILIZAÇÃO AANWIJZING VOOR GEBRUIK EN INSTALLATIE
Страница 3 из 25 ENGLISH DESCRIPTION This appliance is equipped with a completely automatic system (Advanced Sensor Control) capable to manage all the functions of your hood. Thanks to the ASC, the air in the kitchen is costantly clean and odour free without any manual intervention. The advanced sensor catches all
Страница 4 из 25 OPERATION Depending on the model, the unit is equipped with the following commands: AUTOMATIC OPERATION WITH SENSOR: See Figure 19. Key A : switches the lights on/off. Key B : enables/disables “Automatic” function. When this function is selected, an “A” appears on the display C, and the speed of
Страница 5 из 25 Grease filters: special attention must be given to the grease filters which must be periodically cleaned, whenever the grease filter alarm trips. For instructions of the filter Alarm, refer to the Controls paragraph. Remove the filters as shown in para. 1 and wash with neutral detergent. Charcoal
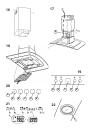
Страница 6 из 25 Stromversorgungskabel durch die entsprechende Öffnung am Bügel verlaufen sollen (Abb. 7). Die Höhe der Teleskopkonstruktion mit den vier Befestigungsschrauben C (Abb. 8) einstellen und dabei berücksichtigen, dass die Höhe der Haube 86 mm beträgt und dass der Abstand der Haube vom Kochfeld zumindest
Страница 7 из 25 Durch die nochmalige Betätigung der Taste B erfolgt die Einstellung auf den manuellen Betrieb. Betriebsweise als herkömmliche Abzugshaube: Bei automatischer Betriebsart auf die Taste B drücken. Somit erfolgt der Übergang auf die manuelle Betriebsart und die LED B erlischt. Durch Betätigung einer
Страница 8 из 25 graisse: à l'aide de la poignée, pousser l’arrêt vers l’intérieur et tirer le filtre vers le bas (Fig. 4). Pour l’assemblage, il est essentiel que: – vous ayez prévu l’alimentation électrique à l’intérieur de la structure télescopique. – Si l'appareil doit être installé en version Aspirante ou en
Страница 9 из 25 visualise l’indice de sensibilité du capteur). - En appuyant sur les touches D ou E, on augmente ou diminue l’indice de sensibilité du capteur (1 : sensibilité minimum / 9: sensibilité maximum). - en cas de coupure de l’alimentation électrique, le capteur fonctionne de nouveau avec sensibilité 5.
Страница 10 из 25 Filtres à charbon: Si l’on utilise l’appareil en version filtrante, il faut remplacer périodiquement les filtres à charbon, quand intervient l’alarme des filtres à charbon. Pour les instructions, concernant l’alarme des filtres, voir le paragraphe des Commandes. Démontage du filtre(s) à charbon:
Страница 11 из 25 elettrica attraverso l'apposito foro della staffa (Fig. 7). Regolate l'altezza della struttura telescopica tramite le quattro viti di fissaggio C (Fig. 8) tenendo conto che l'altezza della cappa è di 86 mm e che la distanza della cappa dal piano cottura deve essere minimo 650 mm. (Fig. 9). Infilare
Страница 12 из 25 P2) ON Luci: Se premuto si accendono le luci. P3) OFF/- Motore: Decrementa la velocità fino ad arrivare alla minima velocità. Se premuto per 2" viene spento il motore. Se premuto per 2" quando è attivo il RESET FILTRI azzera il conteggio ORE. P4) ON/+ Motore: Accende il motore e incrementa la
Страница 13 из 25 MONTAJE - Mediante el uso de una adecuada máscara de agujerear realizar los agujeros para fijar al techo sobre la vertical respecto a Vuestro plano de cocción; tener cuidado a todas las indicaciones para la ubicación final del aparato. Se debe tener en cuenta que uno de los ejes de la máscara debe
Страница 14 из 25 botón durante la visualización de la alarma filtros, se activa el RESET y, por consiguiente, el cálculo de las horas se repone en marcha. Botón E : acciona el motor / aumenta la velocidad del motor / TEMPORIZADOR. Pulsando el botón, se acciona el motor (a la última velocidad seleccionada);
Страница 15 из 25 PORTOGUÊS DESCRIÇÃO Este exaustor está equipado de um sistema completamente automático (Advanced Sensor Control), que controla todas as suas funções. Graças ao Advanced Sensor Control, o ar na cozinha mantém-se sempre limpo e sem cheiros e isto sem alguma intervenção do utilizador. Os sofisticados
Страница 16 из 25 introduzindo um parafuso no orifício do tubo superior, a servir de trava (Fig. 11). Fixar a capa na estrutura telescópica mediante 4 parafusos (presentes na embalagem) - Fig. 17. Através das aberturas D, montar a redução (presente na embalagem) na boca de saída de ar da capa (Fig. 17); fixar então
Страница 17 из 25 P4) ON/+ Motor: Liga o motor e aumenta a velocidade do motor até à velocidade máxima P5) ON/OFF: Activa/desactiva o Sensor( modo de funcionamento AUTOMÁTICO ou MANUAL). No modo de funcionamento Automático o Led L2 está aceso e o led L1 indica a velocidade que está em execução. No modo de
Страница 18 из 25 (afhankelijk van het land), zo glad mogelijke binnenzijde. Er wordt bovendien geadviseerd om drastische veranderingen van de doorsnede van de pijp (diameter: 150 mm) te vermijden. MONTAGE - Maak gebruik van de speciale boormal en boor de gaten voor de bevestiging aan het plafond exact op de
Страница 19 из 25 WERKING ALS EEN TRADITIONELE AFZUIGKAP : Verwijzing Afbeelding 19. Toets A : schakelt de verlichting in/ uit. Display C : - duidt de gekozen snelheid van de motor aan (van 1 tot 4); - duidt de inwerkingstelling van de Timer aan wanneer het getal knippert; duidt het filteralarm aan wanneer het
Страница 20 из 25 vervangen, wanneer het alarm “koolstoffilters” verschijnt. Voor instructies over het alarm van de filters, zie de paragraaf Bedieningselementen. Demontage koolstoffilter(s): neem ten eerste de vetfilters weg. Duw de vergrendeling naar binnen (afb. 18) en verwijder de koolstoffilter van zijn plaats.