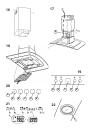
OPERATION
Depending on the model, the unit is equipped with the following commands:
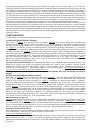
AUTOMATIC OPERATION WITH SENSOR:
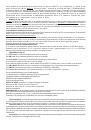
See Figure 19. Key A : switches the lights on/off. Key B : enables/disables “Automatic” function. When this
function is selected, an “A” appears on the display C, and the speed of the motor increases or decreases
depending on the smoke, odours and gas present in the kitchen. Display C : - indicates the automatic operation
of the sensor (the letter “A” appears);- indicates the motor speed selected automatically by the sensor; indicates
the filter alarm whenever the central segment is illuminated or flashing. Key D : decreases motor speed / Reset;
decreases motor speed to zero (stopping); in any case however, after approximately 1 minute, the hood resumes
automatic operation at the speed set by the sensor. Whenever the key is pressed during the display of filter
alarms, a RESET occurs, and the counting of the hours resumes again. Key E : increases motor speed; in
any case however, after approximately 1 minute, the hood resumes automatic operation at the speed set by
the sensor.
Modification of sensor sensitivity:
sensor sensitivity can be modified by operating as follows:
- stop the hood by pressing key B. – Simultaneously press keys D and E (the sensor’s sensitivity index will
appear on the display) - Pressing keys D or E, the sensor’s sensitivity will either increase or decrease (1
: minimum sensitivity / 9: maximum sensitivity). – whenever the power supply is interrupted, the sensor will
resume operation with a sensitivity index of 5.
Warning: in order to avoid damaging the sensor, never use silicone products near the hood!
OPERATION AS TRADITIONAL HOOD:
See Figure 19. Key A : switches the lights on/off. Display C : - indicates the motor speed selected (from
1 to 4); - indicates the operation of the Timer when the number is flashing; - indicates filter alarms whenever
the central segment is illuminated or flashing. Key D : decreases motor speed / Stop / Reset; decreases
motor speed to zero (stopping). Whenever the key is pressing during filter alarm display, a RESET occurs, and
the counting of the hours resumes again. Key E : enables the motor / increases motor speed /TIMER. Pressing
this key starts the motor (at the latest speed set); pressing the key again increases motor speed, while keeping
the key pressed down for a few seconds enables the TIMER, and 5 minutes later the motor will stop (while
the number of speed setting selected will simultaneously begin flashing on the display); the Timer will remain
enabled if motor speed is changed. In order to disable the Timer, press the key again.
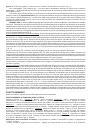
Controls in Fig. 20
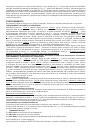
Button A: Turns the lights on/off. If held down for about 2" when the filter alarm is active, it resets the hour counter.
Button B: Activates/deactivates the “Automatic” function. Light S – Filter alarm: When the light comes on, it indicates
that 30 h of use have elapsed; it remains on for 30". When the light S flashes, it means that about 120 h of operation
have elapsed. The filter reset is indicated only when the motor is off, both in manual and automatic mode.
Automatic operation with sensor:
When the button B is pressed, the automatic function is activated. This is indicated by the corresponding LED coming
on. When the LED B flashes, it means that the sensor is waiting for data.
Modifying sensor sensitivity:
While in manual mode and with the motor off, simultaneously press the buttons B and C. At this point, the set
sensitivity is indicated by the LED C, D or E coming on. To set the desired sensitivity press one of the buttons C, D
or E (min, med, max). Press B again to store it.
Press button B once again to go to manual mode.
Operation as traditional hood:
If in automatic mode, press the button B to change to manual mode; the LED B goes off.
Press one of the buttons C, D or E to start the motor in 1st, 2nd or 3rd speed, respectively. Hold the same button
down for 2" to turn off the motor.
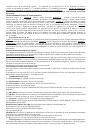
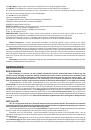
CONTROLS shown in Fig. 21
:
P1)
Lights OFF:
If pressed, lights go off.
P2)
Lights ON:
If pressed, lights go on.
P3)
OFF/- Motor:
Speed drop until minimum speed is reached.
If pressed for 2", motor switches off.
If pressed for 2" with FILTER RESET on HOUR count reset.
P4)
ON/+ Motor:
Starts motor and increases motor speed until top speed is reached
P5)
ON/OFF:
Switches Sensor off and on( AUTOMATIC or MANUAL mode).In Automatic mode, LED L2 is on and L1
shows operating speed In Manual mode, LED L2 is off.
L1)
4 LEDs
4 GREEN LEDs. Indicate set speed
L2)
4 LEDs
GREEN indicates AUTOMATIC mode OFF indicates MANUAL mode RED indicates Filter Reset
FILTER RESET:
shown with Motor Off for 30": After 30h the LED L2 becomes steady RED. After 120h LED L2
becomes flashing RED Reset by means of P3
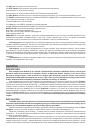
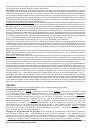
SENSITIVITY:
In manual mode, by pressing P5 and P4 together, sensitivity mode is entered. The set sensitivity is
indicated by the 4 green LEDs. By means of buttons P3(-) and P4(+) the desired sensitivity is set (fig.21/A)
By pressing P5 the sensitivity can be stored, with return to manual mode