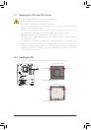
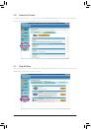
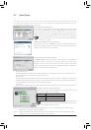
Appendix
- 84 -
Recovery Volume Options
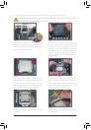
Intel Rapid Recover Technology provides data protection by allowing users to easily restore data and system
operation using a designated recovery drive. With the Rapid Recovery Technology, which employs RAID 1
functionality, users can copy the data from the master drive to the recovery drive; if needed, the data on the
recovery drive can be restored back to the master drive.
Before you begin:
• The recovery drive must have equal or greater capacity than the master drive.
• A recovery volume can be created with two hard drives only. A recovery volume and a RAID array cannot
co-exist in the system at the same time, that is, if you have already created a recovery volume, you are
unable to create a RAID array.
• By default, only the master drive can be viewed in the operating system; the recovery drive is hidden.
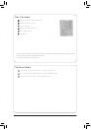
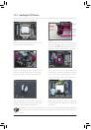
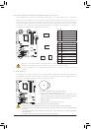
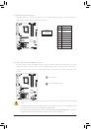
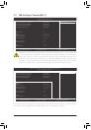
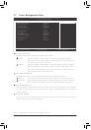
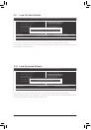
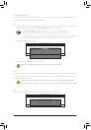
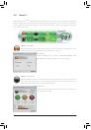
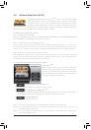
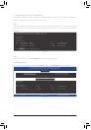
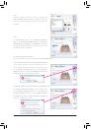
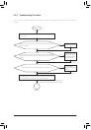
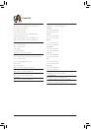
Step 1:
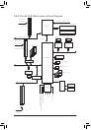
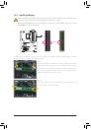
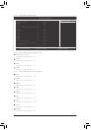
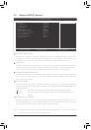
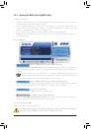
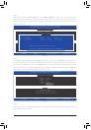
Select Create RAID Volume in MAIN MENU and press <Enter> (Figure 8).
Intel(R) Rapid Storage Technology - Option ROM - 10.0.0.1046
Copyright(C) 2003-10 Intel Corporation. All Rights Reserved.
3. Reset Disks to Non-RAID
4. Recovery Volume Options
RAID Volumes :
None defined.
Physical Disks :
Port
Drive Model
Serial #
Size
Type/Status(Vol ID)
0
ST3120026AS
3JT354CP
111.7GB
Non-RAID Disk
1
ST3120026AS
3JT329JX
111.7GB
Non-RAID Disk
[hi]-Select
[ESC]-Exit
[ENTER]-Select Menu
[ DISK/VOLUME INFORMATION ]
[ MAIN MENU ]
1. Create RAID Volume
2. Delete RAID Volume
5. Exit
Figure 8
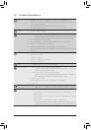
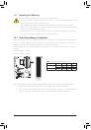
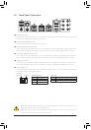
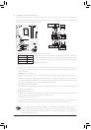
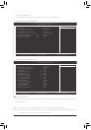
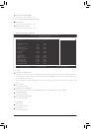
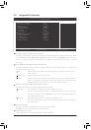
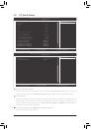
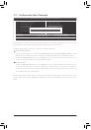
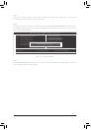
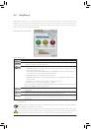
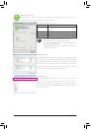
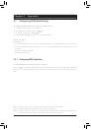
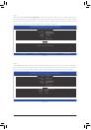
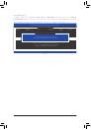
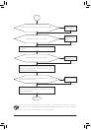
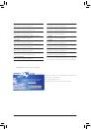
Intel(R) Rapid Storage Technology - Option ROM - 10.0.0.1046
Copyright(C) 2003-10 Intel Corporation. All Rights Reserved.
Recovery: Copies data between a master and a recovery disk.
[hi]-Change
[TAB]-Next
[ESC]-Previous Menu
[ENTER]-Select
[ HELP ]
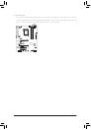
Name : Volume0
RAID Level : Recovery
Disks :
Select Disks
Strip Size : N/A
Capacity : 0.0 GB
Sync : Continuous
Create Volume
[ CREATE VOLUME MENU ]
Figure 9
Step 2:
After entering the volume name, select Recovery under the RAID Level item and press <Enter> (Figure 9).
 1
1
 2
2
 3
3
 4
4
 5
5
 6
6
 7
7
 8
8
 9
9
 10
10
 11
11
 12
12
 13
13
 14
14
 15
15
 16
16
 17
17
 18
18
 19
19
 20
20
 21
21
 22
22
 23
23
 24
24
 25
25
 26
26
 27
27
 28
28
 29
29
 30
30
 31
31
 32
32
 33
33
 34
34
 35
35
 36
36
 37
37
 38
38
 39
39
 40
40
 41
41
 42
42
 43
43
 44
44
 45
45
 46
46
 47
47
 48
48
 49
49
 50
50
 51
51
 52
52
 53
53
 54
54
 55
55
 56
56
 57
57
 58
58
 59
59
 60
60
 61
61
 62
62
 63
63
 64
64
 65
65
 66
66
 67
67
 68
68
 69
69
 70
70
 71
71
 72
72
 73
73
 74
74
 75
75
 76
76
 77
77
 78
78
 79
79
 80
80
 81
81
 82
82
 83
83
 84
84
 85
85
 86
86
 87
87
 88
88
 89
89
 90
90
 91
91
 92
92
 93
93
 94
94
 95
95
 96
96
 97
97
 98
98
 99
99
 100
100
 101
101
 102
102
 103
103
 104
104