12
GB
• follow the recipe;
• do not exceed the
maximum weight
of the dripping pan;
•
remember to pour 50 g (0,5 dl) of cold water into the
baking tray in position 5
.
• The dough must be left to rise at room temperature for
1 – 1 ½ hours (depending on the room temperature) or
until the dough has doubled in size.
Recipe for BREAD:
1 Dripping pan holding 1000 g Max, lower level
2 Dripping pans each holding 1000 g Max, medium and
lower levels
Recipe for 1000 g of dough: 600 g flour, 360 g water, 11g
salt, 25 g fresh yeast (or 2 sachets of powder yeast)
Method:
• Mix the flour and salt in a large bowl.
• Dilute the yeast in lukewarm water (approximately 35
degrees).
• Make a small well in the mound of flour.
• Pour in the water and yeast mixture.
• Knead the dough by stretching and folding it over itself
with the palm of your hand for 10 minutes until it has a
uniform consistency and is not too sticky.
• Form the dough into a ball shape, place it in a large bowl
and cover it with transparent plastic wrap to prevent the
surface of the dough from drying out. Select the manual
LOW TEMPERATURE function on the oven and set the
temperature to 40°C. Place the bowl inside and leave
the dough to rise for approximately 1 hour (the dough
should double in volume).
• Cut the dough into equal sized loaves.
• Place them in the dripping pan, on a sheet of baking
paper.
• Dust the loaves with flour.
• Make incisions on the loaves.
• Place the food inside the oven while it is still cold.
• Start the
BREAD cooking mode.
• Once baked, leave the loaves on one of the grill racks
until they have cooled completely.
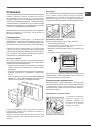
BAKED CAKES
mode
This function is ideal for cooking desserts which are made
using natural yeast, baking powder and desserts which
contain no yeast. Place the dish in the oven while it is still
cold. The dish may also be placed in a preheated oven.
TARTS
mode
This function is ideal for all tart recipes (which normally need
to be heated well from underneath). Place the food inside
the oven while it is still cold.
The dish may also be placed in a preheated oven.
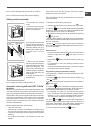
Programming cooking
!
A cooking mode must be selected before programming
can take place.
!
Once a cooking mode has been selected, the
button
is activated; it will then be possible to program a duration.
The
button is only activated after a duration has been
set; it will then be possible to program a delayed start.
Programming the duration
1. Press the
button; the
button and the numbers on
the TIME display will flash.
2. Set the duration by pressing buttons “ ” and “ ”.
3. Once you have reached the desired duration, press the
button again.
4. Press the
button to begin cooking.
5. When cooking has finished, “END” appears on the
TEMPERATURE display and a buzzer sounds.
• For example: it is 9:00 a.m. and a duration of 1 hour and
15 minutes is programmed. The programme will stop
automatically at 10:15 a.m.
Programming delayed cooking
!
A cooking duration must be set before the cooking end
time can be scheduled.
!
For the delayed programming to work properly, the clock
should be set to the correct time.
1. Press the
button and repeat steps 1 to 3 as described
for the duration setting.
2. Then press the
button and set the end time using
the “ ” and “ ” buttons.
3. Once you have reached the desired end time, press the
button again.
4. Press the
button to activate the programmed mode.
The and
buttons will flash alternately to indicate that
programming has taken place; in the time before cooking
starts, the TIME display will show the duration and the
cooking end time alternately.
5. Once cooking has finished, “END” appears on the
TEMPERATURE display and a buzzer sounds.
• For example: it is 9:00 a.m. and a time of 1 hour and 15
minutes is programmed, while the end time is set to 12:30.
The programme will start automatically at 11:15 a.m.
To cancel programming press the
button.
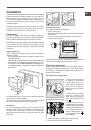
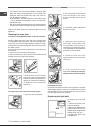
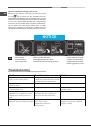
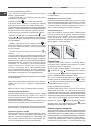
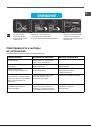
Practical cooking advice
!
Do not place racks in position 1 and 5 during fan-assisted
cooking. This is because excessive direct heat can burn
temperature sensitive foods.
!
In the GRILL and FAN GRILLING cooking modes,
particularly when using the rotisserie spit, place the dripping
pan in position 1 to collect cooking residues (fat and/or
grease).
*
Only available in certain models.