14
GB
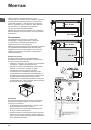
Start-up and use
!
The glue applied on the gaskets leaves traces of
grease on the glass. Before using the appliance, we
recommend you remove these with a special non-
abrasive cleaning product. During the first few hours
of use there may be a smell of rubber which will
disappear very quickly.
!
A few seconds after the hob is connected to the
electricity supply, a buzzer will sound. The hob may
now be switched on.
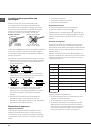
Types of noise during normal hob operation:
• Buzz: due to the vibration of the metallic parts that
make up the induction element and the pot; it is
generated by the electromagnetic field required for
heating and increases as the power of the induction
element increases.
• Soft whistle: heard when the pot placed on the
heating zone is empty; the noise disappears once
food or water is placed into the pot.
• Crackle: produced by the vibration of materials on
the bottom of the pot due to the flow of parasitic
currents caused by electromagnetic fields
(induction); can be more or less intense depending
on the material making up the bottom of the pot, and
decreases as the pot dimensions increase.
• Loud whistle: heard when two induction elements of
the same group function simultaneously at maximum
power and/or when the booster function is set on
the larger element while the other is auto-adjusted.
Noise is reduced by decreasing the power level of
the auto-adjusted induction element; pot bottom
layers made of different kinds of materials are
among the main causes of this noise.
• Fan noise: a fan is necessary to ensure the hob
functions correctly and to safeguard the electronic
unit from possible overheating. The fan functions
at maximum power when the large induction
element is at maximum power or when the booster
function is on; in all other cases, it works at average
power depending on the temperature detected.
Furthermore, the fan may continue to work even after
switching the hob off, if the temperature detected is
high.
The types of noise listed above are due to induction
technology and are not necessarily operational faults.
!
If the
-
or
+
button is pressed for an extended
period of time, the display scrolls quickly though the
power levels and timer minutes.
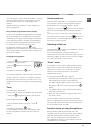
Switching on the hob
To switch the hob on, press and hold the
button
for approximately one second.
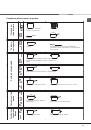
Switching on the cooking zones
Each cooking zone is controlled using a selector
button
and a power adjustment device consisting
of power level selector buttons between the values of 0
and 9.
• To begin operating a cooking zone, press the
corresponding control button and set the desired
power level using the power level selector buttons
between 0 and 9.
Switching off the cooking zones
To switch off a cooking zone, select it using the
corresponding selector button
and:
• Press power level selector button 0: this immediately
returns the power setting to 0 and the cooking zone
switches off.
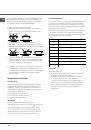
Booster function
The booster function for some of the cooking zones
may be used to shorten heating-up times. It may be
activated by pressing the
Booster
button. The indicator
light directly above the button will illuminate. This
function boosts the power to 2000 W or 3000 W,
depending on the size of the relevant cooking zone.
The booster stops automatically after 4 minutes. While
the booster for one of the cooking zones is active, the
corresponding front or rear cooking zone will operate
at a reduced power level (e.g. if the booster for the
rear left-hand hotplate has been activated, the power
level of the front left-hand hotplate will be reduced).
For further information, please refer to the
Technical
description of the models
.
Programming the cooking duration
!
All the cooking zones may be programmed
simultaneously, for a duration between 1 and 99
minutes.
1. Select the cooking zone using the corresponding
selector button.
2. Adjust the power level of the cooking zone.
3. Press the
programming button. The indicator
light corresponding to the selected zone will start
flashing.
4. Set the cooking duration using the
-
and
+
buttons.
5. Confirm by pressing the
button or automatic
selection occurs after 10 seconds.