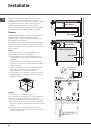
GB
7
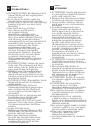
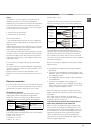
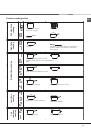
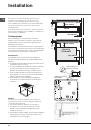
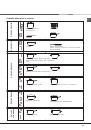
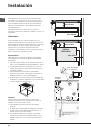
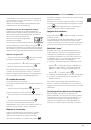
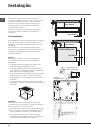
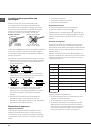
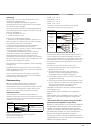
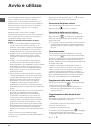
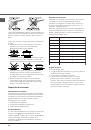
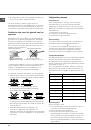
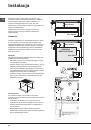
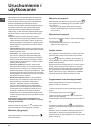
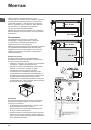
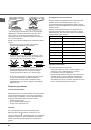
Description of the appliance
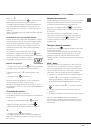
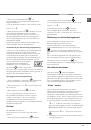
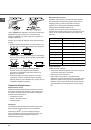
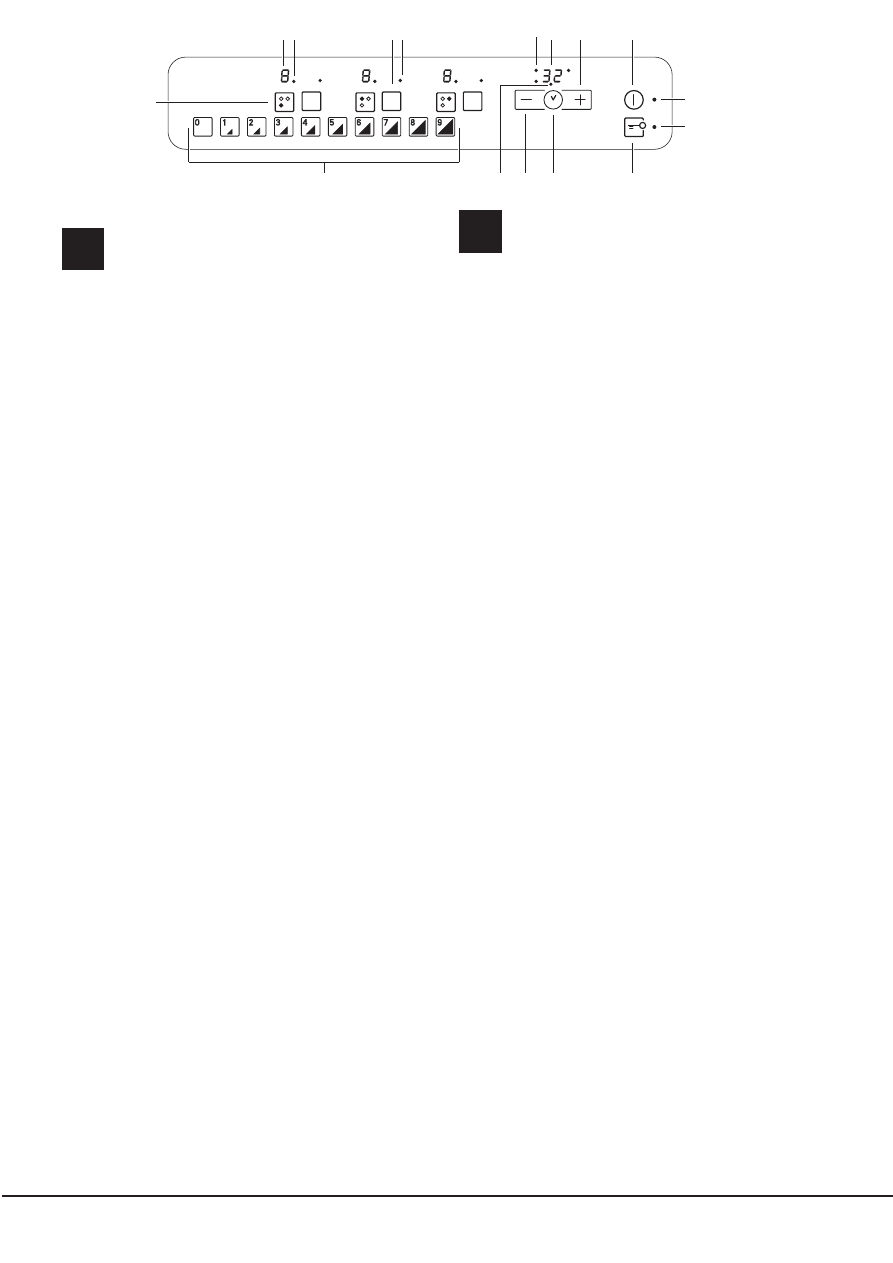
Control panel
GB
Description de l’appareil
Tableau de bord
FR
The control panel described in this manual is only a
representative example: it may not exactly match the panelon
your appliance.
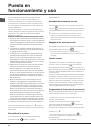
1
INCREASE TIME
button increases the time value
set on the timer
(see Start-up and use)
.
2
DECREASE TIME
button decreases the time value
set on the timer
(see Start-up and use)
.
3
COOKING ZONE SELECTOR
indicator shows a
particular cooking zone has been selected and
therefore various adjustments are possible.
4
COOKING ZONE SELECTOR
button is used to
select the desired cooking zone.
5
POWER
indicator provides a visual display for the
current heat level.
6
ON/OFF
button switches the appliance on and off.
7
ON/OFF
indicator light shows whether the appliance
is on or off.
8
PROGRAMME TIMER
button controls the cooking
programme times (
see Start-up and use
).
9
PROGRAMME TIMER
display shows which
programme has been selected (
see Start-up and use
).
10
COOKING ZONE PROGRAMMED
indicator lights
show which cooking zones are being used during a
cooking programme (
see Start-up and use
).
11
CONTROL PANEL LOCK
button prevents
accidental changes to the hob settings (
see
Start-up
and use
).
12
CONTROL PANEL LOCK
indicator light shows the
control panel has been locked (
see Start-up and use
).
13
COOKING ZONE POWER SELECTOR
buttons
switch on the hotplate and control the power
(see
Start-up and use).
14
TIMER
indicator light shows that the timer has been
activated
15
BOOSTER
button activates the booster function -
3000 W - of the cooking zone
(see Start-up and use)
.
16
BOOSTER
indicator light shows that the booster
function has been activated.
! This product complies with the requirements of the
latest European Directive on the limitation of power
consumption of the standby mode.
If no operations are carried out for a period of 2
minutes, after the residual heat indicator lights turn
off and the fan stops (if present), the appliance
automatically switches to the .off mode..
The appliance resumes the operating mode once the
ON/OFF button is pressed.
Le tableau de bord qui est
décrit n.a qu.une valeur d.exemple :
il peut ne pas correspondre au modèle acheté
.
1 Touche
AUGMENTATION DU TEMPS
pour augmenter le
temps du programmateur
(voir Mise en marche et utilisation)
.
2 Touche
DIMINUTION DU TEMPS
pour diminuer le temps
du programmateur
(voir Mise en marche et utilisation)
.
3 Voyant
FOYER SELECTIONNÉ
pour signaler que le foyer
correspondant a été sélectionné et que les régulations
sont donc possibles.
4 Touche
SÉLECTION FOYER
pour sélectionner le foyer
souhaité
5 Indicateur de
PUISSANCE
: une colonne lumineuse pour
signaler le niveau de puissance atteint.
6 Touche
ON/OFF
pour allumer ou éteindre l’appareil.
7 Voyant
ON/OFF
: il signale si l’appareil est allumé ou
éteint.
8 Touche
PROGRAMMATEUR
pour programmer la durée
d’une cuisson (
voir Mise en marche et Utilisation
).
9 Afficheur
PROGRAMMATEUR
: pour afficher les choix
correspondant à la programmation (
voir Mise en marche et
utilisation
).
10 Voyants
FOYER PROGRAMMÉ
: ils indiquent les foyers
quand une programmation est lancée (
voir Mise en marche
et utilisation
).
11 Touche
VERROUILLAGE DES COMMANDES
pour
empêcher toute intervention extérieure sur les réglages de
la table de cuisson (
voir
Mise en marche et Utilisation
).
12 Voyant
COMMANDES VERROUILLÉES
: pour signaler
le verrouillage des commandes (
voir Mise en marche et
Utilisation
).
13 Touche
SÉLECTION PUISSANCE FOYERS
pour allumer
le foyer et régler sa puissance
(voir Mise en marche et
utilisation)
.
14 Voyant
MINUTEUR
il signale que le minuteur est activé
15 Touche
BOOSTER
pour brancher la suralimentation - 3000
W – du foyer (
voir Mise en marche et utilisation
).
16 Voyant
BOOSTER
il signale que la fonction de
suralimentation du booster est activée.
! Ce produit est conforme à la nouvelle Directive Européenne sur la
réduction de la consommation d’énergie en mode standby. Sans
opérations pendant 2 minutes, après
l’extinction des voyants de chaleur résiduelle et l’arrêt du ventilateur
(si existants), l’appareil se place automatiquement en “off mode”. Pour
remettre l’appareil en mode de fonctionnement
normal, appuyer sur la touche ON/OFF.
*
Only available in certain models.
*
N’existe que sur certains modèles
Booster
Booster
Booster
13
1
2
3
5
4
6
7
8
9
10
11
12
14
15 16