247
Chapter 15: Advanced Configuration
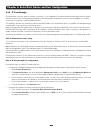
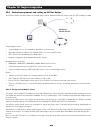
15.14 Zero Touch Provisioning
Zero Touch Provisioning (ZTP) was introduced with firmware release 3.15 to allow appliances to be provisioned during their
initial boot from a DHCP server.
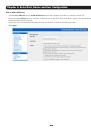
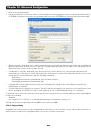
15.14.1 Preparation
These are typical steps for configuration over a trusted network:
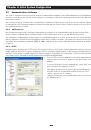
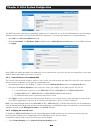
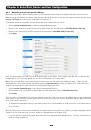
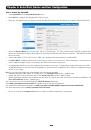
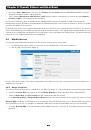
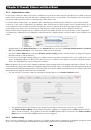
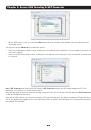
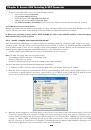
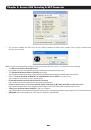
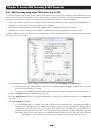
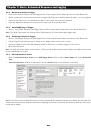
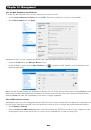
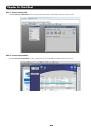
1. Configure a same-model appliance.
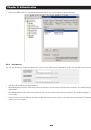
2. Save the configuration as a backup (.opg) file under
System: Configuration Backup
in the web UI, or via
config -e
in the
CLI. Alternatively, you can save the XML configuration as a file ending in .xml.
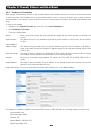
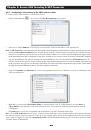
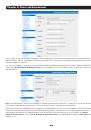
3. Publish the .opg or.xml file on a fileserver that understands one of the HTTPS, HTTP, FTP or TFTP protocols.
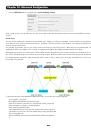
4. Configure your DHCP server to include a “vendor specific” option for Tripp Lite appliances. The option text should be a URL
to the location of the .opg or .xml file. The option text should not exceed 250 characters in length. It must end in either
.opg or .xml.
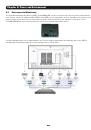
5. Connect a new appliance (either at defaults from the factory, or config erased) to the network and apply power.
6. It may take up to 5 minutes for the device to find the .opg or .xml file via DHCP, download, install the file and reboot itself.
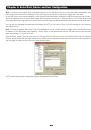
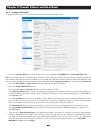
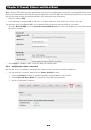
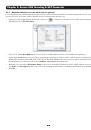
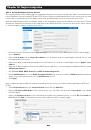
15.14.2 Example ISC DHCP server configuration
The following is an example of an ISC DHCP server configuration fragment for serving an .opg configuration image:
option space tripplite code width 1 length width 1;
option tripplite.config-url code 1 = text;
class “tripplite-ztp” {
match if option vendor-class-identifier ~~ “^TrippLite/”;
vendor-option-space tripplite;
option tripplite.config-url “https://example.com/opg/${class}.opg”;
}
For other DHCP servers, please consult their documentation on specifying “Vendor Specific” option fields. We use sub-option 1
to hold the URL text.
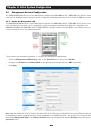
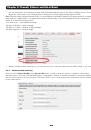
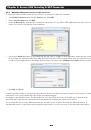
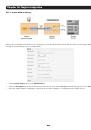
15.14.3 Setup for an untrusted LAN
If network security is a concern, and you can have remote hands insert a trusted USB flash drive into the appliance during
provisioning, then follow the steps below to configure in an untrusted network:
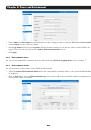
1. Generate an X.509 certificate for the client. Place it and its private key file onto a USB flash drive (concatenated as a
single file, client.pem).
2. Set up a HTTPS server that restricts access to the .opg or .xml file for HTTPS connections providing the client certificate.
3. Put a copy of the CA cert (that signed the HTTP server’s certificate) onto the USB flash drive as well (ca-bundle.crt).
4. Insert the USB flash drive into the Appliance
before attaching power or network
.
5. Continue with the steps above, but using only a https URL.
6. Detailed step-by-step instructions for preparing a USB flash drive and using OpenSSL to create keys can be found later in
this section.
 1
1
 2
2
 3
3
 4
4
 5
5
 6
6
 7
7
 8
8
 9
9
 10
10
 11
11
 12
12
 13
13
 14
14
 15
15
 16
16
 17
17
 18
18
 19
19
 20
20
 21
21
 22
22
 23
23
 24
24
 25
25
 26
26
 27
27
 28
28
 29
29
 30
30
 31
31
 32
32
 33
33
 34
34
 35
35
 36
36
 37
37
 38
38
 39
39
 40
40
 41
41
 42
42
 43
43
 44
44
 45
45
 46
46
 47
47
 48
48
 49
49
 50
50
 51
51
 52
52
 53
53
 54
54
 55
55
 56
56
 57
57
 58
58
 59
59
 60
60
 61
61
 62
62
 63
63
 64
64
 65
65
 66
66
 67
67
 68
68
 69
69
 70
70
 71
71
 72
72
 73
73
 74
74
 75
75
 76
76
 77
77
 78
78
 79
79
 80
80
 81
81
 82
82
 83
83
 84
84
 85
85
 86
86
 87
87
 88
88
 89
89
 90
90
 91
91
 92
92
 93
93
 94
94
 95
95
 96
96
 97
97
 98
98
 99
99
 100
100
 101
101
 102
102
 103
103
 104
104
 105
105
 106
106
 107
107
 108
108
 109
109
 110
110
 111
111
 112
112
 113
113
 114
114
 115
115
 116
116
 117
117
 118
118
 119
119
 120
120
 121
121
 122
122
 123
123
 124
124
 125
125
 126
126
 127
127
 128
128
 129
129
 130
130
 131
131
 132
132
 133
133
 134
134
 135
135
 136
136
 137
137
 138
138
 139
139
 140
140
 141
141
 142
142
 143
143
 144
144
 145
145
 146
146
 147
147
 148
148
 149
149
 150
150
 151
151
 152
152
 153
153
 154
154
 155
155
 156
156
 157
157
 158
158
 159
159
 160
160
 161
161
 162
162
 163
163
 164
164
 165
165
 166
166
 167
167
 168
168
 169
169
 170
170
 171
171
 172
172
 173
173
 174
174
 175
175
 176
176
 177
177
 178
178
 179
179
 180
180
 181
181
 182
182
 183
183
 184
184
 185
185
 186
186
 187
187
 188
188
 189
189
 190
190
 191
191
 192
192
 193
193
 194
194
 195
195
 196
196
 197
197
 198
198
 199
199
 200
200
 201
201
 202
202
 203
203
 204
204
 205
205
 206
206
 207
207
 208
208
 209
209
 210
210
 211
211
 212
212
 213
213
 214
214
 215
215
 216
216
 217
217
 218
218
 219
219
 220
220
 221
221
 222
222
 223
223
 224
224
 225
225
 226
226
 227
227
 228
228
 229
229
 230
230
 231
231
 232
232
 233
233
 234
234
 235
235
 236
236
 237
237
 238
238
 239
239
 240
240
 241
241
 242
242
 243
243
 244
244
 245
245
 246
246
 247
247
 248
248
 249
249
 250
250
 251
251
 252
252
 253
253
 254
254
 255
255
 256
256
 257
257
 258
258
 259
259
 260
260
 261
261
 262
262
 263
263
 264
264
 265
265
 266
266
 267
267
 268
268
 269
269
 270
270
 271
271
 272
272
 273
273