Инструкция для VITEK VT-1607 ST

(скачивание инструкции бесплатно)
Формат файла: PDF
Доступность: Бесплатно как и все руководства на сайте. Без регистрации и SMS.
Дополнительно: Чтение инструкции онлайн
background image

4

 ENGLISH

– 

wash the removable parts that will contact prod-
ucts  with  warm  water  and  a  neutral  detergent 
and dry them thoroughly before use.

– 

Clean  the  unit  body  (9)  with  a  soft,  slightly  damp 
cloth, and then wipe it dry. 

Note

:

– 

Be  cautious  when  holding  grating  filter  (4)  in  your 
hands, as disc grating surface is very sharp.

– 

Practice  assembling  and  disassembling  the  unit 
several times before operation.  

MAKING JUICE

– 

Before the first plugging in make sure that the op-
erating  voltage  of  the  unit  corresponds  to  voltage 
of your mains.

– 

Fruit  and  vegetables  meant  for  processing  must 
be fresh.

– 

Before  juice  extracting  wash  fruit/vegetables  and 
cut  them  into  pieces  matching  the  feeding  chute 
(2), remove inedible parts from vegetables or fruit, 
such  as  stems,  hard  peel  or  stones,  for  example, 
cherry or peach.

• 

Place  the  motor  unit  (9)  on  a  dry,  flat  and  steady 
surface.

• 

Before  unit  assembling  make  sure  that  the  opera-
tion modes switch (10) is set to the position «0», and 
the plug is not inserted into the socket.

• 

Set juice collector (5) on the motor unit (9).

• 

Install grating filter (4) in the juice collector (5).

Attention!
Do not use juice extractor if you found mechanical 
damages of grating filter (4).

• 

Install the lid (3) on the juice collector (5) and fix it 
with  by  placing  the  locking  arm  (7)  in  vertical  po-
sition.

• 

Install pulp container (8) to its place.

• 

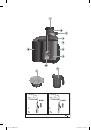
Put the juice cup (11) under the juice draining spout 
(6).

• 

Open  the  juice  cup  (11)  lid,  lower  the  juice  drain-
ing  spout  (6)  by  pressing  it  (fig.  1),  close  the  juice 
cup (11) lid.

• 

Insert the power plug into the socket.

• 

Switch juice extractor on by setting the switch (10) 
to  the  position  «I»  (low  speed)  or  to  position  «II» 
(high speed).

Note

:

Low  speed  «I»

  is  intended  for  juice  extracting  from 

soft  vegetables/fruits  -  such  as  tomatoes,  ripe  pears, 
strawberry,  oranges,  plums  (without  stones),  grapes, 
pumpkin, onion, cucumbers and etc.

High speed


«II» 

is intended for extracting of juice from 

hard vegetables/fruits - such as carrot, apples, pepper, 
beet,  potatoes,  pineapples  (peeled),  vegetable  mar-
rows, celery, spinach, dill, leek etc.

Attention! 
During  the  processing  of  viscous  or  quite  hard 
foods  to  avoid  the  grating  filter  (4)  stopping  and 
motor  unit  jamming  it  is  recommended  to  use  the 
high speed «II» mode of juice extractor operation.

• 

The unit will be switched on only if all the removable 
parts  are  installed  properly,  and  the  lid  (3)  is  fixed 
with the locking arm (7).

• 

Feed  fruit/vegetable  pieces  into  the  lid  (3)  feed-
ing chute (2), only when grating filter (4) is rotating.

• 

Put  vegetables  or  fruits  cut  beforehand  gradually 
into the lid (3) feeding chute (2) and push them gen-
tly with the pusher (1). Do not press on the pusher 
(1)  too  hard  as  it  can  lead  to  decrease  of  juice 
amount as well as to grating filter (4) rotation stop-
ping. The slower is the fruit and vegetables process-
ing, the higher is the juice extraction rate.

• 

Do not put your fingers or any other foreign objects 
into the lid (3) feeding chute (2).

• 

During the operation check the grating filter (4) pe-
riodically for obstruction of mesh with pulp, if nec-
essary  wash  the  grating  filter  (4);  before  removing 
the  grating  filter  switch  the  juice  extractor  off  and 
unplug it.

• 

Control the pulp container filling (8), if the container 
(8)  is  filled  up,  switch  juice  extractor  off,  unplug  it 
and remove the pulp from the container (8).

Attention!
The maximal allowable continuous operation time is 
not more than 2 minutes with subsequent break of 
at least 3 minutes.

• 

After  unit  operation,  switch  it  off  by  setting  the 
switch (10) to the position «0», and unplug it.

• 

To prevent juice dripping set the juice draining spout 
(6) in horizontal position (fig. 1), to do this slightly lift 
the juice cup (11).

CLEANING AND CARE

After  the  end  of  operation  or  before  cleaning  always 
switch the unit off and unplug it.

Disassemble and clean juice extractor after every 
usage:

• 

Remove  the  pusher  (1)  from  the  lid  (3)  feeding 
chute (2).

• 

Bring the locking arm (7) in horizontal position and 
remove the lid (3).

• 

Remove the grating filter (4), it will be easier to re-
move  the  grating  filter  (4)  if  you  remove  it  with  the 
juice collector (5), holding the juice collector (5) and 
pulling it upwards.

• 

It is more convenient to wash grating filter (4) open-
ings from the outside using a small brush.

• 

Be  careful  washing  grating  filter  (4):  disc  grating 
surface is very sharp. 

• 

Wash  all  removable  parts  with  warm  water  and  a 
neutral detergent, then dry thoroughly.

• 

Do  not  wash  grating  filter  (4)  and  other  removable 
parts in the dishwasher.

• 

Clean motor unit (9) with a slightly damp cloth, and 
then wipe it 

• 

dry. 

• 

Do  not  immerse  the  motor  unit  (9)  in  water  or  any 
other liquids; do not wash it under water jet.

• 

Do not use coarse sponges, abrasives and solvents 
to clean the unit.

VT-1607_IM.indd   4

30.04.2013   16:25:45

1
2
3
4
5
6
7
8
9
10
11
12
13
14
15
16
17
18
19
20
21
22
23
24
25
26
27
28
29
30
31
32
33
34
35
36
Оглавление инструкции
  • Страница 1 из 37
    1 VT-1607_IM.indd 1 30.04.2013 16:25:45
  • Страница 2 из 37
    VT-1607_IM.indd 2 30.04.2013 16:25:45
  • Страница 3 из 37
    ENGLISH • Do not bring your face close to the lid feeding chute JUICE EXTRACTOR Description 1. Pusher 2. Feeding chute 3. Lid 4. Grating filter 5. Juice collector 6. Juice draining spout 7. Locking arm 8. Pulp container 9. Motor unit 10. Operation modes switch «I-0-II» 11. Juice cup with lid and
  • Страница 4 из 37
    ENGLISH – wash the removable parts that will contact prod- • The unit will be switched on only if all the removable ucts with warm water and a neutral detergent and dry them thoroughly before use. – Clean the unit body (9) with a soft, slightly damp cloth, and then wipe it dry. Note: – Be cautious
  • Страница 5 из 37
    ENGLISH • Some products, for example, carrots or beets, can STORAGE • Perform the requirements of the «CLEANING AND CARE» section before taking the unit away for storage. • Keep the unit away from children in a dry cool place. TIPS Delivery set Motor unit – 1 pc. Pusher – 1 pc. Lid – 1 pc. Grating
  • Страница 6 из 37
    DEUTSCH ENTSAFTER • Benutzen Sie nur die abnehmbaren Teile, die Beschreibung 1. Stampfer 2. Füllrohr 3. Deckel 4. Reibfilter 5. Safteinfüllschale 6. Saftauslauf 7. Fixator 8. Fruchtfleischbehälter 9. Motoreinheit 10. Betriebsstufenschalter «I-0-II» 11. Saftbehälter mit Deckel und Schaumscheider •
  • Страница 7 из 37
    DEUTSCH • Es ist nicht gestattet, die Motoreinheit ins Was- ENTSAFTUNG – Vergewissern Sie sich vor der ersten Inbetriebnahme, dass die Spannung des Geräts mit der Netzspannung übereinstimmt. – Früchte und Gemüse, die zur Verarbeitung geeignet sind, müssen frisch sein. – Vor der Entsaftung waschen
  • Страница 8 из 37
    DEUTSCH • Nehmen Sie den Stampfer (1) aus dem Füllrohr flüssigen oder genug harten Nahrungsmitteln, um Unterbrechung der Drehung des Reibfilters (4) und Festklemmen des Elektromotorläufers zu vermeiden. • Der Entsafter schaltet sich nur dann ein, wenn alle abnehmbaren Geräteteile richtig
  • Страница 9 из 37
    DEUTSCH • Vergessen Sie bei der Apfelsaftzubereitung • • • • • • Lieferumfang Motoreinheit – 1 St. Stampfer – 1 St. Deckel – 1 St. Reibfilter – 1 St. Safteinfüllschale – 1 St. Fruchtfleischbehälter – 1 St. Saftbehälter – 1 St. nicht, dass seine Sättigung von der Apfelsorte abhängt. Wählen Sie die
  • Страница 10 из 37
    русский СОКОВЫЖИМАЛКА Описание 1. Толкатель 2. Загрузочная горловина 3. Крышка 4. Фильтр-тёрка 5. Сокосборник 6. Носик для слива сока 7. Фиксатор 8. Контейнер для мякоти 9. Моторный блок 10. Переключатель режимов работы «I-0-II» 11. Ёмкость для сбора сока с крышкой и пеноотделителем • • • • • •
  • Страница 11 из 37
    русский • Не разрешайте детям использовать устрой• • • – моторный блок (9) протрите мягкой, ство в качестве игрушки. Данное устройство не предназначено для использования детьми и людьми с ограниченными возможностями, если только лицом, отвечающим за их безопасность, им не даны соответствующие и
  • Страница 12 из 37
    русский • Для предотвращения вытекания капель сока маты, спелые груши, клубника, сливы (без косточек), виноград, тыква, лук, огурцы и т.п. Высокая скорость «II» применяется для отжима сока из твёрдых овощей/фруктов - таких как морковь, яблоки, перец, свёкла, картофель, ананасы (очищенные от
  • Страница 13 из 37
    русский • Для приготовления сока можно использовать • • • • • • • • • • ХРАНЕНИЕ • Перед тем как убрать соковыжималку на различные овощи (морковь, огурцы, свёклу, стебли сельдерея, шпинат, помидоры) или фрукты (яблоки, виноград, ананасы). Ягоды рекомендуется мыть непосредственно перед отжимом сока,
  • Страница 14 из 37
    Қазақша ШЫРЫНСЫҚҚЫШ • Жеткізілім Сипаттамасы 1. Итергіш 2. Жүктейтін ауыз 3. Қақпақ 4. Үккіш-сүзгіш 5. Шырынжинауыш 6. Шырынды құюға арналған шүмек 7. Бекіткіш 8. Сығындыларға арналған сауыт 9. Моторлық блок 10. Жұмыс істеу режимдерінің ауыстырғышы (I-0-II) 11. Қақпағы және көпіршік бөлгіші бар
  • Страница 15 из 37
    Қазақша • • – Өңдеуге арналған жемістер мен көкөністер қауіптер туралы түсінік берілген жағдайда ғана мүмкін. Моторлық блокты суға немесе басқа сұйықтықтарға батыруға, сонымен қатар оны су ағынының астында жууға тыйым салынады. Моторлық блокты тазарту үшін дымқыл матаны пайдаланыңыз. Желілік
  • Страница 16 из 37
    Қазақша • Егер барлық шешілмелі бөліктер дұрыс орнатылған және қақпақ (3) бекіткішпен (7) бекітілген жағдайда ғана шырынсыққыш іске қосылады. • Үккіш-сүзгіш (4) айналып тұрған кезде ғана азық-түлікті қақпақтың (3) аузына (2) жүктеңіз. • Көкөністердің немесе жемістердің алдын-ала туралған бөліктерін
  • Страница 17 из 37
    Қазақша • Алма шырыны тез қараяды, оған бірнеше • • • Техникалық сипаттамалары: Қоректендіру кернеуі: 220-240 В ~ 50-60 Гц Максималды тұтанатын қуаты: 500 Вт тамшы лимон шырынын тамызыңыз, бұл шырынның қараю процесін тоқтатады. Егер шырын тоңазытқышта сақталатын болса, ол тоңазытқышта сақталатын
  • Страница 18 из 37
    romÂnĂ/ Moldovenească STORCĂTOR DE SUC • Descriere 1. Împingător 2. Orificiu capac 3. Capac 4. Filtru-răzătoare 5. Colector de suc 6. Orificiu scurgere suc 7. Fixator 8. Recipient pentru pulpă 9. Bloc motor 10. Comutator moduri de funcţionare «I-0-II» 11. Recipient pentru suc cu capac şi separator
  • Страница 19 из 37
    romÂnĂ/ Moldovenească – poziţionaţi fixatorul (7) în poziţie orizontală şi Atenţie! Atunci când procesaţi fructe sau legume vâscoase sau dure pentru a preveni oprirea mişcărilor filtruluirăzătoare (4) şi blocarea mişcărilor rotorului motorului electric se recomandă să utilizaţi regimul de stoarcere
  • Страница 20 из 37
    romÂnĂ/ Moldovenească • Fiţi prudenţi atunci când spălaţi filtrul-răzătoare (4): • • • • • • PĂSTRARE • Înainte de a stoca storcătorul pentru păstrare, îndepliniţi cerinţele titlului «CURĂŢARE ŞI ÎNTREŢINERE». • Păstraţi aparatul la un loc uscat, răcoros, inaccesibil pentru copii. suprafaţa
  • Страница 21 из 37
    Český • Za provozu přístroje nikdy netlačte potraviny skrz ODŠŤAVŇOVAČ Popis 1. Pěchovač 2. Plnicí otvor 3. Víko 4. Filtr-struhadlo 5. Miska na šťávu 6. Výlevka na šťávu 7. Fixátor 8. Zásobník na dužinu 9. Motorová jednotka 10. Přepínač provozních režimů I-0-II 11. Zásobník na šťávu s oddělovačem
  • Страница 22 из 37
    Český – vyndejte pěchovač (1) z plnícího otvoru (2) víka Upozornění! Aby nedošlo k zastavení filtru-struhadla (4) a zaseknutí rotoru elektromotoru při zpracovávání vazkých a příliš tvrdých potravin se doporučuje používat provozní režim odšťavňovače s vysokou rychlostí II. • Odšťavňovač se zapne
  • Страница 23 из 37
    Český • Motorovou jednotku (9) vytřete měkkým lehce na• • • SKLADOVÁNÍ • Než přístroj uskladníte, proveďte čištění podle pokynů z odstavce ČIŠTĚNÍ A ÚDRŽBA. • Skladujte přístroj v suchém chladném místě mimo dosah dětí vlhčeným hadříkem, pak ji utřete do sucha. Nikdy neponořujte motorovou jednotku
  • Страница 24 из 37
    УКРАЇНЬСКа СОКОВИЖИМАЛКА • Використовуйте лише ті знімні деталі, які вхо- Опис 1. Штовхач 2. Горловина крышки 3. Кришка 4. Фільтр-терка 5. Сокозбірник 6. Носик для зливу соку 7. Фіксатор 8. Контейнер для м’якоті 9. Моторний блок 10. Перемикач режимів роботи «I-0-II» 11. Ємність для соку з кришкою i
  • Страница 25 из 37
    УКРАЇНЬСКа – Перед першим включенням переконайтеся, їх безпеку, їм не дано відповідні і зрозумілі інструкції про безпечне користування приладом і тієї небезпеки, яка може виникати при його неправильному використанні. • Забороняється занурювати моторний блок у воду або будь-які інші рідини, а також
  • Страница 26 из 37
    УКРАЇНЬСКа • Соковижималка включиться лише в тому ви- • Зніміть фільтр-терку (4), зняти фільтр-терку падку, якщо всі знімні частини встановлені правильно, а кришка (3) закріплена фіксатором (7). • Завантажуйте продукти в завантажувальну горловину (2) кришки (3) тільки під час обертання
  • Страница 27 из 37
    УКРАЇНЬСКа • Пийте сік відразу після його приготування. • • • • Технiчнi характеристики Електроживлення: 220-240 В, ~ 50/60 Гц Максимальна споживана потужність: 500 Вт При тривалому зберіганні на повітрі сік втрачає свої смакові якості і харчову цінність. Яблучний сік швидко темніє, але якщо додати
  • Страница 28 из 37
    Беларуская СОКАВЫЦІСКАЛКА • Забараняецца выкарыстоўваць прыладу Апісанне 1. Штурхач 2. Гарлавіна вечка 3. Вечка 4. Фiльтр-тарка 5. Соказборнік 6. Носiк для слiва сока 7. Фіксатар 8. Кантэйнер для мякаці 9. Маторны блок 10. Перамыкач рэжымаў працы «I-0-II» 11. Ёмістасць для соку з вечкам i
  • Страница 29 из 37
    Беларуская – Садавіна і гародніна, прызначаныя для небяспеках, якія могуць узнікаць пры яе няправільным карыстанні. • Забараняецца апускаць маторны блок у ваду ці любыя іншыя вадкасці, а таксама прамываць яго пад бруёй вады. Для ачысткі маторнага блока карыстайцеся злёгку вільготнай тканінай, пасля
  • Страница 30 из 37
    Беларуская • Адпусціце фіксатар (7) у гарызантальнае працы сокавыціскалкі на высокай хуткасці «II». • Сокавыціскалка ўключыцца толькі ў тым выпадку, калі ўсе здымныя часткі ўсталяваны правільна, а вечка (3) замацавана фіксатарам (7). • Загружайце прадукты ў загрузную гарлавіну (2) вечкі (3) толькі
  • Страница 31 из 37
    Беларуская • Выбірайце • • • • • гатунак яблыкаў, з якіх атрымліваецца сок, які адказвае вашым патрабаванням. Піце сок адразу пасля яго прыгатавання. Пры працяглым захоўванні на паветры сок губляе свае смакавыя якасці і харчовую каштоўнасць. Яблычны сок хутка цямнее, але калі дадаць у яго некалькі
  • Страница 32 из 37
    O’zbekcha • Ishlаyotgаnidа mеvа sоlinаdigаn оg’zigа mеvаni SHАRBАT CHIQАRGICH Qismlаri 1. Turtgich 2. Qоpqоq оg’zi 3. Qоpqоq 4. Qirg’ich filtr 5. Shаrbаt to’plаgich 6. Shаrbаt tushаdigаn jo’mrаk 7. Mаhkаmlаgich 8. Shаrbаti оlingаn mеvа eti tushаdigаn idish 9. Mоtоr blоki 10. Ishlаsh usulini
  • Страница 33 из 37
    O’zbekcha – qоpqоq (3) оg’zidаn (2) turtgichni (1) оling. – mаhkаmlаgichni (7) yotiq tushirib qo’yib qоpqоqni piyozi vа shungа o’хshаsh bоshqа qаttiq mеvа/sаbzаvоt shаrbаtini оlishgа mo’ljаllаngаn. – qirg’ich filtrni (4) оling, shаrbаt chiqаrgichni (5) Diqqаt! Yopishqоq yoki аnchа qаttiq mеvа,
  • Страница 34 из 37
    O’zbekcha • Qirg’ich filtr (4) bilаn оlinаdigаn qismlаrini idish • • • • • Shаrbаt chiqаrgich tаrkibidа krахmаl bilаn pеktin ko’p yuvаdigаn mаshinаdа yuvmаng. Mоtоr blоkini (9) nаm mаtо bilаn аrting, so’ng quruq mаtо bilаn аrtiib quriting. Mоtоr blоkini (9) suvgа yoki bоshqа suyuqlikkа sоlish, оqib
  • Страница 35 из 37
    VT-1607_IM.indd 35 30.04.2013 16:25:48
  • Страница 36 из 37
    gb A production date of the item is indicated in the serial number on the technical data plate. A serial number is an eleven-unit number, with the first four figures indicating the production date. For example, serial number 0606ххххххх means that the item was manufactured in June (the sixth month)
  • Страница 37 из 37