Инструкция для ZELMER 32Z011

(скачивание инструкции бесплатно)
Формат файла: PDF
Доступность: Бесплатно как и все руководства на сайте. Без регистрации и SMS.
Дополнительно: Чтение инструкции онлайн
background image

28

Important safety instructions

Read the whole instruction for use before you start using 


your stand blender.

The stand blender is intended for domestic usage only. 


In  case  it  is  used  for  gastronomic  business  purposes, 

warranty terms and conditions change.

Connect the appliance to 230-240 V mains supply.


Always place the appliance on flat, plain surface.


Always unplug the appliance when it is not in use and 


before cleaning.

Do not unplug by pulling on cord.


The supplying cord shall not be hanged over the edge of 


the table or board, nor touch any hot surface.

Do not operate the appliance if the cord, the housing or 


the handle is visibly damaged. In such a case, return the 

appliance to a service center.

If  the  non-detachable  part  of  the  cord  is  damaged, 

it  should  be  replaced  by  the  producer  or  at  a  proper 

service point or by a qualified person in order to avoid 

any hazards.
The appliance should be repaired by trained staff only. 

Improper repair can result in serious hazard for a user. In 

case of defects we recommend you to contact qualified 

service desk.

Do  not  immerse  motor  housing  in  water  or  any  other 


liquid; do not use it in bathroom and outdoors.

Do not use stand blender without feeder opening stopper.


Do not fill the jug in with boiling liquids.


Do not put your hands inside the jug, even if it is removed 


for cleaning, as the cutting blades are still dangerous – 

very sharp.

Do not put any objects (spoon, etc.) into the jug, when 


the blender is connected to power supply.

Keep the stand blender and supplying cord away from 


hot surfaces and burners.

If it is possible, store the stand blender away from direct 


sun radiation and glow-like light.

Never store with lid closed on the blender jug. Damp the 


lid gasket with water before usage, and insert the lid on 

the jug.

Do  not  overflow  the  jug.  In  case  the  liquid  gets  under 


the motor housing, it can be vacuumed into the motor, 

causing its damage.

Do not fill the jug over 1500 ml mark – in such case, the 


content of the jug can lift the lid when the motor starts up

After 2 minutes operation stop the appliance for at least  


minute to let the motor cool down. You can repeat this 

cycle maximum10 times.

Do  not  operate  when  the  jug  is  empty,  as  it  can  get 


overheated.

Do not wash the cutting blades directly with hand.


Use  the  soft  brush  for  washing  metal  parts,  especially 


the sharp blades.

This  appliance  is  not  intended  for  use  by  persons 


(including  children)  with  reduced  physical,  sensory  or 

mental capabilities, or lack of experience and knowledge, 

unless they have been given supervision or instruction 

concerning use of the appliance by a person responsible 

for their safety.

Children should be supervised to ensure that they do not 


play with the appliance.

The temperature of mixed ingredients should not exceed 


60°C.

Make  sure  you  understand  well  above  mentioned 

instructions.

Technical specification

Technical parameters are indicated on the nameplate of the 

product.

Admissible time of uninterrupted operation: 2 minutes.

Time of interval before next operation: 10 minutes.

Maximum noise level: 80 dB/A.

The stand blender is built in 2nd isolation class. 

It does not require connection to the socket equipped with 

grounding pin.

The stand blender meets the requirements of standards in 

force.

The appliance meets the requirements of the directives:

Low Voltage Device (LVD) – 2006/95/EC.


Electromagnetic compatibility (EMC) – 2004/108/EC.


The product is marked with CE mark on the nameplate.

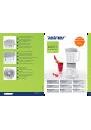
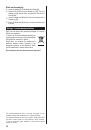
The outline of the appliance 

(Fig. A)

1

 Lid overlay

2

 Lid sieve

3

 Blender jug 

4

 Speed control knob

5

 Lid

6

 Blade unit

7

 Gasket

8

 Motor unit

9

 Anti-slip foot

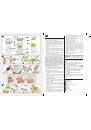
Handling and operation 

(Fig. B)

Preparation for operation

Before first operation of the stand blender (or operation after 

longer storage time), clean the blender jug 

(3)

, lid 

(5)

 and 

lid overlay 

(1)

 in warm water with dish washing liquid, rinse 

them well and dry. Keep your hands far from the blades – 

they are sharp.

Instructions for use

1

 Place  the  motor  unit 

(8)

  on  the  dry,  firm,  horizontal 

surface near the power supply outlet and out of the reach of 

children.

EN

1
2
3
4
5
6
7
8
9
10
11
12
13
14
15
16
17
18
19
20
21
22
23
24
25
26
27
28
29
30
Оглавление инструкции
  • Страница 1 из 31
    PL Pokrywka z praktycznym dozownikiem. CZ Víko s praktickým dávkovačem. SK Kryt s praktickým dávkovačom. HU Praktikus adagolóval ellátott fedő. RO Capac cu dozator practic. RU Крышка с удобным дозатором. BG Капак с практичен дозатор. UA Кришка з практичним дозатором. EN Lid including useful
  • Страница 2 из 31
    A 1 PL 5 Wskazówki dotyczące bezpieczeństwa 6 2 7 3 4 8 9 B 1 2 5 3 6 7 10 9 4 8 11 C 1 2 3 4 Przed rozpoczęciem użytkowania miksera kielichowego zapoznaj się z treścią całej instrukcji obsługi. ● Mikser kielichowy jest przeznaczony do użytku domowego. W przypadku wykorzystywania go do celów
  • Страница 3 из 31
    Obsługa i działanie (Rys. B) Przygotowanie urządzenia do pracy Przed użyciem miksera kielichowego po raz pierwszy (lub po jego przechowywaniu przez dłuższy okres czasu), wymyj dzbanek miksera (3), pokrywę (5) i nakładkę pokrywy (1) w ciepłej wodzie z dodatkiem płynu do mycia naczyń, dobrze
  • Страница 4 из 31
    ●● Do mycia zewnętrznej części zespołu silnika (8) nie używaj agresywnych detergentów w postaci emulsji, mleczka, past itp. Mogą one między innymi usunąć naniesione informacyjne symbole graficzne. ●● Nie czyść przezroczystego dzbanka miksera (3) szorstkimi gąbkami lub ścierkami. ●● Po umyciu
  • Страница 5 из 31
    CZ Pokyny týkající se bezpečnosti Před zahájením používání stolního mixéru se seznamte s obsahem pokynů k obsluze. ●● Stolní mixér je určený k domácímu používání. V případě jeho používání pro komerční gastronomické účely se mění záruční podmínky. ●● Zařízení připojujte pouze do zásuvky na střídavý
  • Страница 6 из 31
    2 Zapojte zástrčku přívodní šňůry do elektrické zásuvky. Před zapojením spotřebiče do napájení se přesvědčte, že je ovládání rychlosti (4) přepnuto do polohy 0. 3 Nasaďte nádobu mixéru (3) na blok motoru tak, aby se symbol na motoru (8) kryl se znaménkem ▼na nádobě. 4 Nádobu mixéru (3) zajistěte
  • Страница 7 из 31
    Ekologicky vhodná likvidace Obalový materiál jednoduše neodhoďte. Obaly a balicí prostředky elektrospotřebičů Twist jsou recyklovatelné, a zásadně by měly být vráceny k novému zhodnocení. Obal z kartonu lze odevzdat do sběren starého papíru. Pytlík z polyetylénu (PE, PE-HD, PE-LD) odevzdejte do
  • Страница 8 из 31
    SK Pokyny týkajúce sa bezpečnosti Pred rozpočatím používania stolového mixéra sa oboznámte s obsahom celého návodu na použitie. ●● Stolový mixér je určený na domáce použitie. V prípade využívania na gastronomické ciele, podmienky záruky sa menia. ●● Zariadenie pripájajte iba do striedavého prúdu
  • Страница 9 из 31
    2 Pripojte zástrčku napájacieho kábla do zásuvky elektrickej siete. Uistite sa, či pred pripojením zariadenia do napájania, regulátor rýchlostí (4) je nastavený na polohu 0. 3 Nasaďte nádobu mixéra (3) na blok motora, tak aby symbol na bloku motora (8) sa prekrýval s označením ▼na nádobe. 4 Nádobu
  • Страница 10 из 31
    Montáž rezacieho zariadenia ●● Založte tesnenie (7) na prírubu rezacích nástavcov (6). ●● Stiahnite kryt (5) z nádoby mixéra (3). Otočte nádobu mixéra (3) „hore nohami” a postavte ju na rovný, stabilný povrch. ●● Vložte rezacie nástavce (6) do otvoru, ktorý je umiestnený v spodnej časti nádoby
  • Страница 11 из 31
    HU Biztonsági utasítások A kelyhes mixer használata előtt alaposan olvassa el a használati utasítást. ●● A kelyhes mixer háztartásbeli használatra készült. A készülék vendéglátóiparban való használata esetén, a garancia feltételei változnak. ●● A készüléket csak a 220-240 V feszültségű váltóáramú
  • Страница 12 из 31
    A készülék kezelése és működése (B. ábra) A készülék üzembehelyezése előtti előkészületek A kelyhes mixer első használata előtt (vagy ha hosszabb ideig nem volt használva), mosogassa el a mixelő kelyhet (3), a fedelet (5) és a fedél kiegészítő tartozékát (1) mosogatószeres meleg vízben, majd azokat
  • Страница 13 из 31
    ●● A motort tartalmazó rész külső részének (7) tisztításá- hoz ne használjon agresszív detergenseket, mint emulzió, tisztítótej, kenőcs stb. Többek között leltüntethetik a tajékoztató írásjeleket. ●● A mixer átlátszó kancsóját (3) érdes szivacs vagy ruha használatával ne tisztítsa. ●● Mosás után
  • Страница 14 из 31
    RO Indicaţii privind siguranţa Înainte de a începe utilizarea blenderului stativ, luaţi la cunoştinţă, în întregime, conţinutul instrucţiunilor de utilizare. ●● Blenderul stativ este destinat numai utilizării casnice. În cazul utilizării sale în scopuri gastronomice, condiţiile garanţiei se
  • Страница 15 из 31
    Întreținere și funcționare (Fig. B) Pregătirea aparatului pentru utilizare Înainte de prima utilizare a blenderului stativ (sau după ce a fost strâns, neutilizat mult timp), spălaţi vasul blenderului (3), capacul (5) şi dopul capacului (1) cu apă caldă şi detergent pentru vase, clătiţi bine şi
  • Страница 16 из 31
    ●● Nu curăţaţi vasul transparent al blenderului (3) cu bureţi şi cârpe aspre. ●● După spălare, lăsaţi să se usuce bine toate elementele aparatului. Demontarea ansamblului de tăiere ●● Decuplaţi cablul de alimentare de la priza electrică. ●● Goliţi vasul blenderului (3) de conţinut. ●● Scoateţi
  • Страница 17 из 31
    RU Указания по технике безопасности Прежде чем пользоваться блендером, внимательно прочитайте настоящую инструкцию по эксплуатации. ●● Блендер предназначен исключительно для домашнего пользования. В случае использования блендера в профессиональном гастрономическом бизнесе условия гарантия
  • Страница 18 из 31
    Устройство блендера 1 2 3 4 5 6 7 8 9 (Рис. A) Защитная накладка Ситечко в крышке Кувшин блендера Переключатель скорости Крышка Ножевой блок Уплотнение Корпус привода Противоскользящие ножки Принцип действия и обслуживание (Рис. B) Подготовка блендера к работе Перед первым включением блендера (или
  • Страница 19 из 31
    ●● Для очистки кувшина блендера от присохших остатков продуктов воспользуйтесь мягкой нейлоновой щеткой. ●● Не мойте кувшин блендера (3), ножи (6), крышку (5) и защитную накладку (1) в посудомоечных машинах. Агрессивные моющие средства, которые используются для мытья в этих бытовых устройствах,
  • Страница 20 из 31
    BG Препоръки за безопасност Преди да започнете да използвате шейкър каната, запознайте се със съдържанието на цялата инструкция за употреба. ●● Шейкър каната е предназначена само за домашно използване. В случай че се използва в заведение за хранене, гаранционните условия се променят. ●● Включвайте
  • Страница 21 из 31
    Употреба и работа (Рис. B) Подготовка на уреда за работа Преди използване на шейкър каната за първи път (или след съхраняването й по-продължително време) измийте каната (3), капака (5) и капачето на капака (1) с топла вода с препарат за миене на съдове, изплакнете ги добре и ги подсушете. Пазете
  • Страница 22 из 31
    ●● За миене на външната част на модула на двигателя (8) не използвайте агресивни миещи препарати – емулсии, млека, пасти и др. Те могат да отстранят нанесените графични информационни символи. ●● Не почиствайте прозрачната кана на уреда (3) с абразивни гъби или кърпи. ●● След измиване внимателно
  • Страница 23 из 31
    UA Вказівки з безпеки ●● Перед початком користування міксером з чашею, ознайомтесь зі змістом інструкції з обслуговування. ●● Міксер з чашею призначений для домашнього використання. У разі його використання для цілей бізнесу загального харчування, умови гарантії змінюються. ●● Міксер підключайте
  • Страница 24 из 31
    Обслуговування та дія (Рис. B) Підготовлення міксера до праці Перед використанням міксера з чашею перший раз (або після його зберігання протягом довготривалого часу), вимийте дзбанок міксера (3), кришку (5) i накладку кришки (1) у теплій воді з доданням засобу для миття посуду, старанно
  • Страница 25 из 31
    емульсії, молочка, пасти та ін. Вони можуть між ін. усунути нанесені інформаційні графічні символи. ●● Не очищуйте прозору чашу міксера (3) шорсткими губками або ганчірками. ●● Після очищення, старанно осушіть усі елементи обладнання. Демонтаж ріжучого блоку ●● Відключіть вилку кабелю живлення від
  • Страница 26 из 31
    EN Important safety instructions ●● Read the whole instruction for use before you start using your stand blender. ●● The stand blender is intended for domestic usage only. In case it is used for gastronomic business purposes, warranty terms and conditions change. ●● Connect the appliance to 230-240
  • Страница 27 из 31
    Arrange the power supply cord, so that it is not hanging down the table or counter and it could not be pulled or fastened. 2 Connect the plug of the power supply cord to the power supply outlet. Make sure, that before connecting the appliance to the power supply, the speed control knob (4) is set
  • Страница 28 из 31
    Blade unit assembling ●● Insert the gasket (7) on the blade unit flange (6). ●● Remove the lid (5) from the blender jug (3). Turn the blender jug (3) „upside down” and place on the flat and firm surface. ●● Insert the blade unit (6) into the inlet on the bottom of the blender jug (3). ●● Block the
  • Страница 29 из 31
    Notes ........................................................................ ........................................................................ ........................................................................ ........................................................................
  • Страница 30 из 31
    Notes ........................................................................ ........................................................................ ........................................................................ ........................................................................
  • Страница 31 из 31