Инструкция для ZELMER ZME 8131SD, ZME 8121SE, ZME 8101SD

(скачивание инструкции бесплатно)
Формат файла: PDF
Доступность: Бесплатно как и все руководства на сайте. Без регистрации и SMS.
Дополнительно: Чтение инструкции онлайн
background image

20

ME-008_v01

  Danger! / Warning!

Health hazard

Incorrect connection of the power cord may cause the risk of electric shock.


Make  sure  the  appliance  has  been  unplugged  before  changing  the  lightbulb  to 


prevent the risk of electric shock.

Accessible parts may become hot. Do not let children near the oven.


This appliance is not intended for use by persons (including children) with reduced 


physical, sensory or mental capabilities, or lack of experience and knowledge, unless 

they have been given supervision or instruction concerning use of the appliance by 

a person responsible for their safety.

Children should be supervised to ensure that they do not play with the appliance.


If the non-detachable power cable has been damaged, to prevent hazard, it may 


only be replaced by the producer or in a specialist repair center or by a qualified 

technician.

Dear Customer!

Congratulations on your choice of our appliance, and welcome among the users of Zelmer 

products.

In order to achieve best possible results we recommend using exclusively original Zelmer 

accessories. They have been specially designed for this product.

Please read this user manual carefully. Pay special attention to any guidelines concerning 

safety,  in  order  to  minimize  any  danger  of  accidents  and/or  to  avoid  damaging  the 

appliance while operating it.

Please save this user manual for future reference.

This  user  manual  contains  information  on  safety,  operation,  installation,  problem-

solving,etc.

Table of Contents

Operational Safety Guidelines ..........................................................................................

20

Control Panel ....................................................................................................................

20

Technical Data ..................................................................................................................

21

Installation ........................................................................................................................

21

Connecting to a Power Source .........................................................................................

22

Air Holes ...........................................................................................................................

22

Operating the Oven ..........................................................................................................

22

Setting the Clock ..........................................................................................................

22

Setting Functions .........................................................................................................

22

Information Function ....................................................................................................

22

Children Safety Lock ....................................................................................................

22

Alarm Function .............................................................................................................

22

Starting/Pausing/Cancelling Functions  .......................................................................

23

Energy Saving Function ...............................................................................................

23

Specification.................................................................................................................

23

Cleaning and Maintenance ...............................................................................................

23

Outer Surface of the Door ............................................................................................

23

Catalyst Self-cleaning ..................................................................................................

23

Changing the Lightbulb inside the Oven ...........................................................................

23

Accessories ......................................................................................................................

23

Tables and Guidelines ......................................................................................................

24

Ecology – keeping it green ...............................................................................................

24

EN

Any repairs of the appliance may only be performed by qualified technicians.


An  improper  repair  may  be  hazardous  to  the  user.  In  case  of  any  faults,  visit 


a specialist service center.

Do not pull the cord to unplug the appliance.


Do not touch the oven with wet or moist hands or feet.


Any  installation,  maintenance  or  other  actions  involving  the  oven  may  only  be 


performed when the appliance is unplugged from the power source.

The appliance becomes hot when used. We recommend remaining careful not to 


touch hot elements inside the oven.

Please be extremely careful when opening the oven door to avoid scalding with hot 


steam coming from the inside.

If the power cord is damaged, it needs to be replaced immediately. When replacing 


the  power  cord,  please  follow  these  instructions:  Remove  the  power  cord,  and 

replace it with a H05VVV-F or H05V2V2-F cord.

The power cord has to withstand the required voltage needed to power the oven. 


The power cord may only be replaced by a qualified technician.

The earth conductor (green-and-yellow) has to be 10 mm longer than the power 


cord.

  Caution!

Not observance can result in damage to possessions

The  appliance  should  be  plugged  into  a  power  socket  with  alternating  current 


equipped with a safety pin, and voltage compatible with the one given on the rating 

plate of the appliance.

The  appliance  is  not  designed  to  work  with  external  time  switches  or  separate 


remote control systems.

Installation  and  repair  works  may  only  be  performed  by  a  qualified  technician 


following the guidelines of the producer.

The appliance is designed for domestic use only. It should be used only to prepare 


food, never to other purposes.

Do not use coarse cleaning agents or sharp metal objects to clean the glass door, as 


they may scratch the surface, and the glass may crack.

Do not use steam cleaners.


The oven may only be used for what it was intended; you may only use it to prepare 


food.  Any  other  use  of  the  oven,  e.g.  as  a  heating  appliance  is  incorrect,  and 

therefore considered hazardous. The producer cannot be held responsible for any 

damages caused by incorrect or unreasonable use of the oven.

We recommend not using any extension cords, adaptors or power strips.


The conductors of power cables must have a nominal cross-section not smaller than 


3 x 1.5 mm².

The disconnector should be installed on the non-detachable cables according to the 


regulations concerning cables.


  Suggestion

Information on the product and suggestions for its use

Store this user manual in a safe place for future reference.


After the installation of the appliance is done, its plug should be easily accessible.


During first use an acrid smoke may come out of the oven. It is a result of heating up 


the binder of insulating panels around the oven for the first time.

It is perfectly normal, and if smoke does appear, you need to wait until it goes away 


before putting food into the oven.

If you do not obey the above guidelines, the producer cannot guarantee safety use 


of the oven.

Make sure you read this instruction manual in whole, before you start operating the 


appliance.

Read this user manual carefully. It includes guidelines on how to safely install, 

use, and service the oven.

Wskazówki dotyczące bezpieczeństwa 

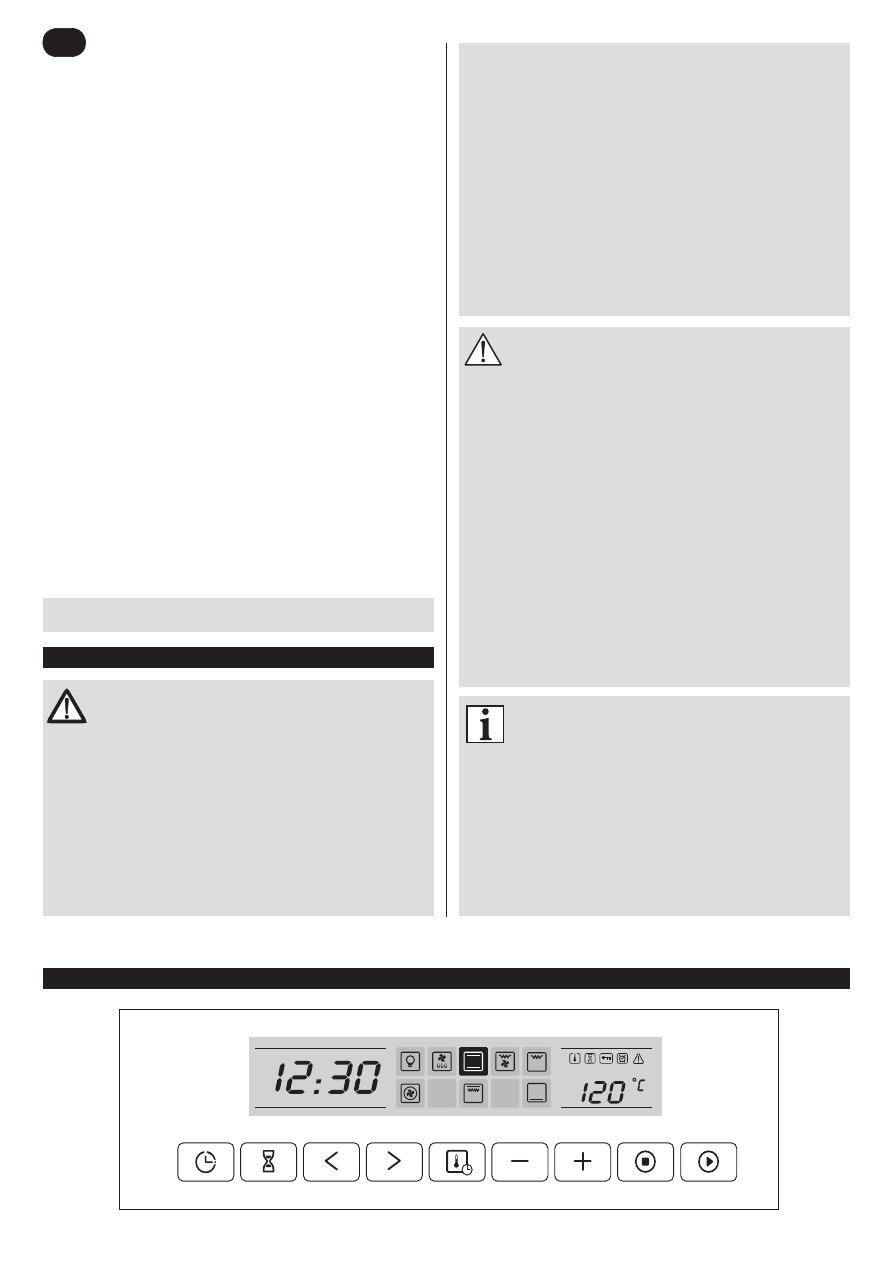
Control Panel

1
2
3
4
5
6
7
8
9
10
11
12
13
14
15
16
17
18
19
20
21
22
23
24
Оглавление инструкции
  • Страница 1 из 25
    Typ ZME8101SD Typ ZME8121SE Typ ZME8131SD PL INSTRUKCJA UŻYTKOWANIA Piekarnik elektryczny do zabudowy Typ ZME8101SD, ZME8121SE, ZME8131SD CZ NÁVOD K POUŽITÍ Vestavná elektrická trouba Typ ZME8101SD, ZME8121SE, ZME8131SD SK NÁVOD NA OBSLUHU Elektrická zabudovateľná rúra Typ ZME8101SD, ZME8121SE,
  • Страница 2 из 25
    PL Szanowny Kliencie! Gratulujemy wyboru naszego urządzenia i witamy wśród użytkowników produktów Zelmer. W celu uzyskania najlepszych rezultatów rekomendujemy używanie tylko oryginalnych akcesoriów firmy Zelmer. Zostały one zaprojektowane specjalnie dla tego produktu. Prosimy o uważne przeczytanie
  • Страница 3 из 25
    Lampka: Najlepszy model wyposażony jest w dodatkową lampkę, wiec możesz widzieć co dzieje się wewnątrz nie otwierając drzwiczek. Rozmrażanie: Powietrze w temperaturze pokojowej zostaje wprawione w ruch przez mocny nadmuch dzięki czemu krąży wokół potrawy. Jest to łagodny sposób skracania czasu
  • Страница 4 из 25
    Podłączenie do zasilania Obsługa piekarnika Przy piekarniku zainstaluj wyłącznik w miejscu łatwo dostępnym, odległość między stykami musi wynosić co najmniej 3 mm. Przed podłączeniem przewodu przyłączeniowego do sieci elektrycznej sprawdź czy sieć elektryczna ma wystarczającą moc w stosunku do
  • Страница 5 из 25
    Jeśli upłynie ustawiony czas, rozlegnie się alarm 10 razy, a następnie symbol zniknie z wyświetlacza. Możesz wykasować alarm podczas procesu ustawiania, naciskając przycisk stop. Jeśli natomiast alarm został już nastawiony, możesz go wykasować naciskając dwukrotnie przycisk „stop”.
  • Страница 6 из 25
    Tabele i wskazówki Potrawa Pozycja półki Ciastka Metoda gotowania Temp. [°C] Czas [min.] 3 160 20-30 Biszkopt 2 160 25-35 Szarlotka 2 190 50-70 Szarlotka 1+3 190 50-70 Ciastka 3 160 20-30 Ciastka 1+3 160 20-30 Zapiekanki* 4 240 1-3 Burgery** 4 240 10-20 7-17 * podgrzewanie 10 min. ** podgrzewanie 5
  • Страница 7 из 25
    Ekologia – zadbajmy o środowisko Każdy użytkownik może przyczynić się do ochrony środowiska. Nie jest to ani trudne, ani zbyt kosztowne. W tym celu: Opakowania kartonowe przekaż na makulaturę. Worki z polietylenu (PE) wrzuć do kontenera na plastik. Zużyte urządzenie oddaj do odpowiedniego punktu
  • Страница 8 из 25
    CZ Vážení zákazníci! Blahopřejeme Vám k nákupu našeho přístroje a vítáme Vás mezi uživateli výrobků Zelmer. Pro dosažení nejlepších výsledků Vám doporučujeme používat pouze originální příslušenství firmy Zelmer. Bylo vyvinuto speciálně pro tento výrobek. Prosíme o důkladné přečtění tohoto návodu k
  • Страница 9 из 25
    Osvětelní: Nejlepší model je vybaven dodatečným osvětlením, díky němuž můžete pozorovat, co se děje uvnitř, bez otvírání dvířek. Rozmrazování: Vzduch v pokojové teplotě je uveden do pohybu silným proudem, díky čemuž krouží kolem jídla. Je to jemný způsob zrychlení rozmrazování citlivých druhů jídla
  • Страница 10 из 25
    Připojení k napájení Použití trouby U trouby nainstalujte vypínač na snadno přístupném místě. Vzdálenost mezi styky musí činit min. 3 mm. Před připojením napájecího kabelu k elektrické síti zkontrolujte, zda elektrická síť má postačující výkon ve vztahu k maximálnímu výkonu trouby, uvedenému na
  • Страница 11 из 25
    Po uplynutí nastavené doby signál zazní desetkrát a potom symbol zmizí z displeje. Můžete zrušit signalizaci během procesu nastavení stisknutím tlačítka stop. Pokud signalizace již byla nastavena, můžete ji zrušit dvojitým stisknutím tlačítka „stop“. START/PAUZA/STORNO 1 Pokud byla nastavená doba
  • Страница 12 из 25
    Tabulky a pokyny Jídlo Poloha police Sušenky Metoda pečení Teplota [°C] Doba [min.] 3 160 20-30 Piškoty 2 160 25-35 Jablečný závin 2 190 50-70 Jablečný závin 1+3 190 50-70 Sušenky 3 160 20-30 Sušenky 1+3 160 20-30 Zapékaná jídla* 4 240 1-3 Burgry** 4 240 10-20 7-17 * ohřev 10 min. ** ohřev 5 min.,
  • Страница 13 из 25
    Ekologie – pečujme o životní prostředí Obalový materiál jednoduše neodhoďte. Obaly a balicí prostředky elektrospotřebičů Zelmer jsou recyklovatelné, a zásadně by měly být vráceny k novému zhodnocení. Obal z kartonu lze odevzdat do sběren starého papíru. Pytlík z polyetylénu (PE, PE-HD, PE-LD)
  • Страница 14 из 25
    SK Vážení Klienti! Blahoželáme Vám k výberu nášho zariadenia a vítame Vás medzi používateľmi výrobkov Zelmer. Ak chcete získať najlepšie výsledky, odporúčame Vám používať len originálne príslušenstvo firmy Zelmer. Príslušenstvo bolo navrhnuté špeciálne pre tento výrobok. Prosíme Vás, pozorne si
  • Страница 15 из 25
    Kontrolka: Najlepší model má kontrolku, môžete teda vidieť, čo sa deje vo vnútri rúry bez toho, aby ste otvárali dvierka. Rozmrazovanie: Začne fúkať vzduch s izbovou teplotou a krúžiť okolo jedla. Toto je mierny spôsob skrátenia času rozmrazovania jemných jedál ako napr. ryba alebo hydina.
  • Страница 16 из 25
    Pripojenie do elektrického prúdu Obsluha rúry Vypínač zainštalujte pri rúre na ľahko prístupným mieste. Vzdialenosť medzi kontaktmi musí byť aspoň 3 mm. Pred pripojením prípojného elektrického kábla do elektrickej siete preverte, či elektrická sieť má postačujúcu napätie v pomere k maximálnemu
  • Страница 17 из 25
    Ak prejde nastavený čas, budete alarm počuť 10 krát a následne sa symbol stratí z displeja. Alarm môžete zrušiť počas procesu nastavovania. Stlačte tlačidlo stop. Keď ste však už alarm nastavili, môžete ho tiež zrušiť. Stlačte dvakrát tlačidlo „stop”. ŠTART / PRESTÁVKA / ZRUŠENIE FUNKCIÍ 1 Ak ste
  • Страница 18 из 25
    Tabuľky a pokyny Jedlo Poloha poličky Zákusky Metóda varenia Teplota [°C] Čas [min.] 3 160 20-30 Piškóta 2 160 25-35 Jablkový koláč 2 190 50-70 Jablkový koláč 1+3 190 50-70 Zákusky 3 160 20-30 Zákusky 1+3 160 20-30 Zapekanky* 4 240 1-3 Burgery** 4 240 10-20 7-17 * ohrievanie 10 min. ** ohrievanie 5
  • Страница 19 из 25
    Ekológia – dbajme o životné prostredie Obalový materiál nevyhadzujte. Obaly a baliace prostriedky elektrospotrebičov ZELMER sú recyklovateľné a zásadne by mali byť vrátené na nové zhodnotenie. Kartónový obal odovzdajte do zberne starého papiera. Vrecká z polyetylénu (PE, PE-HD, PE-LD) odovzdajte do
  • Страница 20 из 25
    EN Dear Customer! Congratulations on your choice of our appliance, and welcome among the users of Zelmer products. In order to achieve best possible results we recommend using exclusively original Zelmer accessories. They have been specially designed for this product. Please read this user manual
  • Страница 21 из 25
    Lamp: The newest model is equipped with an additional lamp, so you can see what is happening inside the oven without opening the door. Defrosting: Room-temperature air is set in motion by a strong forced airflow, which makes it circulate around the food. It is a gentle way to reduce the time needed
  • Страница 22 из 25
    Connecting to a Power Source Operating the Oven Install an easily-accessible switch near the oven. The distance between the contacts should be no less than 3 mm. Before connecting the power cord into the power source, make sure the mains has enough power in comparison to the maximum power needed by
  • Страница 23 из 25
    STARTING/PAUSING/CANCELLING FUNCTIONS 1 If the cooking time has been set, press the been paused, press the button to start cooking. If cooking has 3 Hold the door at a 15-degree angle, grab it with both hand, and unhinge it by pulling towards you. button to continue. 2 Press the button during
  • Страница 24 из 25
    Tables and Guidelines Dish Shelf Level Cookies Cooking Mode Temp. [°C] Time [min.] 3 160 20-30 Sponge Cake 2 160 25-35 Apple Pie 2 190 50-70 Apple Pie 1+3 190 50-70 Cookies 3 160 20-30 Cookies 1+3 160 20-30 Casseroles* 4 240 1-3 Hamburgers** 4 240 10-20 7-17 * 10-minute heating-up ** 5-minute
  • Страница 25 из 25