22
ME-008_v01
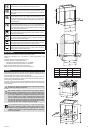
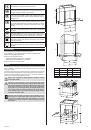
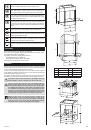
Connecting to a Power Source
Install an easily-accessible switch near the oven. The distance between the contacts
should be no less than 3 mm.
Before connecting the power cord into the power source, make sure the mains has enough
power in comparison to the maximum power needed by the oven, given on the rating plate
of the appliance.
Take into account the position of the power cord during the installation.
Avoid exposing the power cord at any point to temperatures over 50ºC.
The oven ful�lls all safety standards established by the authorities.
The oven is only safe to use, when it has been grounded according to
current legal regulations on cable safety. Make sure the oven is grounded
correctly. The producer cannot be held responsible for any damages or
injuries of people, animals or property caused by incorrect grounding of
the oven.
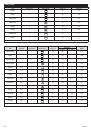
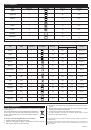
The voltage and frequency are determined on the rating plate. The wiring
system has to withstand the maximum electric power required for the
oven. It is determined on the rating plate.
If in any doubt, call in a quali�ed technician.
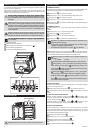
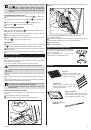
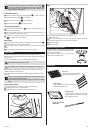
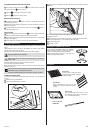
In order to connect the cord:
1
Unscrew the casing of the terminal board.
2
Remove the screws holding the cord, and three contact screws L-N-
3
Place the wires underneath the screw heads.
4
After securing the cable, screw the casing.
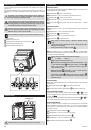
Operating the Oven
SETTING THE CLOCK
When the oven is connected to a power source, firstly “
00:00
” displays, and you hear
a single sound signal, after which the appliance goes into stand-by mode.
1
Press the
button to make the hour digits light up.
2
Press the „
–
”
or „
+
” button to set a desired hour between 0 and 23.
3
Press the
button to make the minute digits light up.
4
Press the „
–
”
or „
+
”
button to set a desired minute between 0 and 59.
5
Press the
button to finish setting the clock. The “
:
” between the digits starts
flashing and the time is displayed.
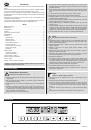
SETTING FUNCTIONS
1
Press the „
<
” or „
>
” button to select a given function. The given indicator will light up.
2
Press the „
–
” or „
+
” button to set the cooking time.
3
Press the
button to set the temperature.
4
Press the „
–
” or „
+
” button to set the cooking mode.
5
Press the
button to start cooking.
A flashing temperature value indicates that the oven is heating to the
desired temperature.
When the oven reaches the desired temperature, it will stop flashing and
you will hear a single beep.
When the oven is hot, the
symbol will light up on the display.
6
If you wish to skip steps 2 to 4, press
in order to confirm immediate start of
baking. The time will be set automatically for 9 hours, whereas the automatic temperature
setting will be displayed on the LED display.
1
Threshold values for setting time with panel buttons:
0 � 9 hours : 1 minute
2
The threshold value of setting temperature is 5 degrees Celsius.
3
Press “–” or “+” in order to set the baking time whilst baking. Then
press
to begin baking. If nothing is pressed
within 3 seconds,
the oven will return to the previous time and will continue baking.
4
Press the
button and then click “�” or “+” to adjust the temperature
whilst baking. The corresponding indicator will light up.
Then press
to begin baking. If nothing is pressed
within
3 seconds, the oven will return to the previous temperature and will
continue baking.
INFORMATION FUNCTION
You may use the information function during cooking. After 3 seconds the appliance comes
back to its regular work mode.
1
During cooking mode press the
button to display current timer.
2
If the clock has been set, press the
button to see what time it is.
CHILDREN SAFETY LOCK
Activating the lock: In stand-by mode press the
and the
button simultaneously
for 3 seconds. You will hear a sound signal and see the
indicator light up confirming
the children safety lock has been activated.
Deactivating the lock: In locked mode press the
and the
button simultaneously
for 3 seconds. You will hear a sound signal confirming the children safety lock has been
deactivated.
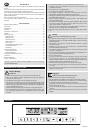
ALARM FUNCTION
The oven has a 9-hour alarm function. The function reminds you to start cooking. The
alarm timer may be set between 1 minute and 9 hours. The alarm may only be set in
stand-by mode. In order to set the alarm, follow these steps:
1
Press the alarm set button
.
2
Press the “
–
” or “
+
” buttons to set the hour of the alarm
3
Press the alarm set button
again.
4
Press the “
–
” or “
+
” buttons to set the minute of the alarm.
5
In order to start the countdown, press the
button.
If the set time passes, a sound signal is heard 10 times, and the
indicator disappears from the LED. You can cancel the alarm during
programming by pressing the stop button. If the alarm has already been
set, you can cancel it by pressing the stop button twice.
Air Holes
The fan works up to 15 minutes after the oven stops working.
Air holes