5
iNUKE NU6000DSP/NU3000DSP/NU1000DSP User Manual
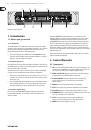
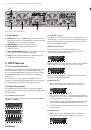
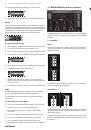
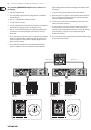
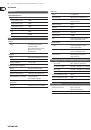
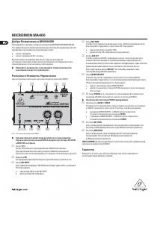
2.2 Rear panel
(10)
BREAKER
(automated fuse, NU6000DSP only). After eliminating the cause of
faulty operation, simply depress the BREAKER and power up the unit again.
The BREAKER acts in place of common discardable fuses.
(11)
POWER SOURCE
jack accepts the included IEC power cable.
(12)
VENTILATION FAN
speed adjusts automatically to ensure
trouble-free operation.
(13)
TWIST- LOCKING SPEAKER OUTPUTS
connect the amplifier to the speakers
using professional speaker cables with twist-locking plugs.
(14)
INPUTS
route line-level input signals into these combination jacks using
XLR, balanced ¼" TRS, or unbalanced ¼" TS connectors.
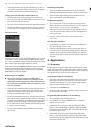
3. DSP Processor
3.1 Processor Functionality
The iNUKE DSP processor manipulates your signal in the digital domain, offering
tremendous flexibility and control. You may control and program the DSP
processor via either the iNUKE amplifier’s front panel or remotely by computer
using the BEHRINGER Amp Remote software (available for download from
behringer.com).
By using the DSP processor, you can program all amplifier functions and
parameters—except for the CH A and CH B input gain settings, which can only
be controlled using the CH A / CH B knobs on the amplifier’s front panel.
3.2 Front Panel control
The following material describes the DSP's screen organization and how to
program the processor's various functions by manipulating your iNUKE amplifier's
front panel controls.
3.2.1 Main top-level screen
The top-level screen displays “iNUKE,” as well as the model name: NU1000DSP,
NU3000DSP, or NU6000DSP.
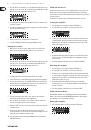
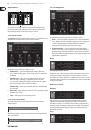
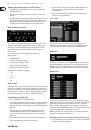
3.2.2 SETUP screens
The SETUP screens access the preset, panel lock, device naming, and LCD screen
contrast functions. To access these functions, press the SETUP button, and then
move up and down through the top-level screens by pressing either the SETUP
button or the UP / DOWN arrow buttons.
SETUP 1/4: Load Preset
The top-level Load Preset screen displays the current Preset name
(up to 10 characters) and Preset number (1–20). Subsidiary screens offer
options for loading, saving, and naming Presets.
Below the Preset name, this screen displays the “Load Preset” option by default.
Rotate the SELECT encoder clockwise to access the “Save Preset” option.
Note:
Preset #1:INIT_DATA cannot be overwritten. Select this preset any time
you want to restore the amp's default settings.
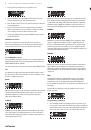
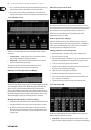
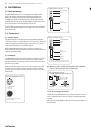
Loading a Preset
1. Make sure the “Load Preset” option appears on the screen. (Rotate the
SELECT encoder to toggle between “Load Preset” and “Save Preset.”)
2. Press the SELECT encoder knob to access the DSP’s internal Preset list on the
next sub-screen. The correct sub-screen will display the LOAD PRESET option
in the upper right-hand corner of the screen.
3. Scroll up and down through the Preset list by rotating the SELECT encoder knob.
As you scroll, the Preset number will appear to the left below the disk icon.
4. To load the selected Preset, you may either press the SELECT encoder or press
the UP arrow button.
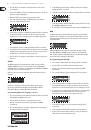
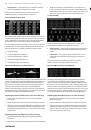
Saving a preset
1. Make sure the “Save Preset” option appears on the screen. (Rotate the
SELECT encoder to toggle between “Load Preset” and “Save Preset.”)
(10)
(12)
(13)
(14)
(11)
Rear panel control elements (NU6000DSP shown)