Доступность: Бесплатно как и все руководства на сайте. Без регистрации и SMS.
Дополнительно: Чтение инструкции онлайн
19
20
22
21
23
Страница: (26 из 28)
навигация
1
2
3
4
5
6
7
8
9
10
11
12
13
14
15
16
17
18
19
20
21
22
23
24
25
26
27
28
Оглавление инструкции
Страница 1 из 29 INSTRUCTIONS FOR INSTALLATION AND USE MONTAGE- UND GEBRAUCHSANWEISUNG INSTRUCTIONS POUR L'INSTALLATION ET L’UTILISATION ISTRUZIONI PER L'INSTALLAZIONE E L’USO INSTRUCCIONES PARA INSTALACIÓN Y USO INSTRUÇÕES DE INSTALAÇÃO Y UTILIZAÇÃO AANWIJZING VOOR GEBRUIK EN INSTALLATIE
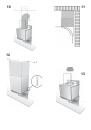
Страница 2 из 29 ENGLISH DESCRIPTION The hood may be in the filtering or the ducting version. Filtering version (Fig. 1): The hood aspirates the kitchen air saturated with fumes and odours, purifies it through the grease filters and charcoal filter and returns clean air into the room. For constant efficiency, the
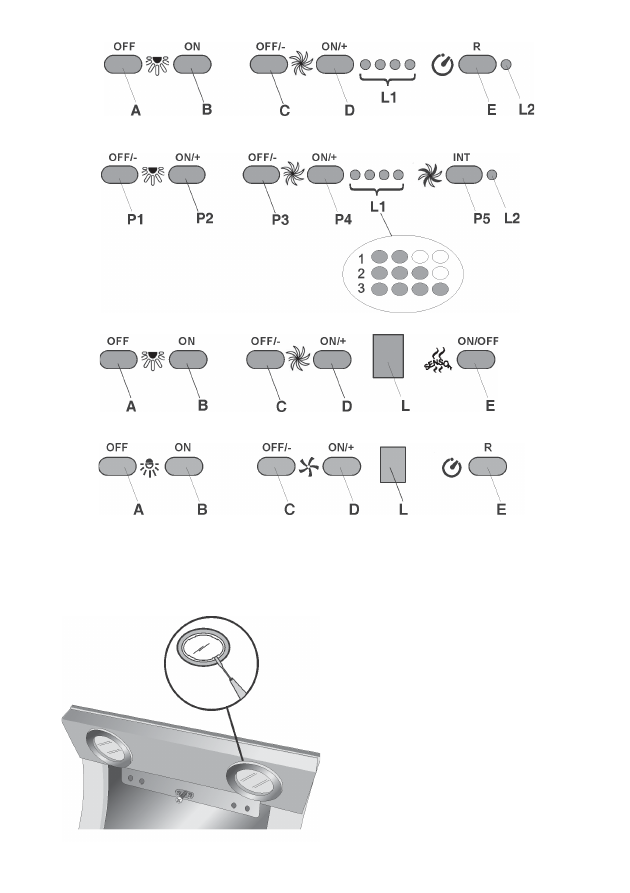
Страница 3 из 29 OPERATION Depending on the model, the unit is equipped with the following controls: CONTROLS shown in Fig.19: A) Turns the LIGHTS off B) Turns the LIGHTS on. C) Decreases speed down to minimum speed. If pressed for 2" the motor is turned off. D) Activates the motor (calling the last speed used) and
Страница 4 из 29 on the display. By means of the buttons C(-) and D(+) the desired sensitivity is set Store the “new” sensitivity by pressing the key E. ATTENTION: TO PREVENT DAMAGING THE SENSOR, DO NOT USE SILICONE PRODUCTS NEAR THE HOOD! CONTROLS of Fig. 22: Key A : Turns the LIGHTS off Key B : Turns the LIGHTS
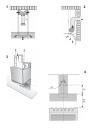
Страница 5 из 29 150 mm). Für die Luftabführung nach außen alle weiteren Angaben im Blatt “Hinweise” befolgen. Die Stromzufuhr innerhalb des vom dekorativen Rohr benötigten Raums vorbereiten (für den elektrischen Anschluss alle weiteren im Blatt “Hinweise” aufgeführten Angaben befolgen). 1. Die Platte der
Страница 6 из 29 FILTERALARM: Nach einer Betriebszeit von 30h leuchtet LED L2 stets ROT, um anzuzeigen, dass die Fettfilter gereinigt werden müssen. Nach einer Betriebszeit von 120h blinkt LED L2 ROT, um anzuzeigen, dass die Fettfilter gereinigt und die Kohlenfilter ausgetauscht werden müssen. Nach der Reinigung
Страница 7 из 29 wird der Motor gestoppt, die Geschwindigkeit bleibt jedoch gespeichert. Taste D : Motor betätigen (durch Aufrufen der zuletzt eingestellten Geschwindigkeit) und Geschwindigkeit bis zum Erreichen der Höchststufe hochfahren. L Display: - zeigt die aktuelle Geschwindigkeit an. - gibt Hinweis auf
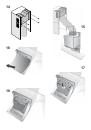
Страница 8 из 29 1. Monter la plaque de l’installation électrique (selon les modèles) en la fixant avec 2 vis et 2 rondelles métalliques (Fig. 4). 2. Fixation au mur: Tracez une ligne sur le mur, à la verticale de votre plan de cuisson. Tracez sur le mur les 2 premiers trous que vous devrez percer, en respectant
Страница 9 из 29 COMMANDES de la Fig.20: P1) OFF/- Eclairages: Diminue l’intensité lumineuse pour arriver à l’intensité minimum. Si pressé pendant 2" les lumières s’éteignent. P2) ON/+ Eclairages: Allume les éclairages en rappelant le dernier niveau de luminosité programmé (avant le dernier arrêt). Augmente
Страница 10 из 29 Touche E : active la MINUTERIE (lorsque le moteur fonctionne) et la hotte s’arrête automatiquement après 5'. En outre remet à zéro le comptage des heures lorsque l’alarme des filtres est activée (avec le moteur arrêté). ALARME FILTRES : elle est signalée avec le Moteur Arrêté : Après 30h de
Страница 11 из 29 secondo le esigenze di allineamento ai pensili. Se avete l'esigenza di regolare la cappa anche in altezza, operare sulle apposite viti (B) di regolazione (in dotazione). A regolazione avvenuta, senza togliere la cappa, segnare sul muro gli altri 4 fori da fare (C); sganciare la cappa ed effettuare
Страница 12 из 29 Incrementa la velocità del motore fino ad arrivare alla massima velocità (NON INTENSIVE). Se premuto per 2" si attiva il TIMER di 5 minuti (evidenziato con il lampeggio dei led relativi alla velocità in esecuzione). Se premuto per 2" quando il Timer è attivo, questo viene ELIMINATO. P5) INT:
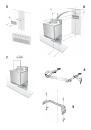
Страница 13 из 29 il fitro antigrasso spingendo il fermo e ruotandolo verso l’esterno (Fig. 17). Filtro carbone: nel caso d'uso dell'apparecchio in versione filtrante, sarà necessario sostituire il filtro al carbone periodicamente, quando compare l’allarme filtri carbone. Per istruzioni sull’Allarme filtri, fare
Страница 14 из 29 inferior se encastren bien (Fig. 12); levantar el tubo superior hasta el techo y asegurarlo con 2 tornillos (H) - Fig.12. INSTALACION DE LA VERSION FILTRANTE: Preparar los cables de alimentación eléctrica dentro de las dimensiones del tubo decorativo (para la conexión eléctrica, seguir las
Страница 15 из 29 En cuanto los filtros antigrasa estén limpios (o sustituidos los filtros de carbón), presione la tecla P3 durante la visualización de la alarma de filtros, para que se reanude el conteo de las horas (RESET). MANDOS de la Fig.21: A) apaga las luces. B) enciende las luces. C) Disminuye la velocidad
Страница 16 из 29 algunos segundos. ADVERTENCIA En caso de fuertes concentraciones de vapores, podría producirse la formación de condensado en la parte inferior de la campana; esto no indica defecto alguno ni altera el funcionamiento normal de la campana. PORTUGUÊS DESCRIÇÃO O aparelho pode ser instalado na versão
Страница 17 из 29 - Montar a redução por cima do exaustor, na posição correspondente ao ponto de saída de ar (Fig.13). - Agarrar no deflector de ar e fixar nele um tubo flexível (com 125 mm de diâmetro), imobilizando-o com uma braçadeira metálica (o tubo e as braçadeiras não são fornecidos com o exaustor); fixar o
Страница 18 из 29 E) Activa/desactiva o Sensor( modo de funcionamento AUTOMÁTICO ou MANUAL). No modo Automático o sensor está activo e no Display (L) aparece a letra “A”. L) Display: - indica a velocidade em execução - indica o modo Automático através da visualização da letra “A”. Ao mudar a velocidade do motor, a
Страница 19 из 29 NEDERLANDS BESCHRIJVING De wasemkap kan worden gebruikt in de filter- of afzuigversie. Filterversie (Afb. 1): de afzuigkap zuigt de met verbrandingsgassen en onaangename luchtjes doordrongen kooklucht af en zuivert de lucht via de vetfilters en het koolstoffilter waarna de schone lucht weer in de
Страница 20 из 29 schroeven. - Verbind de slang met de reductie op de luchtuitgangsopening (Afb.15). - Breng de elektrische aansluiting van de afzuigkap tot stand met de voedingskabel. - Monteer de telescopische buizen door ze op de kap te laten rusten. Let erop dat de vleugels van de onderste buis goed passen (Afb.
Страница 21 из 29 actief en verschijnt op de Display (L) de letter “A”. L) Display: - geeft de huidige snelheid weer - geeft de Automatische bediening weer aan de hand van de letter “A”. Indien de snelheid van de motor wordt gewijzigd, wordt de huidige snelheid 3-maal knipperend weergegeven, waarna opnieuw de letter