on the display. By means of the buttons C(-) and D(+) the desired sensitivity is set Store the “new” sensitivity by pressing
the key E.
ATTENTION: TO PREVENT DAMAGING THE SENSOR, DO NOT USE SILICONE PRODUCTS NEAR THE HOOD!
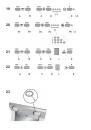
CONTROLS of Fig. 22:
Key A : Turns the LIGHTS off
Key B : Turns the LIGHTS on.
Key C : reduces the motor speed until reaching minimum. If pressed for about 2", it stops the motor and storse the
speed.
Key D : drives the motor (calling the last speed used) and increases the speed until reaching maximum.
L Display:
- signals the running speed.
- signals the filter alarm (with motor off) by displaying the central segment for 30".
- signals Timer activation with a flashing number.
Key E : activates the TIMER (when the motor is running), so that the hood stops automatically after 5'. Also Zero-
sets hour metering when the Filter Alarm is active (motor OFF).
FILTER ALARM: Displayed for 30" when the motor is off:
After 30h of operation, the central segment lights up on the display; It indicates that the grease filters need to be cleaned.
After 120h of operation, the central segment flashes on the display; It indicates that the grease filters need to be cleaned
and the charcoal filters replaced.
After cleaning the grease filters (and/or replacing the charcoal filters), restart the hour counter (RESET) by pressing
the key E during display of the filter alarm.
Grease filters: special attention must be given to the grease filters which must be periodically cleaned, whenever
the grease filter alarm trips. For instructions of the filter Alarm, refer to the Controls paragraph. Wash the filters with neutral
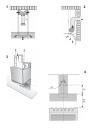
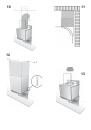
detergent. Disassembly of the grease filter: open the crystal element by turning it towards the outside (Fig.16); remove
the grease filter by pressing the retainer and turning the filter towards the outside (Fig. 17).
Charcoal filter: if the filtering version appliance is used, the charcoal filter will have to be periodically replaced when
the charcoal filter alarm trips. For instructions on the filter Alarm, refer to the Controls paragraph.
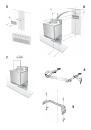
Disassembly of the charcoal filter: open the crystal element by turning it towards the outside (Fig.16); remove the grease
filter by pressing the retainer and turning the filter towards the outside (Fig. 17). Remove the charcoal filter by pressing
it downwards and turning it towards the outside (Fig. 18).
Lighting: to change the halogen bulbs open the cover levering from the proper slots (Fig. 23). Replace with bulbs
of the same type. CAUTION: Do not handle glass bulb with bare hands. If, after replacing the halogen lights, these
fail to work, allow the appliance to cool and then interrupt power for a few seconds.
IMPORTANT
In the event of strong vapour concentrations, condensation could form in the lower part of the hood; this is not a defect,
nor does it affect normal operation of the hood.
DEUTSCH
BESCHREIBUNG
Die Haube steht in Umluftversion und in Abluftversion zur Verfügung.
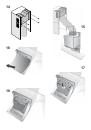
Umluftversion (Abb. 1): Die Haube saugt die mit Rauch und Gerüchen gesättigte Luft an und reinigt sie durch die
Fett- und die Kohlefilter. Danach wird die saubere Luft wieder in den Raum geleitet. Um die gleichmäßige Wirksamkeit der
Kohlefilter zu erhalten, müssen sie regelmäßig ausgetauscht werden. Die Kohlefilter werden nicht mitgeliefert.
Abluftversion (Abb. 2): Die Haube saugt die mit Rauch und Gerüchen gesättigte Luft an, leitet sie durch die Fettfilter
und gibt sie über ein Abführungsrohr nach außen ab. Diese Version benötigt keinen Kohlefilter.
Entscheiden Sie sich von Anfang an für einen Installationstyp (Umluft oder Abluft). Um eine größere Wirkung zu erzielen,
empfehlen wir die Installation einer Haube in Abluftversion (falls möglich).
MONTAGE DES GERÄTS
ACHTUNG: Für die Montage sind wenigstens 2 Personen erforderlich. Es wird empfohlen, die Montage von Fachkräften
durchführen zu lassen.
INSTALLATION DER ABLUFTVERSION: Vor der Befestigung muss das Rohr zur Abführung der Luft außen angebracht
werden. Ein Abführungsrohr verwenden, das folgende Eigenschaften besitzt: - erforderliche Mindestlänge; - so wenig
Kurven wie möglich (maximale Kurvenkrümmung: 90°); - zulässiges Material (Landesnormen); - Innenseite so glatt wie
möglich. Es wird außerdem empfohlen, starke Wechsel des Rohrdurchmessers zu vermeiden (empfohlener Durchmesser: