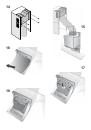
OPERATION
Depending on the model, the unit is equipped with the following controls:
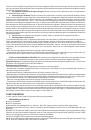
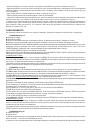
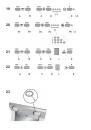
CONTROLS shown in Fig.19:
A) Turns the LIGHTS off
B) Turns the LIGHTS on.
C) Decreases speed down to minimum speed. If pressed for 2" the motor is turned off.
D) Activates the motor (calling the last speed used) and increases the speed until reaching maximum..
E) FILTER ALARM/TIMER RESET: when pressing the key during display of the filter alarm (motor off) it resets the
hour counter. When pressing the key when the motor is running, the TIMER is activated and the hood will automatically
be switched off after 5 minutes.
L1) The 4 green LEDs indicate the running speed.
L2) When the LED is red (motor off) it indicates the FILTER ALARM. When the LED is green (flashing) it indicates
that the TIMER has been activated with the key E.
FILTER ALARM:
After 30h of operation, the LED L2 turns RED. It indicates that the grease filters need to be cleaned.
After 120h of operation, the LED L2 turns RED and flashes; It indicates that the grease filters need to be cleaned and
the charcoal filters replaced.
After cleaning the grease filters (and/or replacing the charcoal filters), restart the hour counter (RESET) by pressing
the key E during display of the filter alarm.
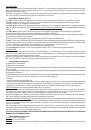
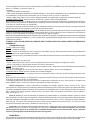
CONTROLS shown in Fig.20:
P1) OFF/- Lights: Decreases light intensity down to minimum intensity. If pressed for 2 seconds, the lights are switched
off.
P2) ON/+ Lights: Switches on the lights using the last brightness level set (prior to the last time the lights were switched
off).Increases light intensity up to maximum intensity.
P3) OFF/- Engine: Decreases speed down to minimum speed. If pressed for 2 seconds, the engine is switched off.
If pressed for 2 seconds when FILTER ALARM is active, HOUR metering is reset.
P4) ON/+ Engine: Switches on the engine using the speed set (prior to the last time the engine was switched
off).Increases the speed of the engine up to maximum speed (NON INTENSIVE). If pressed for 2 seconds, the 5-minute
Timer is activated and HIGHLIGHTED by flashing speed indication LEDs. If pressed for 2 seconds when the Timer
is active, it is ELIMINATED.
P5) INT: Only functions with ENGINE ON. If pressed once, it activates the FIRST intensive speed; if pressed for a
second times, the SECOND intensive is activated; if pressed for a THIRD time, the speed set prior to the intensive
(that is one of the first 4) is set again.
L1) The 4 green LEDs indicate the running speed.
L2) 2-colour LED: GREEN indicates the First Intensive Speed RED indicates the Second Intensive Speed.
FILTER ALARM:
After 30h of operation, the first 2 leds (L1) flash; it indicates that the grease filters need to be cleaned.
After 120h of operation, - the last 2 leds (L1) flash; It indicates that the grease filters need to be cleaned and the charcoal
filters replaced. After cleaning the grease filters (and/or replacing the charcoal filters), restart the hour counter
(RESET) by pressing the key P3 during display of the filter alarm.
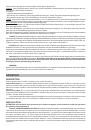
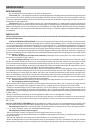
CONTROLS of Fig.21:
A) Turns the lights off.
B) Turns the lights on.
C) Reduces the motor speed until reaching zero. If pressed for 2" when the Filter Alarm is active, the HOUR counter
is reset.
D) Drives the motor (calling the last speed used) and increases the speed until reaching maximum.
E) Activates/deactivates the sensor (AUTOMATIC or MANUAL mode). In Automatic mode the sensor is active and
the letter “A” appears on the display (L).
L) Display:
- signals the running speed
- signals Automatic mode by displaying the letter “A”. When the motor speed is changed, the running speed is displayed
flashing 3 times, and then the letter “A” reappears.
- signals the filter alarm (with motor off) by displaying the central segment for 30".
FILTER ALARM: Displayed for 30" when the motor is off:
After 30h of operation the central segment lights up on the display; It indicates that the grease filters need to be cleaned.
After 120h of operation, the central segment flashes on the display; It indicates that the grease filters need to be cleaned
and the charcoal filters replaced. After cleaning the grease filters (and/or replacing the charcoal filters), restart the hour
counter (RESET) by pressing the key C during display of the filter alarm.
GAS SENSOR SENSITIVITY: The sensitivity of the sensor can be modified to suit your requirements. To modify the
sensitivity, the appliance must be in manual mode (i.e. the running speed and not the letter “A” must appear on the display);
If not, press the key E. Modify the sensitivity by simultaneously pressing the keys D and E. The set sensitivity is indicated