Faxing | 45
6. Enter a speed dial number and press OK.
7. Press OK when speed dial information appears correctly.
8. Press OK when Yes appears.
9. Repeat steps 5 and 6 to include other speed dial numbers into the
group.
10. When you have finished, press the left/right arrow to select No at the
Another No.? prompt and press OK.
11. Press Stop/Clear to return to ready mode.
Editing a group dial number
You can delete a specific entry from a group or add a new number to the
selected group.
1. Press Address Book until New & Edit appears on the bottom line of
the display and press OK.
2. Press the left/right arrow until Group Dial appears and press OK.
3. Enter the group dial number you want to edit and press OK.
4. Enter the name you want to edit and press OK.
5. Enter the speed dial number you want to add or delete and press
OK.
If you entered a new speed dial number, Add? appears.
If you enter a speed dial number stored in the group, Delete?
appears.
6. Press OK to add or delete the number.
7. Press OK when Yes appears to add or delete more numbers and
repeat steps 4 and 5.
8. When you have finished, press the left/right arrow to select No at the
Another No.? prompt and press OK.
9. Press Stop/Clear to return to ready mode.
Using group dial numbers
To use a group dial entry, you need to search for and select it from
memory.
When you are prompted to enter a fax number while sending a fax,
press Address Book. See below.
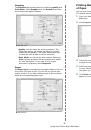
Searching Address Book for an entry
There are two ways to search for a number in memory. You can either
scan from A to Z sequentially, or you can search by entering the first
letters of the name associated with the number.
Searching sequentially through the memory
1. If necessary, press Fax.
2. Press Address Book until Search & Dial appears on the bottom line
of the display and press OK.
3. Press the left/right arrow until the number category you want
appears and press OK.
4. Press OK when All appears.
5. Press the left/right arrow until the name and number you want
appears. You can search upwards or downwards through the entire
memory in alphabetical order.
Searching with a particular first letter
1. If necessary, press Fax.
2. Press Address Book until Search & Dial appears on the bottom line
of the display and press OK.
3. Press the left/right arrow until the number category you want
appears and press OK.
4. Press the left/right arrow until ID appears and press OK.
5. Enter the first few letters of the name you want and press OK.
6. Press the left/right arrow until the name you want appears and press
OK.
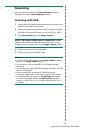
Deleting a Address Book entry
You can delete entries in Address Book one by one.
1. Press Address Book until Delete appears on the bottom line of the
display and press OK.
2. Press the left/right arrow until the number category you want
appears and press OK.
3. Press the left/right arrow until the searching method you want
appears and press OK.
Select Search All to search for an entry by scanning through all
entries in Address Book.
Select Search ID to search for an entry by the first few letters of the
name.
4. Press the left/right arrow until the name you want appears and press
OK.
Or, enter the first letters and press OK. Press the left/right arrow until
the name you want appears and press OK.
5. Press OK.
6. Press OK when Yes appears to confirm the deletion.
7. Press Stop/Clear to return to ready mode.
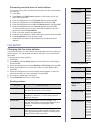
Printing Address Book
1. You can check your Address Book settings by printing a list.
1. Press Address Book until Print appears on the bottom line of the
display.
2. Press OK. A list showing your speed button settings, and speed dial
and group dial entries prints out.
 1
1
 2
2
 3
3
 4
4
 5
5
 6
6
 7
7
 8
8
 9
9
 10
10
 11
11
 12
12
 13
13
 14
14
 15
15
 16
16
 17
17
 18
18
 19
19
 20
20
 21
21
 22
22
 23
23
 24
24
 25
25
 26
26
 27
27
 28
28
 29
29
 30
30
 31
31
 32
32
 33
33
 34
34
 35
35
 36
36
 37
37
 38
38
 39
39
 40
40
 41
41
 42
42
 43
43
 44
44
 45
45
 46
46
 47
47
 48
48
 49
49
 50
50
 51
51
 52
52
 53
53
 54
54
 55
55
 56
56
 57
57
 58
58
 59
59
 60
60
 61
61
 62
62
 63
63
 64
64
 65
65
 66
66
 67
67
 68
68
 69
69
 70
70
 71
71
 72
72
 73
73
 74
74
 75
75
 76
76
 77
77
 78
78
 79
79
 80
80
 81
81
 82
82
 83
83
 84
84
 85
85
 86
86
 87
87
 88
88
 89
89
 90
90
 91
91
 92
92
 93
93
 94
94
 95
95
 96
96
 97
97
 98
98
 99
99
 100
100
 101
101
 102
102
 103
103
 104
104
 105
105
 106
106
 107
107
 108
108
 109
109
 110
110
 111
111
 112
112
 113
113
 114
114
 115
115
 116
116
Инструкции и руководства похожие на DELL 1235cn