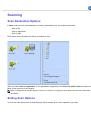
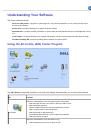
The
AIO Center
opens.
5. When the printer is in
Scan
mode, click the
Scan
to application
icon.
6. Select the ScanSoft OmniPage SE application to activate optical character recognition.
7. Click the
Proceed
button.
The scan parameters that can be customised are displayed on the computer screen.
8. Select the settings you require and click
Scan
. For more information on scan settings, see "
9. The printer performs the scan. On completion, the ScanSoft OmniPage SE program is activated and displays the scanned
image.
10. Follow the instructions displayed on the screen by the
ScanSoft OmniPage SE
program to execute optical character
recognition.
11. At the end, save the processing results in a format which is compatible with the screen writing program you intend using.
Before Installing the Software
Before installing the software:
For USB installations, ensure that your printer is
NOT
connected to the computer. You should connect the printer to the
computer using the USB cable
ONLY
when the software instructs you to do so.
NOTICE: If you attempt to install the CD software with the printer connected to the computer via USB cable,
Windows displays the message "Found New Hardware Wizard", followed by another message telling you to
disconnect your printer and cancel the Hardware Wizard. Power off the printer, unplug the USB cable from the
computer and then restart the installation procedure.
Ensure that your computer is running:
-
Windows 2000 with Service Pack 4, 32-bit Windows XP with Service Pack 2, 64-bit Windows XP with Service Pack 1
(minimum memory requirement: 256MB, 5121MB suggested)
-
32-bit Windows Vista™ and 64-bit Windows Vista™ (minimum memory requirement: 512MB, 1GB suggested).
If you press the
Cancel
button during software installation, the process stops and the installation is cancelled. A message
is displayed indicating the current status and informing you what to do next.
Any software updates to the printer drivers can also be successively installed. In this case you will be guided by the
InstallShield Wizard
to update the software currently installed on the computer.
Installing the Software and Connecting the Printer to Your
Computer Using a USB Cable
1. With the computer powered on and the printer
NOT
connected using a USB cable (not included), insert the
Drivers and
Utilities
CD into the computer drive with its printed label facing upwards. The Installation program's start-up screen is
displayed.
NOTICE: If the start-up screen is NOT displayed, the auto-run feature is disabled on your computer. Remove and
re-insert the CD, select Startg Rung Browse, find the CD identifier and click Open. Select Setup and click
Open; the setup.exe file is displayed in the dialogue box. Click OK.
2. Follow the instructions on the screen.
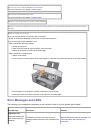
3. When instructed by the software, switch on your printer and physically connect it to your computer by means of a USB
cable. Plug one end of the USB cable that you purchased separately into the USB connector at the rear of your printer
and the other end into the USB connector on your computer.
NOTE:
If at any point you want to interrupt the software installation, click the Cancel button and then click the
Finish
button to exit the InstallShield Wizard.
NOTE:
The USB cable is not included with the printer.


Инструкции и руководства похожие на DELL 928