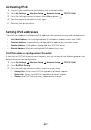
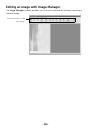
- 4
-
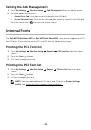
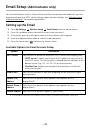
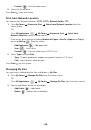
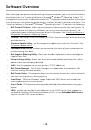
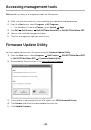
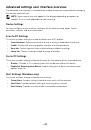
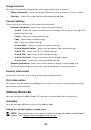
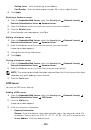
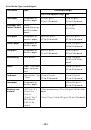
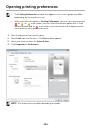
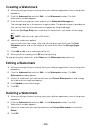
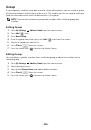
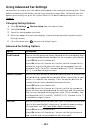
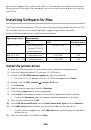
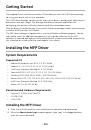
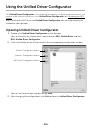
Finding Information
What Are You Looking For?
Find It Here
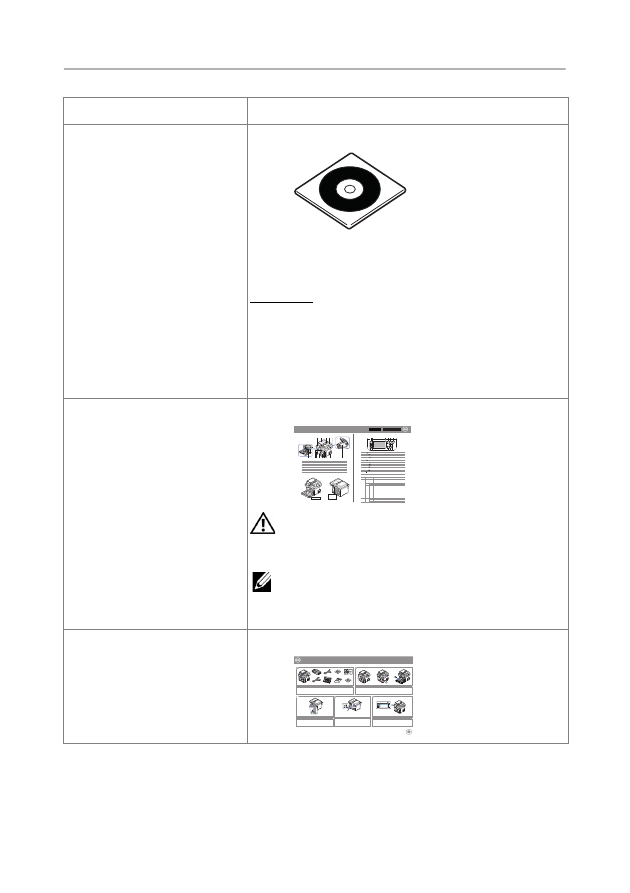
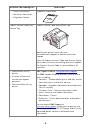
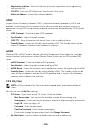
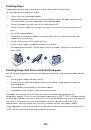
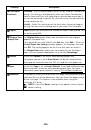
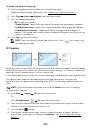
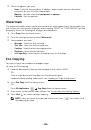
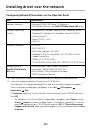
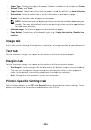
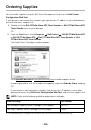
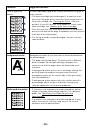
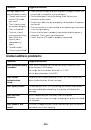
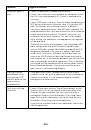
• Drivers for my printer
• My User’s Guide
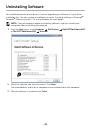
Drivers and Documentation CD
You can use the Drivers and Documentation CD to
install, uninstall, or reinstall drivers and utilities or
access your User’s Guide. For details, see
"Software".
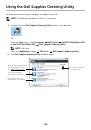
Readme files may be included on your Drivers and
Documentation CD to provide last-minute updates
about technical changes to your printer or
advanced technical reference material for
experienced users or technicians.
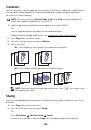
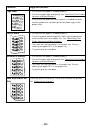
• How to use my printer
Quick Reference Guide
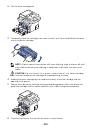
CAUTION:
Read and follow all safety
instructions in your Important Information
prior to setting up and operating your printer.
NOTE:
Quick Reference Guide may not be
provided with your product depending on
your country.
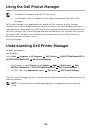
• How to set up my
printer
Setup diagram
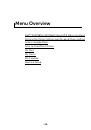
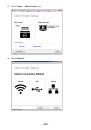
Dell™ B2375dfw / B2375dnf Mono MFP
Quick Reference Guide
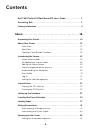
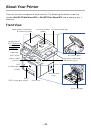
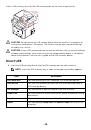
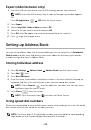
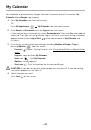
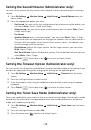
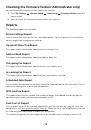
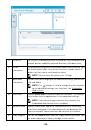
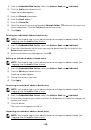
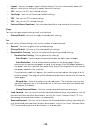
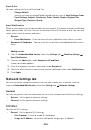
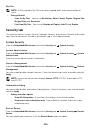
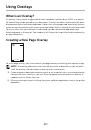
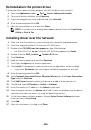
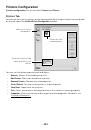
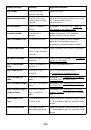
About Your Printer
Locating the Service Tag
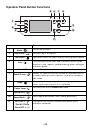
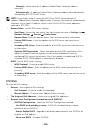
Operator Panel Button Functions
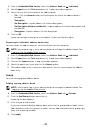
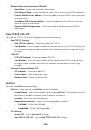
Understanding the Status LED
1
2
3
4
5
1 2
4
3
5
6
11 10
9
8
7
10
11
12
13
14
9
8
7
6
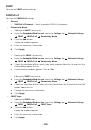
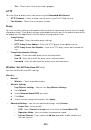
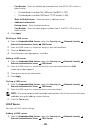
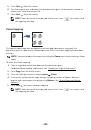
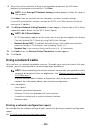
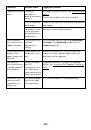
1 Operator
Panel
3
Document Width Guide
5
Document Output Tray
7
Control Board Cover
9 Output
Tray
11 Tray
1
13
Paper Output Extension
2
Duplex Automatic Document Feeder (DADF)
4
Document Input Tray
6 Document
Glass
8
USB Memory Port
10 Front
Cover
12
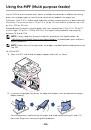
Multipurpose Feeder (MPF)
14 Toner
Cartridge
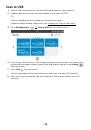
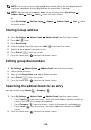
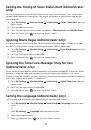
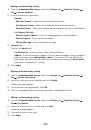
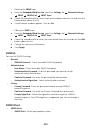
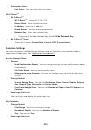
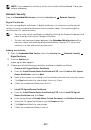
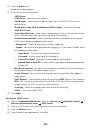
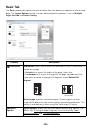
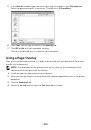
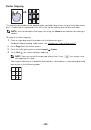
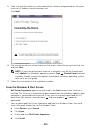
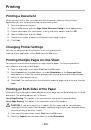
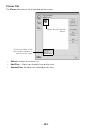
1
Home
Go to home screen.
2
Log In/Out
You can log in or log out.
3
Status LED
Status LED indicates the status of your machine.
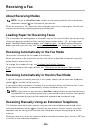
4
Redial/Pause
Redials the recently sent fax number or received caller ID in ready mode,
or inserts a pause(-) into a fax number in edit mode.
5
Copy
Start copy job using copy default setting regardless of which screen
the user is in if it is selected.
6
Power Saver
You can enter or exit Power Save mode.
7
Speed Dial1
Fax image to destination from stored speed dial1.
8
Speed Dial2
Fax image to destination from stored speed dial2.
9
Wi-Fi/WPS
Configures the wireless network connection easily without a computer.
(
Dell B2375dfw Mono MFP
only)
10
Job Status
Job status shows the jobs currently running and in queue.
11
Info
Gives detailed information about product feature guide machine’s info.
reports, troubleshooting guide, and quick reference guide.
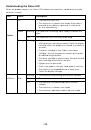
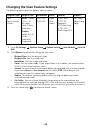
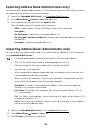
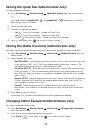
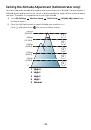
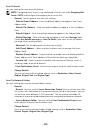
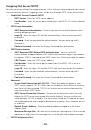
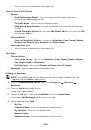
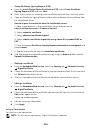
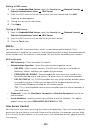
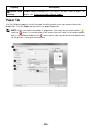
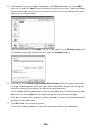
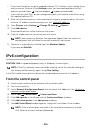
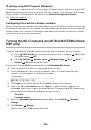
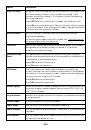
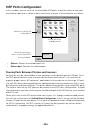
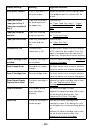
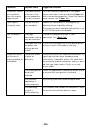
LED
Status
Wireless
Status
Off
Green
Orange
Blue
Blinking
On
Blinking
Blinking
On
Off
Description
• The machine is off-time.
• The machine is in power save mode. When data is received,
or any button is pressed, it switches to on-line automatically.
The machine is warming up or ready to receive the data.
The machine is on-line and can be used.
• A minor error has occurred and the machine is waiting for the error to be
cleared. Check the display message. When the problem is cleared, the
machine resumes operation.
• The toner cartridge is low. Order a new toner cartridge.
You can temporarily improve print quality by redistribution.
• The toner cartridge is totally empty. Remove the old toner cartridge and
install a new one.
• A paper jam has occurred.
• There is no paper in the tray. Load paper in the tray.
• The machine has stopped due to a major error. Check the display message.
• The machine is connecting to a wireless network.
• The machine is connected to a wireless network.
• The machine is disconnected from a wireless network.
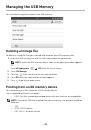
HMCWMA01
JC68-03031A00
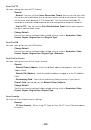
Service Tag XXXXXXX
Service Tag
XXXXXXX
000 000 000 00
Express Service Code
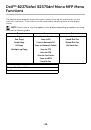
Dell 2355dn MFP Quick Reference Guide
le
n
a
P
r
o
t
a
r
e
p
O
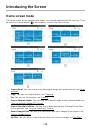
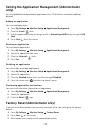
Touch Screen
Front
Back
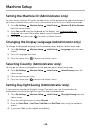
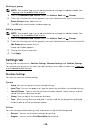
Quick Reference Guide
Quick Reference Guide
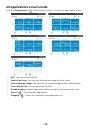
Front
1. LCD: Display.
2. Status LED: Shows the status of your machine.
3. Job Status button: Shows the jobs.
4. M/C Setup button: Leads you to the machine setup and advanced settings.
5 Start button: Initiate operation.
6. Cancel button: Cancel displayed operation.
1. LCD: Display.
2. Status LED: Shows the status of your machine.
3. Job Status button: Shows the jobs.
4. M/C Setup button: Leads you to the machine setup and advanced settings.
5 Start button: Initiate operation.
6. Cancel button: Cancel displayed operation.
1. LCD: Display.
2. Status LED: Shows the status of your machine.
3. Job Status button: Shows the jobs.
4. M/C Setup button: Leads you to the machine setup and advanced settings.
5 Start button: Initiate operation.
6. Cancel button: Cancel displayed operation.
1. USB port
2. Locking slot
3. Network port
4. Optional tray 2 cable
connector
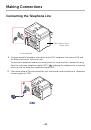
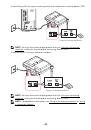
5. Telephone line socket (Line)
6. Extension telephone socket (EXT)
7. Rear door
8. Power receptacle
9. Power switch
10. Express
ervice code
11. Optional memory
12. Optional wireless card
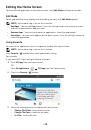
1.Copy: Enters the copy menu.
2. Fax: Enters the fax menu.
3. Scan: Enters the scan menu.
4. Setup: Enters the advanced settings.
5. None: You can set the option which is frequently uses on
main screen. Also you can change shortcut name as well.
6. : Shows the main screen.
7. : Enters the LCD brightness, the USB memory,
language, and job status.
8. : Return to the upper menu.
9. : Scroll through available options.
10. : Start a job.
Front
Front
Operator Panel
Operator Panel
Touch Screen
Touch Screen
13
1
7
1
3
4
7
8
5
2
6
9
10
11
12
14
15
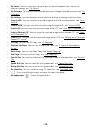
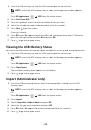
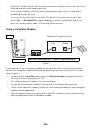
1. DADF
2. Document width guides
3. Document input tray
4. Document output tray
5. Operator panel
6. Output tray (face down)
7. MPF (Multi purpose feeder)
8. Front cover
9. Tray 1
10. Optional tray 2
11. USB memory port
12. Paper output extension
13. Document glass
14. Toner cartridge
15. Express
ervice code
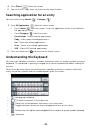
Back
Back
1
2
3
5
4
6
8
9
10
11
12
1. USB port
2. Locking slot
3. Network port
4. Optional tray 2 cable
connector
5. Telephone line socket (Line)
6. Extension telephone socket (EXT)
7. Rear door
8. Power receptacle
9. Power switch
10. Express
ervice code
11. Optional memory
12. Optional wireless card
1. USB port
2. Locking slot
3. Network port
4. Optional tray 2 cable
connector
5. Telephone line socket (Line)
6. Extension telephone socket (EXT)
7. Rear door
8. Power receptacle
9. Power switch
10. Express
ervice code
11. Optional memory
12. Optional wireless card
1.Copy: Enters the copy menu.
2. Fax: Enters the fax menu.
3. Scan: Enters the scan menu.
4. Setup: Enters the advanced settings.
5. None: You can set the option which is frequently uses on
main screen. Also you can change shortcut name as well.
6. : Shows the main screen.
7. : Enters the LCD brightness, the USB memory,
language, and job status.
8. : Return to the upper menu.
9. : Scroll through available options.
10. : Start a job.
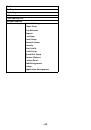
Dell™ B2375dfw / B2375dnf Mono MFP
1
3
4
2
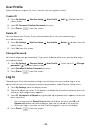
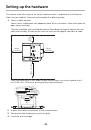
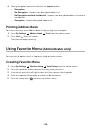
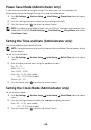
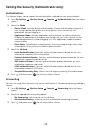
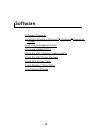
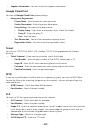
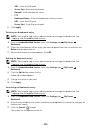
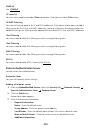
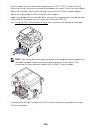
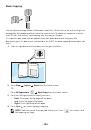
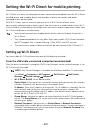
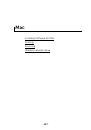
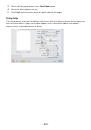
Setting Up Your Printer
Configuration de votre imprimante | Configurazione della stampante
Einrichten des Druckers | Configuración de la impresora
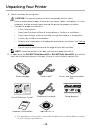
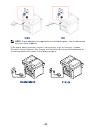
Verify the contents of the box
Vérifiez le contenu de votre carton
Verificare il contenuto della confezione
Überprüfen Sie den Inhalt der Box
Compruebe el contenido de la caja
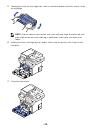
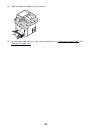
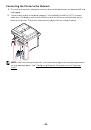
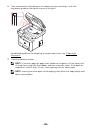
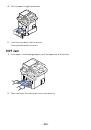
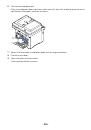
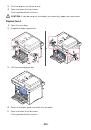
Remove the packing material
Retirez les matériaux d’emballage
Rimuovere il materiale di imballo
Entfernen Sie das Verpackungsmaterial
Retire el material de embalaje
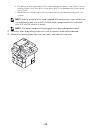
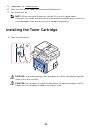
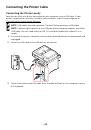
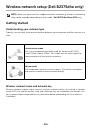
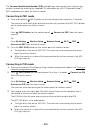
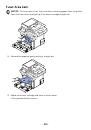
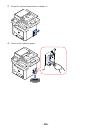
(For Ethernet connection only)
Insert Ethernet cable
(Uniquement pour la connexion Ethernet) Insérez le câble Ethernet
(solo per la connessione Ethernet) Inserire il cavo Ethernet
(Nur für Ethernet-Verbindung) Schließen Sie das Ethernet-Kabel an
(Solamente para la conexión Ethernet) Inserte el cable Ethernet
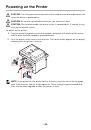
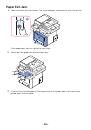
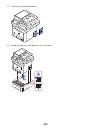
Mettez l’imprimante sous tension
Accendere la stampante
Schalten Sie den Drucker ein
Encienda la impresora
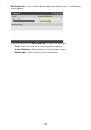
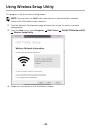
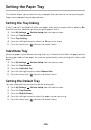
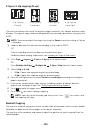
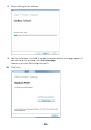
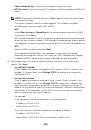
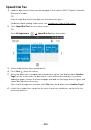
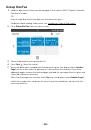
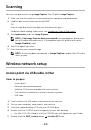
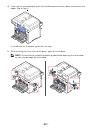
Set the language, country, time zone, date, and time.
Wait until "Ready" appears on the screen.
Réglez la langue, le pays, le fuseau horaire, la date et l’heure. Patientez jusqu’à ce que "Prêt" s’affiche à l’écran.
Impostare la lingua, il paese, il fuso orario, la data e l’ora. Attendere finché non viene visualizzato "Pronto" sullo
schermo.
Legen Sie Sprache, Land, Zeitzone, Datum und Uhrzeit fest. Warten Sie, bis "Bereit" im Display angezeigt wird.
Configure el idioma, el país, la zona horaria, la fecha y la hora. Espere hasta que aparezca "Lista" en la pantalla.
Turn on the printer
 1
1
 2
2
 3
3
 4
4
 5
5
 6
6
 7
7
 8
8
 9
9
 10
10
 11
11
 12
12
 13
13
 14
14
 15
15
 16
16
 17
17
 18
18
 19
19
 20
20
 21
21
 22
22
 23
23
 24
24
 25
25
 26
26
 27
27
 28
28
 29
29
 30
30
 31
31
 32
32
 33
33
 34
34
 35
35
 36
36
 37
37
 38
38
 39
39
 40
40
 41
41
 42
42
 43
43
 44
44
 45
45
 46
46
 47
47
 48
48
 49
49
 50
50
 51
51
 52
52
 53
53
 54
54
 55
55
 56
56
 57
57
 58
58
 59
59
 60
60
 61
61
 62
62
 63
63
 64
64
 65
65
 66
66
 67
67
 68
68
 69
69
 70
70
 71
71
 72
72
 73
73
 74
74
 75
75
 76
76
 77
77
 78
78
 79
79
 80
80
 81
81
 82
82
 83
83
 84
84
 85
85
 86
86
 87
87
 88
88
 89
89
 90
90
 91
91
 92
92
 93
93
 94
94
 95
95
 96
96
 97
97
 98
98
 99
99
 100
100
 101
101
 102
102
 103
103
 104
104
 105
105
 106
106
 107
107
 108
108
 109
109
 110
110
 111
111
 112
112
 113
113
 114
114
 115
115
 116
116
 117
117
 118
118
 119
119
 120
120
 121
121
 122
122
 123
123
 124
124
 125
125
 126
126
 127
127
 128
128
 129
129
 130
130
 131
131
 132
132
 133
133
 134
134
 135
135
 136
136
 137
137
 138
138
 139
139
 140
140
 141
141
 142
142
 143
143
 144
144
 145
145
 146
146
 147
147
 148
148
 149
149
 150
150
 151
151
 152
152
 153
153
 154
154
 155
155
 156
156
 157
157
 158
158
 159
159
 160
160
 161
161
 162
162
 163
163
 164
164
 165
165
 166
166
 167
167
 168
168
 169
169
 170
170
 171
171
 172
172
 173
173
 174
174
 175
175
 176
176
 177
177
 178
178
 179
179
 180
180
 181
181
 182
182
 183
183
 184
184
 185
185
 186
186
 187
187
 188
188
 189
189
 190
190
 191
191
 192
192
 193
193
 194
194
 195
195
 196
196
 197
197
 198
198
 199
199
 200
200
 201
201
 202
202
 203
203
 204
204
 205
205
 206
206
 207
207
 208
208
 209
209
 210
210
 211
211
 212
212
 213
213
 214
214
 215
215
 216
216
 217
217
 218
218
 219
219
 220
220
 221
221
 222
222
 223
223
 224
224
 225
225
 226
226
 227
227
 228
228
 229
229
 230
230
 231
231
 232
232
 233
233
 234
234
 235
235
 236
236
 237
237
 238
238
 239
239
 240
240
 241
241
 242
242
 243
243
 244
244
 245
245
 246
246
 247
247
 248
248
 249
249
 250
250
 251
251
 252
252
 253
253
 254
254
 255
255
 256
256
 257
257
 258
258
 259
259
 260
260
 261
261
 262
262
 263
263
 264
264
 265
265
 266
266
 267
267
 268
268
 269
269
 270
270
 271
271
 272
272
 273
273
 274
274
 275
275
 276
276
 277
277
 278
278
 279
279
 280
280
 281
281
 282
282
 283
283
 284
284
 285
285
 286
286
 287
287
 288
288
 289
289
 290
290
 291
291
 292
292
 293
293
 294
294
 295
295
 296
296
 297
297
 298
298
 299
299
 300
300
 301
301
 302
302
 303
303
 304
304
 305
305
 306
306
 307
307
 308
308
 309
309
 310
310
 311
311
 312
312
 313
313
 314
314
 315
315
 316
316
 317
317
 318
318
 319
319
 320
320
 321
321
 322
322
 323
323
 324
324
 325
325
 326
326
 327
327
 328
328
 329
329
 330
330
 331
331
 332
332
 333
333
 334
334
 335
335
 336
336
 337
337
 338
338
 339
339
 340
340
 341
341
 342
342
 343
343
 344
344
 345
345
 346
346
 347
347
 348
348
 349
349
 350
350
 351
351
 352
352
 353
353
 354
354
 355
355
 356
356
 357
357
 358
358
 359
359