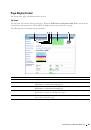
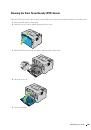
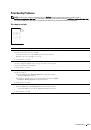
Registration
Adjustments
*1
Y(Yellow)
Available Range:
-5–+5
Specifies lateral (perpendicular to paper feed direction)
color adjustment values individually.
M(Magenta)
Available Range:
-5–+5
C(Cyan)
Available Range:
-5–+5
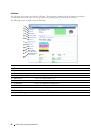
LY(Left Yellow)
Available Range:
-5–+5
Specifies process (paper feed direction) color
adjustment values individually.
LM(Left Magenta)
Available Range:
-5–+5
LC(Left Cyan)
Available Range:
-5–+5
RY(Right Yellow)
Available Range:
-5–+5
RM(Right Magenta)
Available Range:
-5–+5
RC(Right Cyan)
Available Range:
-5–+5
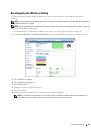
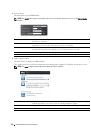
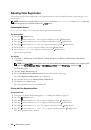
Apply New Settings
After you complete
changes.
the settings, click
Apply New Settings
to apply the
Restart printer to apply new settings
Click
Restart printer to apply new settings
to apply the changes.
*1
This item is available only when Auto Registration Adjustment is set to Off.
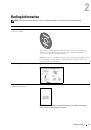
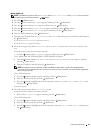
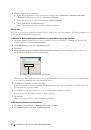
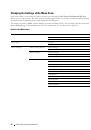
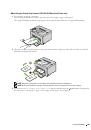
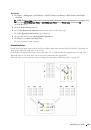
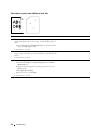
*2
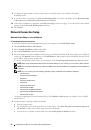
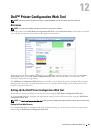
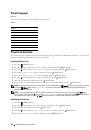
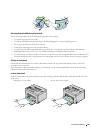
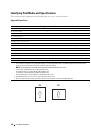
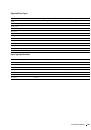
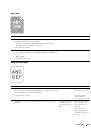
The color registration chart prints a lattice pattern of yellow, magenta, and cyan lines. On the chart, find the values on the right side that
are next to the line that is perfectly straight for each of the three colors. If the value for this line is 0, color registration is not needed. If
the value for this line is any value other than 0, specify the adjustment values under Registration Adjustments.
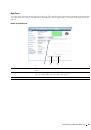
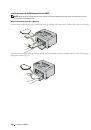
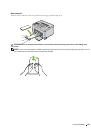
Adjust Altitude
Purpose:
To specify the altitude of the location where the printer is installed.
The discharge phenomenon for charging the photo conductor varies with barometric pressure. Adjustments are
performed by specifying the altitude of the location where the printer is being used.
NOTE:
An incorrect altitude adjustment setting leads to poor printing quality, incorrect indication of remaining toner.
Values:
0 meter
Specifies the altitude of the location where the printer is installed.
1000 meters
2000 meters
3000 meters
Apply New Settings
After you complete the settings, click
Apply New Settings
to apply the changes.
Restart printer to apply new settings
Click
Restart printer to apply new settings
to apply the changes.
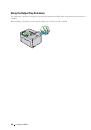
Understanding the Tool Box Menus
118
 1
1
 2
2
 3
3
 4
4
 5
5
 6
6
 7
7
 8
8
 9
9
 10
10
 11
11
 12
12
 13
13
 14
14
 15
15
 16
16
 17
17
 18
18
 19
19
 20
20
 21
21
 22
22
 23
23
 24
24
 25
25
 26
26
 27
27
 28
28
 29
29
 30
30
 31
31
 32
32
 33
33
 34
34
 35
35
 36
36
 37
37
 38
38
 39
39
 40
40
 41
41
 42
42
 43
43
 44
44
 45
45
 46
46
 47
47
 48
48
 49
49
 50
50
 51
51
 52
52
 53
53
 54
54
 55
55
 56
56
 57
57
 58
58
 59
59
 60
60
 61
61
 62
62
 63
63
 64
64
 65
65
 66
66
 67
67
 68
68
 69
69
 70
70
 71
71
 72
72
 73
73
 74
74
 75
75
 76
76
 77
77
 78
78
 79
79
 80
80
 81
81
 82
82
 83
83
 84
84
 85
85
 86
86
 87
87
 88
88
 89
89
 90
90
 91
91
 92
92
 93
93
 94
94
 95
95
 96
96
 97
97
 98
98
 99
99
 100
100
 101
101
 102
102
 103
103
 104
104
 105
105
 106
106
 107
107
 108
108
 109
109
 110
110
 111
111
 112
112
 113
113
 114
114
 115
115
 116
116
 117
117
 118
118
 119
119
 120
120
 121
121
 122
122
 123
123
 124
124
 125
125
 126
126
 127
127
 128
128
 129
129
 130
130
 131
131
 132
132
 133
133
 134
134
 135
135
 136
136
 137
137
 138
138
 139
139
 140
140
 141
141
 142
142
 143
143
 144
144
 145
145
 146
146
 147
147
 148
148
 149
149
 150
150
 151
151
 152
152
 153
153
 154
154
 155
155
 156
156
 157
157
 158
158
 159
159
 160
160
 161
161
 162
162
 163
163
 164
164
 165
165
 166
166
 167
167
 168
168
 169
169
 170
170
 171
171
 172
172
 173
173
 174
174
 175
175
 176
176
 177
177
 178
178
 179
179
 180
180
 181
181
 182
182
 183
183
 184
184
 185
185
 186
186
 187
187
 188
188
 189
189
 190
190
 191
191
 192
192
 193
193
 194
194
 195
195
 196
196
 197
197
 198
198
 199
199
 200
200
 201
201
 202
202
 203
203
 204
204
 205
205
 206
206
 207
207
 208
208
 209
209
 210
210
 211
211
 212
212
 213
213
 214
214
 215
215
 216
216
 217
217
 218
218
 219
219
 220
220
 221
221
 222
222
 223
223
 224
224
 225
225
 226
226
 227
227
 228
228
 229
229
 230
230
 231
231
 232
232
 233
233
 234
234
 235
235
 236
236
 237
237
 238
238
 239
239
 240
240
Инструкции и руководства похожие на DELL C1760nw, C1660w