U s i n g t h e p r i n t e r
1 3
First, follow these instructions while you are at your own computer.
1
For Microsoft® Windows® 2000, click Start
→
Settings
→
Printers.
For Windows XP, click Start
→
Control Panel
→
Printers and Other Hardware
→
Printers and Faxes.
2
Right-click the Dell Inkjet Printer J740 icon.
3
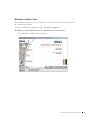
For Windows 2000, click File Sharing.
For Windows XP, click Sharing....
4
For Windows 2000, check the Shared as check box, and then type a name in the
Shared Name text box.
For Windows XP, click Share this Printer, and then type a name in the Share Name
text box.
5
Click Additional Drivers and select the operating systems of all network clients
printing to this computer.
6
Click OK to close the Additional Drivers dialog box.
7
Click Apply.
8
Click OK on the Print Properties dialog box.
If you are missing files, you are prompted to insert the server operating system CD.
To check that the printer is successfully shared:
•
Make sure the printer object in the Printers folder shows it is shared. For example, in
Windows 2000, a hand is shown underneath the printer icon.
•
Browse Network Neighborhood. Find the host name of the server and look for the
shared name you assigned the printer.
Now, follow these instructions while you are at the second computer:
1
For Windows 2000, click Start
→
Settings
→
Printers.
For Windows XP, click Start
→
Control Panel
→
Printers and Other Hardware
→
Printers and Faxes.
2
Click Add Printer to launch the Add Printer wizard.
3
Click Network Printer.
4
Select the network printer from the Shared printers list. If the printer is not listed,
type the path of the printer in the text box.
For example:\\<server host name>\<shared printer name>
The server host name is the name of the server computer that identifies it to the
network. The shared printer name is the name assigned during the server
installation process.


Инструкции и руководства похожие на DELL J740