15
•
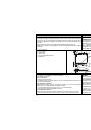
If the back wall is incombustible (Class A) no gap is required.
•
The cooker may be set against the walls with combustibility degrees B, C1, C2, C3
under the condition that the furniture wall is made of or covered with heat-resistant
material (e.g. aluminum foil) securing a heat resistance of 100° C for the box (a
portion of the range under the hob).
•
Без соблюдения расстояния плиту можно поставить около стен со степенью
горючести А.
•
Плита может быть установлена вплотную к стенам со степенью горючести В,
C1, C2, C3 при условии, что стенки мебели будут покрыты
теплоизоляционным материалом (например, алюминиевой фольгой),
который обеспечит их теплостойкость - 100°C (речь идёт о той части плиты,
которая расположена ниже уровня варочного стола).
CONNECTION TO GAS SUPPLY
ПРИСОЕДИНЕНИЕ ПЛИТЫ К ГАЗОПРОВОДУ
GAS SUPPLY
The appliance may be connected to gas supply by only by the authorized personnel.
Connection must comply with the local standards and requirements. The gas supply
pipe must be fitted with the accessible gas shut-off cock, located before the coupling
with the cooker.
ГАЗОПРОВОД
Присоединение плиты к газопроводу должно быть выполнено специалистами
уполномоченной сервисной организации в соответствии с нормами и
правилами, действующими в стране Покупателя.
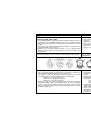
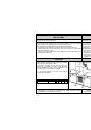
WARNING:
In handling the gas line (e.g. connection to the gas distribution system or flexible gas
hose) always use a wrench to hold the gas line terminal, in order to avoid
deformations.
ВНИМАНИЕ!
Чтобы при выполнении присоединения плиты к газопроводу или при
присоединении с помощью шланга не произошло повреждение наконечника
газового присоединения, применяйте для его поддержки ключ.
CONNECTION TO THE NATURAL GAS NETWORK
Connection must be made in accordance with standing local regulations. In case of
excessive gas pressure use pressure regulator.
ПРИСОЕДИНЕНИЕ ПЛИТЫ ДО ПРИРОДНОГО ГАЗУ
Присоединение плиты должно быть выполнено в соответствии с нормами и
правилами, действующими в стране Покупателя.
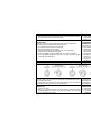
CONNECTION TO THE LPG NETWORK
Special LPG coupling must be installed at the 1/2" pipe connection.
ПРИСОЕДИНЕНИЕ ПЛИТЫ К БАЛЛОНУ С ПРОПАН-
БУТАНОМ
Шланг должен иметь присоединительный штуцер с внутренней резьбой с
номинальным диаметром 1/2”.
FLEXIBLE HOSE CONNECTION
For safety reasons use only the certified hose complying with local standards and with
recommended length of 1000mm.
Heat resistance of the connection hose should
be at least 100° C.
Each hose must contain instructions regarding the method of connection, allowed
heating, inspections, service life, etc. These instructions must be unconditionally
adhered to.
ПРИСОЕДИНЕНИЕ К ГАЗОПРОВОДУ С ПОМОЩЬЮ ШЛАНГА
Недопустимо применять шланг, который не имеет сертификации для
использования его с данной целью.
Рекомендуемая длина шлангa 1000 –
1500 мм и тепловое сопротивление шланга мин. 100°С
.
На шланг не должно влиять излучаемое тепло и не должно быть
соприкосновения с открытым огнём.
Нельзя прокладывать шланг около той части наружных стенок плиты, где
находится духовка.
Уплотнение соединений необходимо выполнить уплотнительным материалом,
рекомендованным заводом-изготовителем в инструкции по применению шланго