Инструкция для GORENJE MGIN53260GW

(скачивание инструкции бесплатно)
Формат файла: PDF
Доступность: Бесплатно как и все руководства на сайте. Без регистрации и SMS.
Дополнительно: Чтение инструкции онлайн
background image

7


  After firing the burner hold the knob pressed to a limit position to the panel for 

about 5 seconds till the flame sensor heats up.  

  Release the knob and check whether the burner is on. If the flame dies after 

releasing the knob, repeat the ignition procedure. After that set the knob to the 
desired position. 

  Если газ загорелся, то ручку крана/термостата подержите прижатой к панели 

ещё, приблизительно, 5 секунд, чтобы нагрелся датчик предохранителя 
пламени.  

  Отпустите ручку и проконтролируйте, горит ли газ горелки. Если пламя 

погасло, то повторите весь процесс зажигания. 

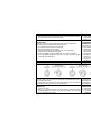
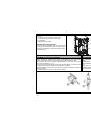
IGNITION OF THE OVEN BURNER A TEMPERATURE 
SELECTOR 

  Open the oven door. 

  Set the oven temperature selector knob to the position “8" and press it slightly 

towards the panel to a limit position. 

  Now use another hand and press the gas ignition knob on the control panel and 

keep it pressed until it ignites the flame. 

  After firing the burner hold the knob pressed to a limit position to the panel for 

about 5 seconds till the flame sensor heats up.  

  Release the knob and check whether the burner is on. If the flame dies after 

releasing the knob, repeat the ignition procedure. After that set the knob to the 
desired position. 


ЗАЖИГАНИЕ ГОРЕЛКИ ДУХОВКИ C ПОМОЩЬЮ 
ЭЛЕКТРОРОЗЖИГА  

 Откройте 

дверцу 

духовки. 

  Установите ручку термостата духовки в положение “8”, соответствующее 

выбранной температуре 

 Другой рукой нажмите на кнопку выключателя электророзжига, которая 

находится на панели управления. Ручку термостата прижмите к панели 
управления до упора и подержите прижатой, пока от искры загорится газ. 

  Если газ загорелся, то ручку крана/термостата подержите прижатой к панели 

ещё, приблизительно, 5 секунд, чтобы нагрелся датчик предохранителя 
пламени.  

  Отпустите ручку и проконтролируйте, горит ли газ горелки. Если пламя 

погасло, то повторите весь процесс зажигания. 

IGNITION OF THE OVEN BURNER  

  Open the oven door. 

  Press the appropriate burner control knob slightly towards the appliance and turn it 

anti-clockwise to the „MAXIMUM POWER“ position. Light the gas using a match or 
any gas ignition device. 

  After firing the burner hold the knob pressed to a limit position to the panel for 

about 5 seconds till the flame sensor heats up.  

  Release the knob and check whether the burner is on. If the flame dies after 

releasing the knob, repeat the ignition procedure. After that set the knob to the 
desired position. 

ЗАЖИГАНИЕ ГОРЕЛКИ ДУХОВКИ  

 Откройте 

дверцу 

духовки. 

 Повернуть кнопку влево на позицию «МАКСИМАЛЬНАЯ МОЩНОСТЬ» и 

зажечь газ спичкой или зажигалкой. 

  Если газ загорелся, то ручку крана/термостата подержите прижатой к панели 

ещё, приблизительно, 5 секунд, чтобы нагрелся датчик предохранителя 
пламени.  

  Отпустите ручку и проконтролируйте, горит ли газ горелки. Если пламя 

погасло, то повторите весь процесс зажигания. 

IMPORTANT:  

If the burner is not on after 10 seconds, open the oven door and wait for 5 minutes 
before the next try. 

ВНИМАНИЕ!  

Если же через 10 секунд газ не загорится, то перед следующей попыткой 
подождите 5 минут, оставив дверцу духовки открытой. 
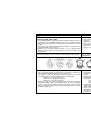
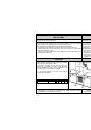


MINUTE MINDER 

Awaiting cooking time (oven or hob burners) is possible to set on mechanical minute 
minder in range of 0–115 minute. 
Required time to be set by turning of the knob. First turn the knob to the right to max. 
positron and than turn back to required time. 
When time empire the bell rings.   

МЕХАНИЧЕСКИЙ ТАЙМЕР  

Период деятельности духовки и горелок можно отследовать с помощью 
механического таймера 
в интервале от 0 до 115 минут.  
Устанавливается вращением кнопки. сперва, направлением вправо в 
максимальное положение (115 минут) и затем снова в заданное время (35 мин). 
После истечения срока установленного время играет звуковой сигнал. 


1
2
3
4
5
6
7
8
9
10
11
12
13
14
15
16
17
18
19
20
21
22
23
Оглавление инструкции
  • Страница 1 из 24
    GB GAS COOKER RU ПЛИТА ГАЗОВАЯ
  • Страница 2 из 24
    GB RU OPERATING AND MAINTENANCE INSTRUCTIONS РУКОВОДСТВО ПО ЭКСПЛУАТАЦИИ Dear customer! Thank you for purchasing the appliance from our new range of gas cookers. The following information will help you understand the features of the appliance and use it safely. We hope the appliance will serve you
  • Страница 3 из 24
    • The appliance requires a minimum air admission of 2m3/h for every kW of power input. • Never use naked light to detect gas leakage! • If you detect any defects on the gas installation of the appliance, never attempt to repair it by yourself. Switch the appliance off, cut the gas supply and call
  • Страница 4 из 24
    Different models are equipped with different accessories. Any additional accessories (grids, baking trays, grill pans, adjustable feet) are available in authorized shops or our service outlets. Различные модели имеют разлчные принадлежности. Другие принадлежности (противень, решётка, принадлежност
  • Страница 5 из 24
    proper room ventilation. This process will remove any agents and odors remaining in the oven from the factory treatment. • Be sure that the power cords of adjacent or other appliances do not come into contact with burner, oven door or other hot parts of the range while in operation. The
  • Страница 6 из 24
    the gas ignition knob on the control panel and keep it pressed until it ignites the flame. высоковольтного зажигания прямо на рычаге управления. LIGHTING THE BURNERS WITH HIGH VOLTAGE GAS IGNITION KNOB (TWO HAND) ЗАЖИГАНИЕ ГОРЕЛКИ C ПОМОЩЬЮ ЭЛЕКТРОРОЗЖИГА • Press the appropriate burner control knob
  • Страница 7 из 24
    CAUTION: ПРИМЕЧАНИЕ • Before opening the hob lid any spilled liquid must be removed from the lid surface. • Do not close the hob lid if the burners are still hot! • Закрытую крышку не используйте как рабочий стол и не ставьте на неё какиелибо предметы. • Перед тем, как закрыть крышку, выключите все
  • Страница 8 из 24
    • After firing the burner hold the knob pressed to a limit position to the panel for about 5 seconds till the flame sensor heats up. • Release the knob and check whether the burner is on. If the flame dies after releasing the knob, repeat the ignition procedure. After that set the knob to the
  • Страница 9 из 24
    BAKING / ROASTING FOOD ВЫПЕЧКА • Preheat the oven for a period of 10 - 15 min before putting yeast dough to bake. • Place the baking tin in the middle groove, the baking tin must not reach the rear side in the oven. • Перед тем, как начать выпекать, при необходимости, прогрейте духовку в течение
  • Страница 10 из 24
    Knob position Регулировочная степень Oven temperature Температура в духовке 1 2–3 3–4 4–5 5–6 6–7 8 150 – 160° C 160 – 180° C 180 – 196° C 196 – 212° C 212 – 228° C 228 – 244° C 260°C Relation between the temperature selector position and the oven temperature for different oven operations
  • Страница 11 из 24
    ATTENTION! ВНИМАНИЕ! • Always use the control panel protection sheet during grilling! • After fixing the protection sheet close the oven door. • При работе с грилем обязательно должна быть установлена защитная пластина ручек кранов, которую нужно пазами насадить на штифты на верхней стенке духовки.
  • Страница 12 из 24
    ASSEMBLING GRILLING EQUIPMENT ПОРЯДОК СБОРКИ ПОВОРОТНОГО ВЕРТЕЛА: • Insert roasting spit support into the third guide from the oven bottom. • Place the dripping tray into first guide from the oven bottom. • Fix the roast on the spit step by step, by first fixing the nearer fork then the meat,
  • Страница 13 из 24
    CLEANING AND MAINTENANCE УХОД ЗА ПЛИТОЙ Before attempting any cleaning or maintenance set all gas control knobs and temperature selectors to “OFF” position and let the cooker cool down completely. При любой манипуляции с плитой, помимо повседневного применения, закройте кран подачи газа,
  • Страница 14 из 24
    • наденьте плафон на лампочку, вкрутив его вправо, включите главный выключатель. NOTE: ПРИМЕЧАНИЕ: For oven illumination always use T 300° C, E14, 230-240V, 25W bulb. 1. Glass cover 2. Lamp 3. Sleeve 4. Oven rear wall Для освещения духовки применяется лампа T 300°, E14, 230/240 B, 25 Bт. 1. Плафон
  • Страница 15 из 24
    INSTALLATION INSTRUCTIONS AND SETTINGS РУКОВОДСТВО ПО МОНТАЖУ И ТЕХНИЧЕСКОМУ ОБСЛУЖИВАНИЮ The appliance must be installed in accordance with valid local regulations, and shall be placed only in well vented spaces. Плита должна быть установлена и подключена в соответствии с нормами и правилами,
  • Страница 16 из 24
    • If the back wall is incombustible (Class A) no gap is required. • The cooker may be set against the walls with combustibility degrees B, C1, C2, C3 under the condition that the furniture wall is made of or covered with heat-resistant material (e.g. aluminum foil) securing a heat resistance of
  • Страница 17 из 24
    1 - Connection ending 2 - Knee 3 - Connection hose (connection from the right) 4 - Connection hose (connection from the left) 5 - Fixing clamp 6 - Back cover of the cooker IMPORTANT PRECAUTION: In case of left side connection (seen from the front) the hose must be connected by means of a clamp
  • Страница 18 из 24
    OVEN BURNER SETTINGS PRIMARY AIR ADJUSTMENT To access the primary air adjusting screw (5), open or remove oven door and remove oven bottom (2). By unscrewing the adjusting screw the quantity of primary air is increase, by tightening it is reduced. The air/gas mixture is correct when the flame has
  • Страница 19 из 24
    Right turn reduces the height of the flame, and left turn increases the height. The adjustment is correct when the body of the flame is about 3 to 4 mm high. Replace the knob and set it to the switch off position, then replace the oven base. If the flame sensor does not operate properly, check its
  • Страница 20 из 24
    • Stick new gas setting label with relevant nozzle information. установлен на подводящем газопроводе), • первоначальный заводской типовой щиток заменить новым, поставляемым совместно с комплектом сопел, • о проведении данной операции сделать соответствующие записи в “Гарантийном талоне”. CONNECTION
  • Страница 21 из 24
    Burner Конфорка Small Малая Medium Cредняя Rapid Большая Oven Духовка MGN 51103 G MGIN 53260 G MG 51103 G MGIN 53203 G Oven Grill Духовка Гриль MGIN 52290 G Natural gas / Природный газ G 20 – 1,3 кПа RU BY Nozzle diameter Дiаметр форсунки (мм) Adjustment „X“ Установкака „X“ (мм) 0,83 1,12 1,37 1,45
  • Страница 22 из 24
    GB RU Technical data Gas cooker Технические данные Dimensions: height / width / depth Размеры плиты: высота / ширина / глубина Burner input power Горелки Left front (kW) Left rear (kW) Right rear (kW) Right front (kW) левая передняя (малая) (кВт) левая задняя (средняя) (кВт) правая задняя (большая)
  • Страница 23 из 24
    PS MGN 51103 G, MG 51103 G, MGIN 52290, MGIN 53260, MGIN 53203 G / GB, RU / 2011 03 30 / SAP 267480
  • Страница 24 из 24