5
the gas ignition knob on the control panel and keep it pressed until it ignites the
flame.
высоковольтного зажигания прямо на рычаге управления.
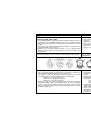
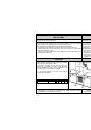
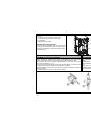
LIGHTING THE BURNERS WITH HIGH VOLTAGE GAS
IGNITION KNOB (TWO HAND)
•
Press the appropriate burner control knob slightly towards the appliance and turn it
anti-clockwise to the „MAXIMUM POWER“ position. Now use another hand and
press the gas ignition knob on the control panel and keep it pressed until it ignites
the flame.
•
After firing the burner hold the knob pressed to a limit position to the panel for about
5 seconds till the flame sensor heats up.
•
Release the knob and check whether the burner is on. If the flame dies after
releasing the knob, repeat the ignition procedure. After that set the knob to the
desired position.
ЗАЖИГАНИЕ ГОРЕЛКИ C ПОМОЩЬЮ
ЭЛЕКТРОРОЗЖИГА
•
Легко нажать на кнопку и поворачивать влево на позицию «максимальная
мощность». Второй рукой нажать на выключатель высоковольтного
зажигания, пока искра не воспламенит горелку.
•
Если газ загорелся, то кнопку подержите прижатой к панели ещё,
приблизительно 5 секунд, чтобы нагрелся датчик предохранителя пламени.
•
Отпустите кнопку и проконтролируйте, горит ли газ горелки. Если пламя
погасло, то повторите весь процесс зажигания.
SHUTTING THE HOB BURNERS OFF
Turn the selected knob to the “OFF” position and check whether the flame is extinct
ГАШЕНИЕ ПЛАМЕНИ ГОРЕЛКИ
При гашении пламени горелки духовки поверните ручку крана в положение
“ВЫКЛЮЧЕНО”. Проконтролируйте - погасло ли пламя горелки.
COOKING
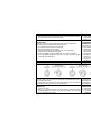
•
Use low and wide cookware for preparing food on gas burners. Make sure the
burner flames heat the dish bottom and do not go beyond its rim.
•
The appliance is fitted with different size burners. For optimum (economical)
consumption of gas use the recommended cookware bottom diameters:
- small burner - from Ø 120 to Ø 160 mm,
- medium burner - from Ø 160 to Ø 220 mm,
- large burner - from Ø 220 to Ø 280 mm.
•
Rotation of control knob sets the gas heating power (flame size) between the
“MAXIMUM POWER” position and “SAVING” position. To reach the “SAVING”
position, the knob must be rotated to the extreme left position. After the food is
brought to ,boiling point, reduce the gas power to the position sufficient to maintain
the desired cooking stage.
ВАРКА
•
При варке пользуйтесь более низкой и более широкой посудой. Обращайте
внимание на то, чтобы пламя горелки нагревало дно сосуда и не выходило за
его края .
•
Газовые горелки плиты имеют разные размеры. Для полного (экономичного)
использования мощности горелки применяйте посуду с рекомендуемыми
диаметрами:
- для малой горелки - от 120 мм до 160 мм,
- для средней горелки - от 160 мм до 220 мм,
- для большой горелки - от 220 мм до 280 мм.
•
Потребляемую мощность (размер пламени) горелки можно регулировать
поворотом ручки крана в пределах положений “МАКСИМАЛЬНАЯ МОЩНОСТЬ” и
“МАЛОЕ ПЛАМЯ”. Ручки кранов поворачиваются при слабом нажатии в сторону
панели. Поворотом ручки крана влево устанавливаем кран в положение
“МАКСИМАЛЬНАЯ МОЩНОСТЬ”, далее, поворотом ручки влево, до крайнего
положения - “МАЛОЕ ПЛАМЯ”, и обратно, вправо (также до крайнего положения), в
положение “ВЫКЛЮЧЕНО”.