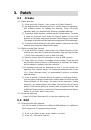
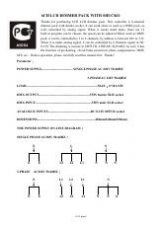
Страница 2 из 27 1 Overview AD1000 1024 DMX controller can control up to 96 fixtures. It is compatible with the library in Avolite Pearl R20 format and featured with built-in shape effects of pan/tilt circle, RGB rainbow, beam dimming wave, etc. 10 scenes and 5 built-in shapes can be output simultaneously. Faders
Страница 4 из 27 The front panel consists of several areas: Fixture area: including 16 <Fixture> buttons, 16 faders and 6 <Page> buttons. There are 6 pages of fixtures supporting up to 96 fixtures. The <Swap Preset Fader Function> button with 2 LED indicators can be used to switch the functions of the 16 faders.
Страница 5 из 27 Playback area: Including 10 <Playback> buttons, 10 <Palette> buttons, 10 playback Faders, 5 <Page> buttons and 1 <DBO> button, 3 Master Faders The Page Of Playback lets you select different pages of playbacks, <1>, <2>, <3> Buttons and <A>, <B> Buttons combine 6 pages. The Blackout lets
Страница 6 из 27 Attribute area: Including 8 <Attributes> buttons and 3 <Attribute Banks> buttons. Each < Attributes> button carries two attributes, respectively controlled by <Wheel A> and <Wheel B>. When <Attribute/Level> button is switched at <Attribute> side, the faders in the fixture area can be used to
Страница 7 из 27 Playback control area: Including 5 playback control buttons: <Connect>, <Stop>, <Go->, <Go+> and <Playback Parameters>. The Connect Button lets you connect a running chase you want to control. The Stop Button let you stop the chase you have connected. The Go+ button let you play the
Страница 8 из 27 Function area: Operations about scene storage and copy or fixture patch can be implemented in this area. The LED indicators on these buttons are to show the status of the buttons. Fixture control area: including buttons of <Previous>, <Next>, <HiLight>, <All>, <Odd>, <Even>, <Locate> and <ML>,
Страница 9 из 27 LCD area: The LCD is to display the menu, implement the menu operations and clear the Programmer. The Menu softkeys (labelled A – E) are used to select control options. The display next to the buttons shows what each one will do. The options for each key change depending on what the console is
Страница 10 из 27 3.1 Glossaries HTP: The type of the channels with the highest output (highest takes precedence), normally for dimmer channels. LTP: The type of the channels with the latest output (latest takes precedence), for non-dimmer channels. Fade in: The intensity of the light changes
Страница 11 из 27 3. Patch 3.1 Create 3.1.1 Patch dimmer 1) Press and hold <Patch>, then, press <A>[Patch Dimmer]. 2) An address will be displayed at Line 2 on the screen for patching. Roll <Wheel Value> to change the address; Press <D>[Auto calculate Addr.] to automatically achieve a suitable address. 3) To patch a
Страница 12 из 27 3) An address will be displayed at Line 2 on the screen for patching. Roll <Wheel Value> to change the address. 4) Once the address code is set, press a desired <Fixture> button to patch. 5) Press <Enter> to confirm. 3.2.2 Deleting a patched fixture 1) If not in the Patch menu, press <Patch> to
Страница 13 из 27 4. Controlling fixtures 4.1 Select fixtures Select a single fixture: Press the handle Fixture buttons for the fixtures you want. The LED in the Fixture button comes on for selected fixtures Select a range of fixtures: To select a range of fixtures, hold down the Fixture button for the
Страница 14 из 27 “Fixture control area” then <B>, the currently selected attribute values of all the selected fixtures will be aligned to the values of the first fixture. 4.4 Fan mode Fan mode automatically spreads out the values on a selected range of fixtures. If used on pan and tilt, the result is spreading out
Страница 15 из 27 5. Shapes A shape is simply a sequence of values which can be applied to any attribute of a fixture. A “circle” shape, for example, applied to the pan and tilt attributes, would cause the fixture to move its beam around in a circular pattern. You can set the centre point of the circle, the size of
Страница 16 из 27 5.3 1) 2) 3) 4) Delete a shape Press <Shape> in “Function area”; Press <Delete> in “Function area”; Highlight the shape that you want to delete; Press <Enter> to confirm. 5.4 Playback Parameters This option lets you set parameters for a shape stored in a playback / scene. When a scene fades in, you
Страница 17 из 27 6. Palette When programming a show you will find that you frequently use certain positions, colours, etc. Like an artist’s palette, the Pearl lets you store these settings so you can recall them at the touch of a button rather than having to find them on the wheels every time. There are 6 pages of
Страница 18 из 27 7. Scene There are many functions in the controller to create a complicated lighting effect; and, the most fundamental part is a scene, in which you can store a “look” you have created using your light. There are 60 playbacks on 5 pages, each page with 12, which can be used to store scenes and
Страница 19 из 27 7.3 Copying a Scene 1) Press <Copy>, then, press a <Playback> button that stores a scene; 2) Press an empty <Playback> button to copy. 7.4 Delete a Scene 1) Press <Delete> to enter the Delete menu; 2) Press a desired <Playback> button to delete; press it again to confirm. 7.5 Time Press <Time>,
Страница 20 из 27 times are set to zero. LTP channels are controlled by the fader position (except Instant channels). Set the LTP fade time to 0 to use this mode. 7.6 Run scenes Raise fader, the corresponding scene on the current page will be output. At the first Menu, press a <Playback> button, the selected scene
Страница 21 из 27 8. Chase A sequence of one or more pre recorded steps programmed using the CHASE button. It can be replayed automatically if desired. Sometimes known as SEQUENCE, STACK or Linked Cues. The chase can include 600 steps in this console. 8.1 Create 1) Press <Chase> In the Playback area, the LED
Страница 22 из 27 Under the Chase editing menu, press a desired <Playback> button of the step, then, scene data will be imported. 8.5 Global Time 1) Under the first level menu, press <Time>; 2) Then, press a desired scene. Press <Up> or <Down> to turn the pages; press a soft key to select the options for editing;
Страница 23 из 27 8.10 Advanced Option Each chase has options which can be set to affect the way it runs. Press <P.b. Par>. You need to have a chase “connected”, or the button will not do anything. The options you set are individual for each chase. The options are: A[Save Speed] – saves the current speed of the
Страница 24 из 27 9. Setup 9.1 Manage USB memory At first menu, press <Setup> button, then press <A> - "U-Disk". Then you can select "Save Data" or "Read Data". In "Save Data" Menu, use Wheel V to change character, up and down to move the curse. Then press Enter to save. 9.2 Wipe data At first menu, press <Setup>
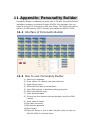
Страница 25 из 27 11. Appendix: Personality Builder Personality Builder is software for library edit. A CD with Personality Builder installation program is enclosed in each AD1000 1024 package. You can install it into your PC and use it to edit your library. The library files can be saved in a USB memory (FAT32
Страница 26 из 27 ООО «ИНВАСК» Адрес: 143406, Московская область, Красногорск, ул. Ленина, дом 3-Б Тел. (495) 565-0161 (многоканальный) Факс (495) 565-0161, доб. 105 http://www.invask.ru e-mail: invask@invask.ru Сервис-центр «ИНВАСК» Адрес: 143400, Московская область, Красногорск, Коммунальный квартал, дом. 20 Тел.