
-
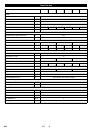
5
If the vacuum result is unsatisfactory the in-
clination of the straight vacuum bar can be
modified.
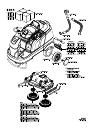
Figure 8, see cover page
Release the wing nuts.
Tilt the vacuum bar.
Tighten the wing nuts.
Figure 10, see cover page
Unlock the lever for the brush contact
pressure to the left and relock to the
right.
–
Level down: Reduce contact pressure.
–
Level up: Increase contact pressure.
Adjust the wiper flaps by turning the ad-
justment wheel so that they touch the
floor.
Turn the adjustment wheel an addition-
al turn toward the bottom.
Note
Overflow dirt water tank. If the dirt water
tank is full, the suction turbine switches off
and the indicator lamp "dirt water tank full"
begins to blink. All cleaning programs with
suction are blocked for one minute. Empty
the dirt water reservoir.
몇
Warning
Please observe the local provisions regard-
ing the wastewater treatment.
Take the dirt water discharge hose from
the support and lower above a suited
collection device.
Figure 11, see cover page
Let off water by opening the dosage de-
vice at the discharge hose.
The rinse the dirt water reservoir with
clear water.
Unscrew the filter cup of the fresh water
filter and let the fresh water tank drain
completely.
Replace the filter cup.
Check the waste container. If needed,
remove and empty waste container af-
ter work.
Turn main key to "0" and remove it.
Secure the machine with wheel chocks
to prevent it from rolling away.
Danger
Risk of injury! When loading or unloading
the machine, it may only be operated on
gradients of max. 10%. Drive slowly.
Caution
Risk of injury and damage! Observe the
weight of the appliance when you transport
it.
When transporting in vehicles, secure
the appliance according to the guide-
lines from slipping and tipping over.
Remove brushes from the brush head.
Caution
Risk of injury and damage! Note the weight
of the appliance in case of storage.
This appliance must only be stored in
interior rooms.
Select the storage site for the appliance
taking into consideration the permissi-
ble total weight of the appliance in order
not to impact its stability.
Danger
Risk of injury. Before carrying out any tasks
on the machine, set the main key to "0" and
remove it. Press emergency-stop button.
Place the appliance on a stable, even sur-
face and disconnect the battery.
Note
Suction turbine will continue to run for a
while after switch-off. Carry out mainte-
nance tasks only after the suction turbine
has come to a halt.
Drain and dispose of the dirt water and
the residual fresh water.
Caution
Risk of damage. Do not wash down the ap-
pliance with water and do not use aggres-
sive detergents.
Drain off dirt water.
Check the flat folded filter, clean if re-
quired
Only with R cleaning head Remove bulk
waste container and empty it.
Clean the outside of the appliance with
a damp cloth which has been soaked in
mild detergent.
Clean the vacuum lips and the wiping
lips, check for wear and replace if re-
quired.
Check the brushes for wear, replace if
required.
Charge battery.
During long operating pauses: Carry
out refill charging for the battery.
Check battery pole for oxidation; brush
it if required and lubricate it using pole
grease. Ensure that the connection ca-
ble sits firmly.
Clean the seals between dirt water res-
ervoir and cover and check for tight-
ness, replace if required.
Check the acid density of the cells if the
batteries are not maintenance-free bat-
teries.
Clean the brush tunnel (only R cleaning
head)
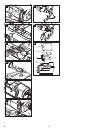
Figure 12, see cover page
Remove the water distribution strip from
the cleaning head and clean water ca-
nal (only R cleaning head).
Replace pump hose of the metering
pump (only Dose model).
Have the prescribed inspection carried
out by the customer service.
To ensure a reliable operation of the appli-
ance maintenance contracts can be con-
cluded with the competent Kärcher sales
office.
Remove the vacuum bar.
Unscrew the star grips.
Figure 13, see cover page
Remove the plastic parts.
Remove the vacuum lips.
Insert new vacuum lips.
Insert the plastic parts.
Screw in and tighten the star grips.
Push the pedal for raising/ lowering the
cleaning head down.
Slide the cleaning head under the appli-
ance so that the hose points toward the
rear.
Only slide the cleaning head halfway
under the appliance.
Figure 14, see cover page
Remove the lid of the cleaning head.
Figure 15, see cover page
Connect the power cord of the cleaning
head to the appliance (same colours
must meet).
Replace the lid and lock it.
Slide the cleaning head halfway under
the appliance.
Figure 16, see cover page
Connect the hose couplers on the
cleaning head to the hose on the appli-
ance.
Figure 17, see cover page
Insert the tab into the middle of the
cleaning head, between the fork of the
lever.
Position the lever on the pedal for rais-
ing/lowering so that the borings in the
lever and the cleaning head align.
Insert the stop pin through the bushings
and swivel the locking plate downward.
Figure 18, see cover page
Insert the cylinder pin into the boring of
the drawbar.
Slide the drawbar with the pin the guide
channel on the cleaning head all the
way to the bottom and lock.
Inclination
Adjust brush contact pressure (only
with the Adv model)
Adjust wiper flaps (only with the
Adv model)
Emptying the Dirt Water Reservoir
Emptying the Fresh Water Tank
Empty waste container (only with R
cleaning head)
Shutting down
Transport
With mounted D cleaning head
Storage
Maintenance and care
Maintenance schedule
After the work
Monthly
Yearly
Maintenance Works
Maintenance contract
Replacing the vacuum lips
Install D cleaning head
19
EN
 1
1
 2
2
 3
3
 4
4
 5
5
 6
6
 7
7
 8
8
 9
9
 10
10
 11
11
 12
12
 13
13
 14
14
 15
15
 16
16
 17
17
 18
18
 19
19
 20
20
 21
21
 22
22
 23
23
 24
24
 25
25
 26
26
 27
27
 28
28
 29
29
 30
30
 31
31
 32
32
 33
33
 34
34
 35
35
 36
36
 37
37
 38
38
 39
39
 40
40
 41
41
 42
42
 43
43
 44
44
 45
45
 46
46
 47
47
 48
48
 49
49
 50
50
 51
51
 52
52
 53
53
 54
54
 55
55
 56
56
 57
57
 58
58
 59
59
 60
60
 61
61
 62
62
 63
63
 64
64
 65
65
 66
66
 67
67
 68
68
 69
69
 70
70
 71
71
 72
72
 73
73
 74
74
 75
75
 76
76
 77
77
 78
78
 79
79
 80
80
 81
81
 82
82
 83
83
 84
84
 85
85
 86
86
 87
87
 88
88
 89
89
 90
90
 91
91
 92
92
 93
93
 94
94
 95
95
 96
96
 97
97
 98
98
 99
99
 100
100
 101
101
 102
102
 103
103
 104
104
 105
105
 106
106
 107
107
 108
108
 109
109
 110
110
 111
111
 112
112
 113
113
 114
114
 115
115
 116
116
 117
117
 118
118
 119
119
 120
120
 121
121
 122
122
 123
123
 124
124
 125
125
 126
126
 127
127
 128
128
 129
129
 130
130
 131
131
 132
132
 133
133
 134
134
 135
135
 136
136
 137
137
 138
138
 139
139
 140
140
 141
141
 142
142
 143
143
 144
144
 145
145
 146
146
 147
147
 148
148
 149
149
 150
150
 151
151
 152
152
 153
153
 154
154
 155
155
 156
156
 157
157
 158
158
 159
159
 160
160
 161
161
 162
162
 163
163
 164
164
 165
165
 166
166
 167
167
 168
168
 169
169
 170
170
 171
171
 172
172
 173
173
 174
174
 175
175
 176
176
 177
177
 178
178
 179
179
 180
180
 181
181
 182
182
 183
183
 184
184
 185
185
 186
186
 187
187
 188
188
 189
189
 190
190
 191
191
 192
192
 193
193
 194
194
 195
195
 196
196
 197
197
 198
198
 199
199
 200
200
 201
201
 202
202
 203
203
 204
204
 205
205
 206
206
 207
207
 208
208
 209
209
 210
210
 211
211
 212
212
 213
213
 214
214
 215
215
 216
216
 217
217
 218
218
 219
219
 220
220
 221
221
 222
222
 223
223
 224
224
 225
225
 226
226
 227
227
 228
228
 229
229
 230
230
 231
231
 232
232
 233
233
 234
234
 235
235
 236
236
 237
237
 238
238
 239
239
 240
240
 241
241
 242
242
 243
243
 244
244
 245
245
 246
246
 247
247
 248
248
 249
249
 250
250
 251
251
 252
252
 253
253
 254
254
 255
255
 256
256
 257
257
 258
258
 259
259
 260
260
 261
261
 262
262
 263
263
 264
264
 265
265
 266
266
 267
267
 268
268
 269
269
 270
270
 271
271
 272
272
Инструкции и руководства похожие на KARCHER B 90 R ADV BP


Другие инструкции и руководства из категории Поломоечная машина


