al sole potrebbe causare cambiamenti di colore in
molti materiali.
• Conservare il prodotto in un posto asciutto.
ATTENZIONE
• NON LASCIATE MAI INCUSTODITO IL VOSTRO
BAMBINO.
• POTREBBE ESSERE PERICOLOSO UTILIZZARE
ACCESSORI CHE NON SIANO APPROVATI DAL
COSTRUTTORE.
• EVITARE DI INTRODURRE LE DITA NEI MECCANISMI.
• LE OPERAZIONI DI MONTAGGIO DEVONO ESSERE
EFFETTUATE DA ADULTI.
• NON UTILIZZATE IL PRODOTTO SE PRESENTA
ROTTURE O PEZZI MANCANTI.
• DA FERMI METTERE SEMPRE I FRENI.
• NON UTILIZZATE IL PRODOTTO
IN VICINANZA DI SCALE O GRADINI.
• VERIFICARE IL CORRETTO AGGANCIO DEI
SEGGIOLINI.
NORME DI SICUREZZA
Pacchi e/o accessori possono rendere instabile il
prodotto. Raccomandiamo di non caricare il cestello
con più di 5 kg.
Fate attenzione al rischio rappresentato dal fuoco
e da altre significative fonti di calore quali radiatori
elettrici, stufe a gas ecc. nelle immediate vicinanze del
prodotto.
Assicurarsi sempre che i seggiolini siano ben
agganciati da ambo i lati, premendo con entrambe le
mani sul prodotto.
• IMPORTANT: read the instructions carefully before
use. Save the instructions for future reference.
• PEG PEREGO reserves the right to make any
necessary changes or improvements to the products
shown at any time without notice.
Peg Perego S.p.A. is an ISO 9001 certified
company.
The fact that we are certified provides
a guarantee of our honesty for our
customers, and fosters trust in the
companyʼs way of working.
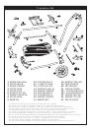
CUSTOMER SERVICE
If parts of the model are accidentally lost or damaged,
use only original Peg Perego spare parts. Contact
the Peg Perego Customer Service for all repair work,
replacements, information about products, and sale of
original spare parts and accessories, at the following:
tel.: 0039-039-60.88.213
fax: 0039-039-33.09.992
e-mail: assistenza@pegperego.it,
www.pegperego.com
Peg Perego is at the consumer's service, meeting
every need in the best way possible. This is why our
customers' opinions are so important and valuable
to us. We would be very grateful if you would kindly
fill in the CUSTOMER SATISFACTION QUESTIONNAIRE
after using one of our products. You will find the
questionnaire on the Internet at "www.pegperego.
com/SSCo.html.en-UK".
Please note any observations or suggestions you may
have on the questionnaire.
INSTRUCTIONS FOR USE
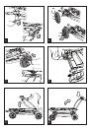
ASSEMBLING THE WHEELS
1• Remove the four protection caps (two round ones
and two square ones) from the chassis while it is
still folded up, as shown in the Þ gure.
2• Mount the front wheels with the chassis folded,
pressing on the attachment lever (Þ gure A) and
inserting the hub onto the rod (Þ gure B). Check
to make sure the wheels are correctly attached by
pulling them in opposite directions.
3• Repeat the same operation on the rear wheels as
for the front wheels (steps A and B).
•
Check to make sure the brake gear is correctly
installed.
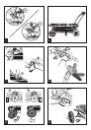
BRAKE
4• To set the brake on the chassis, lower the brake
bar on the rear wheels, as shown in the Þ gure.
OPENING THE CHASSIS
•
Set the brake while the chassis is still folded up.
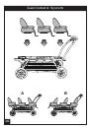
5• Lift the handlebar in the direction shown by the
arrow.
6• Press the handlebar downwards until it clicks into
the Þ nal position.
7• To make sure the chassis is correctly open, check
the illustration.
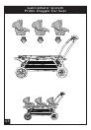
BASKET
8• The basket goes at the base of the chassis, as
shown in the Þ gure.
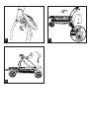
9• The basket fastens to six diff erent points. First,
fasten it to the four buttons in the front and back,
as shown in Þ gure A and B. Then fasten the two
straps to the chassis pipe, as shown in Þ gure C.
EN•ENGLISH