Windows Printing
Xerox® Phaser® 3052/3260
User Guide
47
6.
Check the check box for
LPR Port Monitor
to enable the service.
7.
Select the
OK
button. Your computer may need to restart.
Windows 2008
1.
Select
Start
>
Administrative Tools
.
2.
Select
Print Management
.
3.
Select the
+
sign for Print Servers. Select the print server to which you want to add the printer and
select Add Printer.
4.
Check the check box for
LPR Port Monitor
to enable the service.
5.
Select the
OK
button. Your computer may need to restart.
Install Printer Driver
1.
From the Windows
Start
menu, navigate to your
Devices and Printers
or
Printers
settings.
2.
Select
Add a Printer
.
3.
Select the Local Printer option.
Depending on your operating system, if already selected, select
Automatically detect and install
my Plug and Play printer
to deselect it.
4.
Select the local printer and click
Next
.
5.
Select
Create a new port
.
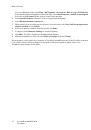
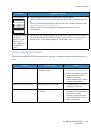
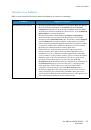
6.
Select the
LPR
option from the
Type of Port
pull-down menu:
7.
Select the
Next
button.
8.
Enter the IP Address of the printer.
9.
Enter a name for the printer.
10. Select the
OK
button.
11. You will be prompted for a Printer Driver. Select
Have Disk
.
12. Select the
Browse
button.
13. Select the required Printer Driver file
.inf
.
14. Select the
Open
button.
15. Select the
OK
button.
16. Select the printer model from the list.
17. Select the
Next
button.
18. The
Name your Printer
screen appears.
19. Enter details in the
Printer name
field.
20. Select the
Next
button. The
Printer Sharing
screen appears.
21. Select the
Do not share
or
Share
option and enter the name, location, and comment, if required.
22. Select the
Next
button.
23. Select
Set as the default printer
if required.
24. Select
Print Test Page
to print a test page.
25. Select the
Finish
button. The printer driver will install.
26. Verify that the test page is printed at the machine.
 1
1
 2
2
 3
3
 4
4
 5
5
 6
6
 7
7
 8
8
 9
9
 10
10
 11
11
 12
12
 13
13
 14
14
 15
15
 16
16
 17
17
 18
18
 19
19
 20
20
 21
21
 22
22
 23
23
 24
24
 25
25
 26
26
 27
27
 28
28
 29
29
 30
30
 31
31
 32
32
 33
33
 34
34
 35
35
 36
36
 37
37
 38
38
 39
39
 40
40
 41
41
 42
42
 43
43
 44
44
 45
45
 46
46
 47
47
 48
48
 49
49
 50
50
 51
51
 52
52
 53
53
 54
54
 55
55
 56
56
 57
57
 58
58
 59
59
 60
60
 61
61
 62
62
 63
63
 64
64
 65
65
 66
66
 67
67
 68
68
 69
69
 70
70
 71
71
 72
72
 73
73
 74
74
 75
75
 76
76
 77
77
 78
78
 79
79
 80
80
 81
81
 82
82
 83
83
 84
84
 85
85
 86
86
 87
87
 88
88
 89
89
 90
90
 91
91
 92
92
 93
93
 94
94
 95
95
 96
96
 97
97
 98
98
 99
99
 100
100
 101
101
 102
102
 103
103
 104
104
 105
105
 106
106
 107
107
 108
108
 109
109
 110
110
 111
111
 112
112
 113
113
 114
114
 115
115
 116
116
 117
117
 118
118
 119
119
 120
120
 121
121
 122
122
 123
123
 124
124
 125
125
 126
126
 127
127
 128
128
 129
129
 130
130
 131
131
 132
132
 133
133
 134
134
 135
135
 136
136
 137
137
 138
138
 139
139
 140
140
 141
141
 142
142
 143
143
 144
144
 145
145
 146
146
 147
147
 148
148
 149
149
 150
150
 151
151
 152
152
 153
153
 154
154
 155
155
 156
156
 157
157
 158
158
 159
159
 160
160
 161
161
 162
162
 163
163
 164
164
 165
165
 166
166
 167
167
 168
168
 169
169
 170
170
 171
171
 172
172
 173
173
 174
174