Printing Using Windows
Xerox® Phaser® 3052/3260
User Guide
72
4.
Select
Save
. The name appears in the
Overlay List
box.
5.
Select
OK
.
Note:
The overlay document size must be the same as the documents you print with the overlay.
Do not create an overlay with a watermark.
6.
Select
OK
on the
Advanced
tab page.
7.
Select
OK
in the main
window.
8.
An Are you Sure? message displays. Select
Yes
to confirm.
Using a Page Overlay
1.
Select the required overlay from the
Overlay
drop-down list box.
If the overlay file you want does not appear in the overlay list, select the
Edit
button and
Load
Overlay
, and select the
Overlay file
.
If you have stored the overlay file you want to use in an external source, you can also load the file
when you access the Load Overlay window.
After you select the file, select
Open
. The file appears in the Overlay List box and is available for
printing. Select the overlay from the Overlay List box.
2.
If necessary, select
Confirm Page Overlay When Printing
. If this box is checked, a message
window appears each time you submit a document for printing, asking you to confirm your wish to
print an overlay on your document.
If this box is not checked and an overlay has been selected, the overlay automatically prints with
your document.
3.
Select
OK
.
Deleting a Page Overlay
1.
Select
Edit
from the Overlay drop-down list. The
Edit Overlay
window appears.
2.
Select the Overlay you want to delete from the
Overlay List
box.
3.
Select
Delete Overlay
. When a confirming message window appears, select
Yes
.
4.
Select
OK
.
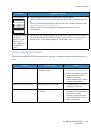
Output Options
Select the required Print order from the drop-down list box:
•
Normal:
All pages are printed.
•
Reverse All Pages:
Your printer prints all pages from the last page to the first page.
•
Print Odd Pages:
Your printer prints only the odd numbered pages of the document.
•
Print Even Pages:
Your printer prints only the even numbered pages of the document.
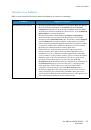
Select the
Skip Blank Pages
check box if you do not want blank pages to be printed.
To add a binding margin, select the
Manual Margin
check box and select
Details
to select the margin
position and width.
 1
1
 2
2
 3
3
 4
4
 5
5
 6
6
 7
7
 8
8
 9
9
 10
10
 11
11
 12
12
 13
13
 14
14
 15
15
 16
16
 17
17
 18
18
 19
19
 20
20
 21
21
 22
22
 23
23
 24
24
 25
25
 26
26
 27
27
 28
28
 29
29
 30
30
 31
31
 32
32
 33
33
 34
34
 35
35
 36
36
 37
37
 38
38
 39
39
 40
40
 41
41
 42
42
 43
43
 44
44
 45
45
 46
46
 47
47
 48
48
 49
49
 50
50
 51
51
 52
52
 53
53
 54
54
 55
55
 56
56
 57
57
 58
58
 59
59
 60
60
 61
61
 62
62
 63
63
 64
64
 65
65
 66
66
 67
67
 68
68
 69
69
 70
70
 71
71
 72
72
 73
73
 74
74
 75
75
 76
76
 77
77
 78
78
 79
79
 80
80
 81
81
 82
82
 83
83
 84
84
 85
85
 86
86
 87
87
 88
88
 89
89
 90
90
 91
91
 92
92
 93
93
 94
94
 95
95
 96
96
 97
97
 98
98
 99
99
 100
100
 101
101
 102
102
 103
103
 104
104
 105
105
 106
106
 107
107
 108
108
 109
109
 110
110
 111
111
 112
112
 113
113
 114
114
 115
115
 116
116
 117
117
 118
118
 119
119
 120
120
 121
121
 122
122
 123
123
 124
124
 125
125
 126
126
 127
127
 128
128
 129
129
 130
130
 131
131
 132
132
 133
133
 134
134
 135
135
 136
136
 137
137
 138
138
 139
139
 140
140
 141
141
 142
142
 143
143
 144
144
 145
145
 146
146
 147
147
 148
148
 149
149
 150
150
 151
151
 152
152
 153
153
 154
154
 155
155
 156
156
 157
157
 158
158
 159
159
 160
160
 161
161
 162
162
 163
163
 164
164
 165
165
 166
166
 167
167
 168
168
 169
169
 170
170
 171
171
 172
172
 173
173
 174
174