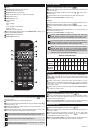
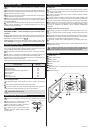
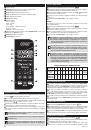
MW-007_v01
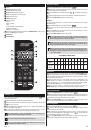
Kitchen timer
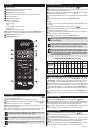
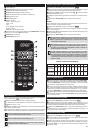
1
Press the
Kitchen Timer
button „
” will start flashing on the display.
2
By means of the numeric keypad, set the time for the timer. The maximum time which
can be set for the timer is 99 minutes and 99 seconds.
3
Set the
START/+30SEC.
button to confirm the setting and to start the countdown.
4
Irrespective of whether the door is closed or open, after the set time has elapsed,
a five-time sound signal will be heard. If the clock has been set earlier (12-hour display
mode), the current time will appear on the display.
The kitchen timer is a separate operating mode of the microwave oven,
independent from the clock.
During the countdown, no other oven programme can be set.
Each programme can be stopped by pressing the STOP/Cancel button,
by pressing the button twice you will end the programme. To resume the
stopped programme, press the START/+30SEC. button.
Auto menu
The microwave oven has the auto menu pre-set for cooking certain products: popcorn,
potatoes, pizza, frozen vegetables, beverages, food on plate.
Each auto menu programme has several weight or volume options with the appropriate
cooking time.
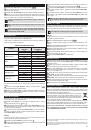
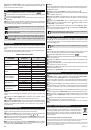
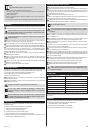
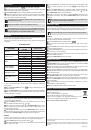
AUTO MENU TABLE
PROGRAMME
PRODUCT WEIGHT,
VOLUME
COOKING TIME [s]
Popcorn
50 g
0:55
100 g
2:00
Potato
(Potatoes)
1 (230 g)
4:00
2 (460 g)
8:00
3 (690 g)
13:00
Pizza
100 g
0:40
200 g
1:10
400 g
2:30
Frozen Vegetable
(frozen vegetables)
150 g
4:00
350 g
8:00
500 g
11:00
Beveraga
(beverages)
1 (120 ml)
1:00
2 (240 ml)
2:00
3 (360 ml)
3:00
Dinner Plate
(Food on
plate)
250 g
3:30
350 g
4:30
500 g
6:00
EXAMPLE
In order to set the auto menu for defrosting 350 grams of vegetables, complete the
following steps:
1
Press the
Frozen Vegetable
button until „
” appears on the display (in this case,
press the button twice).
2
Press the
START/+30SEC.
button to start defrosting. The end of the defrosting will be
signalled by a five-time sound. If the clock has been set earlier (12-hour display mode), the
current time will appear on the display.
Memory function
The microwave oven has a built-in memory function which saves the programmed cooking
values (power level and cooking time).
1
Press the
0/Memory
button to select one of the available memory cells (3 memory
cells are available). The display will show „ ”, „ ” or „ ”.
2
If the memory cell has been set earlier, press the
START/+30SEC.
button to use it.
However, if the memory cell has not been set earlier, continue the setting process. One or
two cooking stages may be set.
3
After completing the setting process, press the
START/+30SEC.
button to confirm the
settings. The display will show the number of the memory cell in which the programme has
been saved. Press the
START/+30SEC.
button again to start the programme.
EXAMPLE
In order to set the programme for cooking for 3 minutes and 20 seconds at the 80%
microwave power level and to save it in memory cell “2”, complete the following steps:
1
Press the
0/Memory
button twice, the display will show „ ”.
2
Press the
Time Cook
button and then enter the cooking time by means of the numeric
keypad – press in turn “
3
,
2
,
0
”.
3
Press the
Power
button, and then press the “
8
” button on the numeric keypad in order
to set the microwave power level to 80%, the symbo „
” will start flashing on the
display.
4
Press the
START/+30SEC.
button to confirm the settings. The display will show the
number of the memory cell in which the programme has been saved – „ ”. Press the
button
START/+30SEC.
again to start the programme.
5
In order to start the saved programme, press the
0/Memory
button twice (until
„
”) appears on the display). Then, press the
START/+30SEC.
button to start the saved
programme.
The settings will last as long as the microwave oven is connected to the
mains (and the electricity supply is maintained).
Multi-stage cooking
You can set up to 2 cooking stages. In the case of multi-stage cooking, if defrosting is one
of the cooking stages, the defrosting program will be automatically started as the first one.
When one stage is finished, a sound signal will be heard and the next stage will start.
Automatic cooking may not be one of the multi-stage cooking programmes.
EXAMPLE
You want to set defrosting for 5 minutes and then to cook for 7 minutes at the 80%
microwave power level. Complete the following steps:
1
Press the
Time Cook
button, the display will show „
”.
2
By means of the numeric keypad, enter the cooking time, press in turn “
5
,
0
,
0
”
(5 minutes).
3
Press the
Power
button, and then press the “
8
” button on the numeric keypad to set
the microwave power level to 80%.
4
Press the
Time Cook
button and, by means of the numeric keypad, enter the cooking
time, press in turn “
1
,
0
,
0
,
0
” (10 minutes).
5
Press the
Power
button, and then press the “
6
” button on the numeric keypad to set
the microwave power level to 60%.
6
Press the
START/+30SEC.
button to start cooking.
Additional information
1
Each started programme can be stopped by pressing the
STOP/Cancel
button. Press
the
START/+30SEC.
button to resume the stopped programme. By pressing the
STOP/
Cancel
button twice you will end the programme.
2
When in the cooking mode, press the
Clock
button, the display will show the current
time. After 3 seconds the indications will return to the previous state.
3
After pressing the
Power
button during the microwave cooking or multi-stage cooking,
the display will show the current microwave power level. After 3 seconds the indications will
return to the previous state.
4
If during the operation of the oven the door has been opened, then after its closing
press the
START/+30SEC.
button in order to resume the oven operation.
5
If within one minute after the end of setting, the programme will not be confirmed by
means of the
START/+30SEC.
button, the settings will be cancelled. The current time will
appear on the display.
6
The correct pressing of the button will be signalled by a single sound. In case of
incorrect pressing, no sound will be heard.
7
The end of programme will be signalled by a five-time sound.
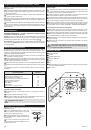
Ecology – Environmental protection
Each user can contribute to protect the environment. It is neither difficult nor
expensive. In order to do so:
Return cardboard packages to recycling points.
Throw polyethylene (PE) bags into appropriate containers.
Return a worn out appliance to an appropriate collecting point as the
components of the appliance may pose a threat to the environment.
Do not dispose of with household waste!!!
The manufacturer/importer does not accept any liability for any damages resulting from unintended use
or improper handling.
The manufacturer/importer reserves his rights to modify the product any time in order to adjust it to law
regulations, norms, directives, or due to construction, trade, aesthetic or other reasons, without notifying
in advance.