34 | Scanning
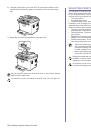
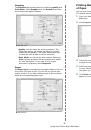
5. Press the left/right arrow until Local PC appears on the bottom line of
the display and press OK. If the printer connected to a network, select
Network PC and press OK.
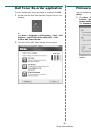
6. From Scan Destination, press the left/right arrow until the application
program you want appears, then press OK.
Default setting is My Documents.
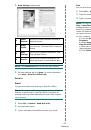
7. Press the left/right button until the setting you want appears then press
OK.
•
Resolution: Sets the image resolution.
•
Scan Color: Sets the color mode.
•
Scan Format: Sets the file format in which the image is to be saved.
•
Scan Size: Sets the image size.
8. Scanning begins.
SCANNING BY A NETWORK CONNECTION
If you have connected your printer to a network and set up network
parameters correctly, you can scan and send images over the network.
Setting up an e-mail account
To scan and send an image as an email attachment, you need to set up
network parameters using Embedded Web Service.
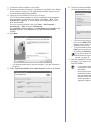
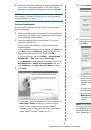
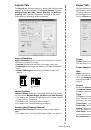
1. Enter your printer’s IP address as the URL in a browser and click Go
to access the web site of your printer.
2. Click Machine Settings and E-mail Setup.
3. Select IP Address or Host Name.
4. Enter the IP address in dotted decimal notation or as a host name.
5. Enter the server port number, from 1 to 65535.
The default port number is 25.
6. Check the box next to SMTP Requires Authentication to require
authentication.
7. Enter the SMTP server login name and password.
8. Click Apply.
Registering authorized users
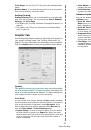
1. Enter your printer’s IP address as the URL in a browser and click Go
to access the web site of your printer.
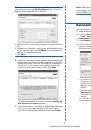
2. Click Machine Settings and User Authentication.
3. Click Add.
4. Select index number corresponding to the location for storing the
entry, from 1 to 50.
5. Enter user name, auth ID, password and e-mail address.
You need to enter the registered user ID and password in the printer
when you start scanning to email from the control panel.
6. Click Apply.
Scanning to Email
You can scan and send an image as an email attachment. You first need to
set up your email account in Embedded Web Service. See "Setting up an
e-mail account" on page 34.
Before scanning, you can set the scan options for your scan job.
See "Changing the settings for each scan job" on page 35.
1. Ensure that your printer is connected to a network.
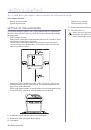
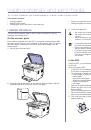
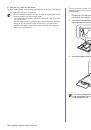
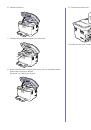
2. Place a single document face down on the document glass. OR load the
document(s) face up into the ADF.
For details about loading an original. See "Loading originals" on
page 23.
3. Press Scan/Email.
4. Press the left/right arrow until Scan to Email appears on the bottom line
of the display and press OK.
5. When From appears on the top line of the display, enter the sender’s
email address and press OK.
6. When DestinationEmail appears on the top line of the display, enter the
recipient’s email address and press OK.
If you have set up Address Book, you can use a speed button or a speed
email or group email number to retrieve an address from memory.
See "Setting up Address Book" on page 35.
7. To enter additional addresses, press OK when Yes appears and repeat
step 6.
To continue to the next step, press the left/right arrow to select No and
press OK.
8. If the display asks if you want to send the email to your account, press
the left/right arrow to select Yes or No and press OK.
9. Enter an email subject and press OK.
If you see a Not Available message, check the port connection.
If you selected Network PC, select your registered user ID and
enter the PIN. Press OK.
•
ID is the same ID as the registered ID for Dell Scan Manager.
•
PIN is the 4 digit number registered for Dell Scan Manager.
To add or delete the folder where the scanned file is saved, add or
delete the application program in Dell Scan Manager
→
Set Scan
Button.
•
Scan Format appears only when you selected the Scan
Destination to My Documents.
•
If you want to scan from the default setting, press Color Start
or Black Start.
•
Scanned image is saved in computer's My Documents
→
My
Pictures
→
Dell folder.
•
You can use Twain driver to scan quickly in Dell Scan
Manager program.
•
You can also scan by pressing Window's Start
→
Control
Panel
→
Dell Scan Manager
→
Quick Scan.
If the authentication method of SMTP server is POP3 before
SMTP, check the box next to SMTP Requires POP3 Before
SMTP Authentication.
a. Enter the IP address in dotted decimal notation or as a host
name.
b. Enter the server port number, from 1 to 65535. The default
port number is 25.
If you registered Auth Id, Password and checked Enable Auth
User in User Authentication on Embedded Web Service, My
Log in ID and Password appear. Enter the Auth Id and Password
for your printer. Go to step 6.
This prompt does not appear if you have activated the Auto Send
To Self option in the email account setup.
 1
1
 2
2
 3
3
 4
4
 5
5
 6
6
 7
7
 8
8
 9
9
 10
10
 11
11
 12
12
 13
13
 14
14
 15
15
 16
16
 17
17
 18
18
 19
19
 20
20
 21
21
 22
22
 23
23
 24
24
 25
25
 26
26
 27
27
 28
28
 29
29
 30
30
 31
31
 32
32
 33
33
 34
34
 35
35
 36
36
 37
37
 38
38
 39
39
 40
40
 41
41
 42
42
 43
43
 44
44
 45
45
 46
46
 47
47
 48
48
 49
49
 50
50
 51
51
 52
52
 53
53
 54
54
 55
55
 56
56
 57
57
 58
58
 59
59
 60
60
 61
61
 62
62
 63
63
 64
64
 65
65
 66
66
 67
67
 68
68
 69
69
 70
70
 71
71
 72
72
 73
73
 74
74
 75
75
 76
76
 77
77
 78
78
 79
79
 80
80
 81
81
 82
82
 83
83
 84
84
 85
85
 86
86
 87
87
 88
88
 89
89
 90
90
 91
91
 92
92
 93
93
 94
94
 95
95
 96
96
 97
97
 98
98
 99
99
 100
100
 101
101
 102
102
 103
103
 104
104
 105
105
 106
106
 107
107
 108
108
 109
109
 110
110
 111
111
 112
112
 113
113
 114
114
 115
115
 116
116