U s i n g t h e Pr i n t e r
5 3
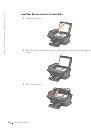
Using Your Speed Dial List
1
Press Speed Dial, and then:
•
Use the + or - button to scroll through the speed dial list to find the desired fax
number, and then press Fax.
•
Press the keypad buttons to enter a two-digit number (viewable in the upper left
corner of the display), and then press Fax.
2
When the default screen appears, press Options.
3
Press Select.
4
Enter the information about when you want your fax to send.
5
Press Select again, and then press 1 for AM or 2 for PM.
The default screen appears again.
NOTE:
You can repeat this process to enter more numbers to which you want to send a delayed
fax.
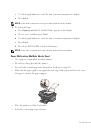
On Hook Dial
1
On the operator panel, press Fax.
2
Press Options repeatedly until
On Hook Dial
appears.
3
Press Select to make the printer go off hook.
4
Enter the number to which you want to send a fax.
5
Press the keypad numbers to navigate an automated answering system.
6
Press Black or Color when you are ready to send a fax.
 1
1
 2
2
 3
3
 4
4
 5
5
 6
6
 7
7
 8
8
 9
9
 10
10
 11
11
 12
12
 13
13
 14
14
 15
15
 16
16
 17
17
 18
18
 19
19
 20
20
 21
21
 22
22
 23
23
 24
24
 25
25
 26
26
 27
27
 28
28
 29
29
 30
30
 31
31
 32
32
 33
33
 34
34
 35
35
 36
36
 37
37
 38
38
 39
39
 40
40
 41
41
 42
42
 43
43
 44
44
 45
45
 46
46
 47
47
 48
48
 49
49
 50
50
 51
51
 52
52
 53
53
 54
54
 55
55
 56
56
 57
57
 58
58
 59
59
 60
60
 61
61
 62
62
 63
63
 64
64
 65
65
 66
66
 67
67
 68
68
 69
69
 70
70
 71
71
 72
72
 73
73
 74
74
 75
75
 76
76
 77
77
 78
78
 79
79
 80
80
 81
81
 82
82
 83
83
 84
84
 85
85
 86
86
 87
87
 88
88
 89
89
 90
90
 91
91
 92
92
 93
93
 94
94
 95
95
 96
96
 97
97
 98
98
 99
99
 100
100
 101
101
 102
102
 103
103
 104
104
 105
105
 106
106
 107
107
 108
108
 109
109
 110
110
 111
111
 112
112
 113
113
 114
114
 115
115
 116
116
 117
117
 118
118
 119
119
 120
120
 121
121
Инструкции и руководства похожие на DELL A960