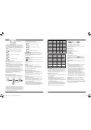
6
7
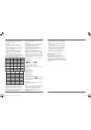
Display the three
channels alternatively
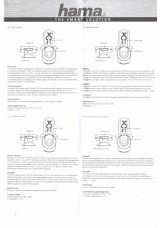
FRONT
VIEW
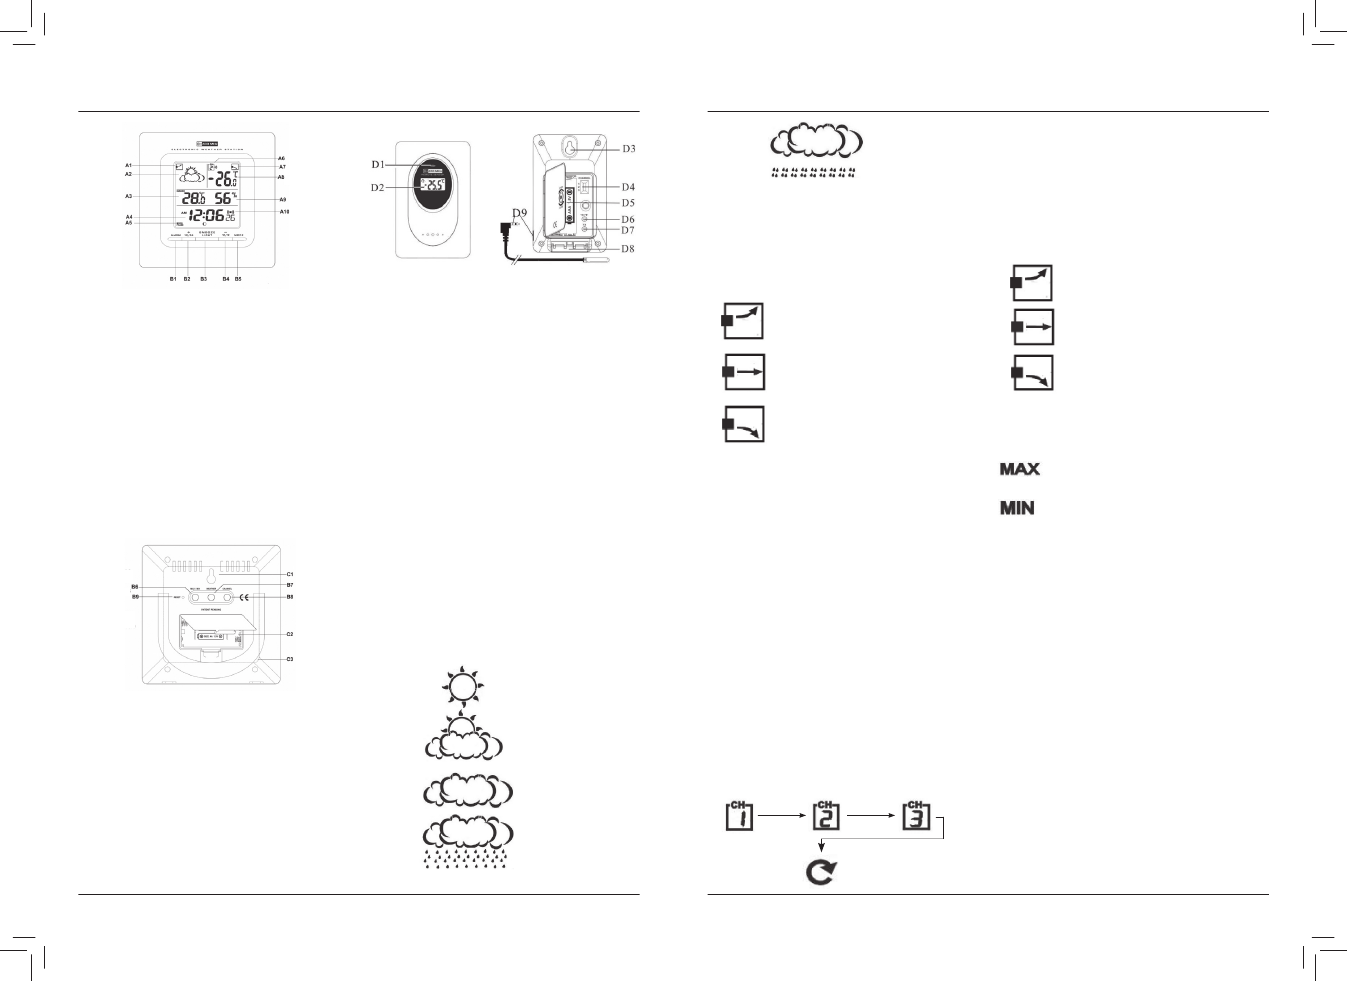
Part A- LCD
A1: Barometer Pressure Trend
A2: Weather
Forecast
A3: Indoor Temperature.
A4: Real Time Display.
A5: Moon Phase Selected Channel
A6: Outdoor channel
A7: Outdoor Temperature Trend
A8: Outdoor Temperature
A9:
Indoor
Humidity
A10: Alarm icon
Part B- Buttons
B1: “ALARM” button
B2: “+(12/24)”
button.
B3: ”SNOOZE/LIGHT” button
B4: “- (°C/°F)” button
BACK
VIEW
B5: “MODE” button
B6: “MAX/MIN “ button
B7: “WEATHER” button
B8: “CHANNEL”
button
B9: “RESET” button
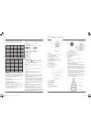
Part C- Structure
C1: Wall Mount Hole
C2: Battery Compartment
C3: Stand
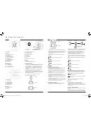
Thermo Sensor Unit Appearance.
FRONT VIEW
BACK VIEW
D1: Transmission Indication LED
D2: Outdoor
Temperature
D3: Wall Mount Hole
D4: Channel Select Switch
D5: Battery
Compartment
D6: °C/°F”
button
D7: “TX” button
D8: Stand
D9: Temperature Sensor Probe Plug and Jack
Set Up:
• Insert batteries.
• Use a pin to press the RESET (B9) button
Weather Forecast Function:
• After you have inserted the batteries or pressed the
“WEATHER” button (B7) for 3 seconds, the weather icon starts
to fl ash (A2). Enter the current weather pressing “- “ (B4)
buttons. Press “ + “ (B2) button to confi rm the setting. The
weather forecast may not be accurate if the current weather
entered is not correct.
• The current weather status should be entered again if the
altitude of the Main Unit is changed. ( Barometric pressure is
lower at higher altitudes. Therefore, altitude change will affect
the weather forecast). The weather station will start the fi rst
forecast 6 hours after the current weather status is entered.
• 5 different weather symbols indicate the weather forecast.
These symbols stand for the weather forecast.
means Sunny .
means Slightly Cloudy.
means
Cloudy.
means
Rainy
g Operating Instruction
means
Cloudburst.
• If there is any inconsistency of weather forecast between
Local Weather Station and this unit, the Local Weather
Station’s forecast should prevail. We will not be held
responsible for any trouble that may come up due to wrong
forecasting from this unit.
• The trend pointer displayed on the LCD (A1) indicates the
trend of the Barometric pressure.
indicates the barometric pressure trend is
increasing.
indicates the barometric pressure trend is
steady.
indicates the barometric pressure trend is
decreasing.
Outdoor Thermo Sensor Unit Registration Procedure:
• The main unit automatically starts receiving outdoor
temperature data from the Outdoor Thermo Sensor after
the batteries are inserted.
• The thermo sensor will automatically transmit temperature
data to the main unit after batteries are inserted. The battery
compartment (D5) of the thermo sensor is located behind the
back cover. To open the compartment unscrew the screws.
• If you would like to use more than one external transmitter
(Maximum3), select the Channel, CH1, CH2 or CH3 respectively
to ensure that each thermo sensor transmitts data via a
different channel. The Channel Select Switch (D4) is at the
back of the thermo sensor.
• Press “ TX “ button (D7) on the thermo sensor unit to transmit
temperature data to the main unit manually. The main unit
makes a “beep” sound as soon as it has received the
temperature
data.
• Press “ °C /°F” button (D6), on the Thermo Sensor unit, to
switch between degrees Celsius or Fahrenheit on the
temperature
display.
Display outdoor temperature :
• Press “ CHANNEL” button (B8) to view the 3 Channels’
temperatures. The sequence as follows:
Press
Press
Press
“CHANNEL” button
“CHANNEL” button
“CHANNEL” button
• Hold “ CHANNEL” button (B8) for 3 seconds to deactivate an
unused channel manually. It will automatically register a new
channel again if a new channel is received. If a temperature is
not displayed via an existing channel ( “- - . –“ is displayed on
the LCD ), hold “CHANNEL” button (B8) for 3 seconds to
deactivate this channel. Afterwards another signal will be
received by that channel (“Beep” sound can be heard.). Then,
press “ TX “ button (D7) on the thermo sensor unit to transmit
signal to the main unit manually
• The trend pointer displayed on the LCD(A7) indicates the trend
of the outdoor temperature.
indicates the outdoor temperature is
increasing.
indicates the outdoor temperature is steady.
indicates the outdoor temperature is
decreasing.
Maximum/Minimum Temperature/Humidity recording function:
• Press “MAX/MIN” button (B6) to show the maximum or
minimum of indoor/outdoor Temperature and indoor Humidity.
is shown on the LCD if maximum Temperature/
Humidity is shown.
is shown on the LCD if minimum Temperature/
Humidity is shown.
• Hold “MAX/MIN” button (B6) for 3 seconds to clear the
recorded maximum and minimum reading.
Thermometer:
• Press “-(°C / °F)” button (B4) to select Indoor/Outdoor
Temperature in Celsius mode/ Fahrenheit mode.
• If the temperature is out of the measurable range, LL.L
(beyond the minimum temperature) or HH.H (beyond the
maximum temperature) will be shown on the LCD.
The use of 1.5m cord Temperature Probe:
• Insert the probe plug (D9) to the jack on the right hand side
of the Thermo Sensor Unit.
• Put the metal casing outside and leave the Thermo Sensor
Unit in an indoor area to avoid freezing up the battery when
the outdoor temperature is below -20 °C.
• Always use the temperature probe to sense the temperature
when the temperature is between the following range:
-50 °C ~ 0°C and +50°C ~ + 70°C
Time Setting:
• Hold “MODE” button (B5) for 3 seconds to enter Clock/
Calendar setting Mode .
• Press “+” (B2) or “-” (B4) buttons to adjust the setting and
press “MODE” button (B5) to confi rm each setting.
• The setting sequence is as follows: Hour, Minutes, Second,
Year, Month/Day sequence, Month, Day, Time Zone, Day- of-
week
language.
00075293man_bg_de_en_es_fr_nl_pl_ro_ru_tr.indd 6-7
00075293man_bg_de_en_es_fr_nl_pl_ro_ru_tr.indd 6-7
19.01.11 07:35
19.01.11 07:35