8
9
Thursday
Friday
Saturday
DO
TH
HT
TO
DO
GI
JU
JE
FR
FR
NT
FR
VR
VE
VI
VE
SA
SA
CY
LO
ZA
SA
SA
SA
Language
German, GE
English, EN
Russian, RU
Danish, DA
Dutch, NE
Italian, IT
Spanish, ES
French, FR
Wednesday
MI
WE
CP
ON
WO
ME
MI
ME
Language
Sunday
Monday
Tuesday
German, GE
English, EN
Russian, RU
Danish, DA
Dutch, NE
Italian, IT
Spanish, ES
French, FR
SO
SU
BC
SO
ZO
DO
DO
DI
MO
MO
NH
MA
MA
LU
LU
LU
DI
TU
BT
TI
DI
MA
MA
MA
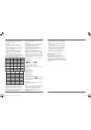
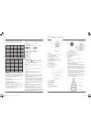
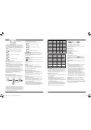
• 8 languages can be selected in Day-of-week, they are:
German, English, Russian, Danish, Dutch, Italian Spanish and
French,. The languages and their selected abbreviations for
each day of the week are shown in the following table.
The time zone :
When travelling to another city in a different time zone, you can
use this function to regulate the time. If for example the time
difference in this city is +1 hour, you must set the time zone to
«+1». If you do not make an adjustment within 15 seconds the
time setting mode will automatically end.
12/24 Hour Display mode:
Press “+(12/24)” button (B2) to select 12 or 24 hours mode.
Snooze Alarm Clock Function:
• Press “MODE” button (B5) to select to view :
Time /Date/Month /Weekday/Alarm/ Time (“AL “Shown on
theCD)
• When viewing the Alarm Time, hold “MODE/SET” button (B5)
for 3 seconds to enter Alarm Time setting. Press “ +” (B2) or
“-” (B4) buttons to adjust the alarm time.
• Press “ALARM” button (B1) to switch alarm on or off. If it is
on, is shown on the LCD.
• When the alarm rings, press “SNOOZE / LIGHT” button (B3) to
activate the snooze alarm. The alarm will snooze for 5 minutes,
then it alarms again. This snooze function can be activated up
to 7 times.
• Press any button to stop the snooze alarm.
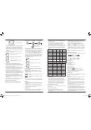
Moon Phase Display
The Moon Phase (A5) of each day is shown on the LCD.
A: New Moon
B: Waxing Crescent
C: First Quarter
D: Waxing Gibbous
E: Full Moon
F: Waning Gibbous
G: Last Quarter
H: Waning Crescent
Low batteries indicator:
The low battery icon appears in the row where the
outdoor temperature of a particular channel is displayed and
indicates that the external transmitter’s batteries are almost
empty. The batteries should be replaced.
Back Light:
When you press “ SNOOZE/LIGHT” button (B3), the back light
glows for 5 seconds.
Note:
• Use a pin to press the reset button (B9) if the Unit does not
work properly.
• Avoid placing the clock near interference sources/metal
frames such as computer or TV sets.
• The clock loses its time information when the battery is
removed.
• Buttons will not function while scanning for thermo sensor’s
signal unless they are well received or stopped manually.
• All Setting Modes will end automatically if you do not make
an adjustment within 15 seconds.
• To achieve a true temperature reading, avoid mounting remote
sensor in direct sunlight or wetness. We recommend that you
mount the remote sensor on an outside Northfacing wall;
obstacles such as walls, concrete, and large metal objects
will reduce the range. To wall mount, use 3 screws to affi x the
wall bracket to the desired wall, plug in the remote sensor to
the
bracket.
Registration and Safety Certifi cation/General Information
This device bears the CE symbol as specifi ed by the provisions
of Directive R & TTE (1999/5/EC).
Hama GmbH & Co. KG hereby declares that this device is in
compliance with the basic requirements and other relevant
guideline and regulations of the 1999/5/EC guideline. You will fi nd
the declaration of compliance and declaration of conformity in
the Internet at http://www.hama.com
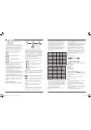
VUE
FRONTALE
Partie A- LCD
A1 : Tendance de la pression atmosphérique
A2 : Prévision météorologique
A3 : Température intérieure
A4 : Affi chage de l´heure actuelle
A5 : Canal sélectionné phase de la lune
A6 : Canal extérieur
A7 : Tendance de la température extérieure
A8 : Température extérieure
A9 : Humidité intérieure A10 : Icône alarme
Partie B- Boutons
B1 : Bouton “ALARME”
B2 : Bouton “+(12/24)”
B3 : Bouton ”SNOOZE/LUMIÈRE”
B4 : Bouton “- (°C/°F)”
B5 : Bouton “MODE”
VUE
ARRIERE
B6 : Bouton“MAX/MIN “
B7 : Bouton “TEMPS”
B8 : Bouton “CANAL”
B9 : Bouton “RESET”
Partie C- Structure
C1 : Creux pour le montage mural
C2 : Compartiment pour batteries
C3 : Etat
Détection thermique
VUE
FRONTALE
VUE ARRIERE
D1 : DEL Indication de la transmission
D2 : Température extérieure
D3 : Creux pour le montage mural
D4 : Commutateur pour la sélection du canal
D5 : Compartiment pour batteries
D6 : Bouton °C/°F”
D7 : Bouton“TX”
D8 : Etat
D9 : port et connecteur de la sonde de détection
Installation :
• Insérer les batteries.
• Utiliser un crayon pour appuyer sur le bouton RESET (B9)
Fonction Prévision Météorologique :
• Après avoir inséré les piles ou après avoir appuyé pendant
3 secondes sur le bouton “TEMPS” (B7), l´icône du temps
• Eclair (A2) apparaît. Entrer comme donnée le temps actuel en
appuyant sur le bouton “- “ (B4). Appuyer sur le bouton “ + “
(B2) pour confi rmer. La prévision météorologique ne sera pas
correcte si vous n´avez pas entré correctement le temps
actuel.
• Si vous modifi ez l´altitude de l´unité principale, introduire de
nouveau l´état actuel du temps. (La pression atmosphérique
est plus basse à une altitude plus élevée. C´est pourquoi le
changement d´ altitude infl uera sur la prévision
météorologique). La station météorologique commencera à
donner sa première prévision météo six heures après avoir
introduit l´état du temps actuel.
• Au total, 5 symboles indiquent la prévision météo future.
signifi
e
Ensoleillé
signifi
e
Pas
signifi
e
Nuageux.
signifi
e
Pluie
f
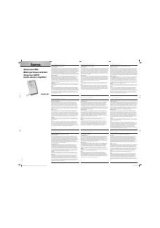
Mode d‘emploi
00075293man_bg_de_en_es_fr_nl_pl_ro_ru_tr.indd 8-9
00075293man_bg_de_en_es_fr_nl_pl_ro_ru_tr.indd 8-9
19.01.11 07:35
19.01.11 07:35