Инструкция для INDESIT K3C557

(скачивание инструкции бесплатно)
Формат файла: PDF
Доступность: Бесплатно как и все руководства на сайте. Без регистрации и SMS.
Дополнительно: Чтение инструкции онлайн
background image

GB

21

   TOP  OVEN 

 TOP  OVEN 

 TOP  OVEN 

 TOP  OVEN 

 TOP  OVEN mode

Turn the thermostat knob between 50°C and Max.
The top heating element comes on.
This mode can be used to brown food at the end of
cooking.

    GRILL

GRILL

GRILL

GRILL

GRILL  mode

Position the thermostat knob between 50°C and
Max.
The central top heating element and the turnspit will
be activated.
The extremely high and direct temperature of the
grill makes it possible to brown the surface of meats
and roasts while locking in the juices to keep them
tender. The grill is also highly recommended for
dishes that require a high surface temperature: such
as beef steaks, veal, rib steak, fillets, hamburgers
etc...
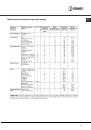
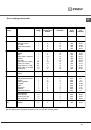
Some grilling examples are included in the “Practical
cooking advice” section.


    FAN-ASSISTED GRILL

FAN-ASSISTED GRILL

FAN-ASSISTED GRILL

FAN-ASSISTED GRILL

FAN-ASSISTED GRILL mode

Position the thermostat knob between 50°C and
Max.
The central top heating element and the fan will be
activated.
This combination of features increases the
effectiveness of the unidirectional thermal radiation
of the heating elements through forced circulation of
the air throughout the oven. This helps prevent food
from burning on the surface, allowing the heat to
penetrate right into the food.     Excellent results are
obtained by using the fan-assisted grill to cook
mixed meat and vegetable kebabs, sausages, pork
ribs, lamb cutlets, spicy chicken, sage-dressed
quail, pork fillet etc...
Cook dishes “au gratin” in this mode with the oven
door closed.
“Gratin” is the best way of cooking sliced perch,
tuna, swordfish, stuffed squid, etc...

Electronic timer*

This function displays the time and works as a timer
which counts down to zero.

!

 All functions will be implemented approximately 7

seconds after they have been set.

Resetting the clock

After the appliance has been connected to the
power supply, or after a power cut, the clock display
will begin to blink, showing the figure: 0:00

0:00

0:00

0:00

0:00

• Press button

  G

  G

  G

  G

  G

 and then buttons 

-

 and 

+

 to set

the exact time. Press and hold the buttons to
quicken the count upwards.

Any necessary modifications can be made by
repeating the above process.

Timer feature

This function may be accessed by pressing the 

nnnnn

button, after which the display will show the symbol

nnnnn

. Every time the 

+

 button is pressed it

corresponds to a time increase of 10 seconds, until
it reaches 99 minutes and 50 seconds. After this
point, each press of the button represents an
increase of one minute, up to a maximum of 10
hours.
Pressing the 

-

 button reduces the time.

After the time period has been set, the timer will
begin to count down. When the timer reaches zero,
the buzzer will sound (this may be stopped by
pressing any button).
The time may be displayed by pressing the 

G

G

G

G

G

button, and the 

nnnnn

 symbol indicates that the timer

function has been set. After approximately 7
seconds, the display will automatically revert to the
timer.

Cancelling a time that has already been set

Press the 

– 

button until the display shows 0:00.

0:00.

0:00.

0:00.

0:00.

Adjusting the buzzer volume

After selecting and confirming the clock settings,
use the 


button to adjust the volume of the alarm

buzzer.

*

Only available in certain models.
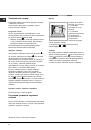
Timer*

To activate the Timer proceed as follows:
1. Turn the TIMER knob in a clockwise direction 

4

for almost one complete revolution to set the
buzzer.
2. Turn the TIMER knob in an anticlockwise direction

5

 to set the desired length of time.

1
2
3
4
5
6
7
8
9
10
11
12
13
14
15
16
17
18
19
20
21
22
23
24
25
26
27
28
Оглавление инструкции
  • Страница 1 из 29
    Руководство по эксплуатации КУХОННАЯ ПЛИТА С ДУХОВЫМ ШКАФОМ RS РУССКИЙ,1 GB English, 15 Содержание Монтаж, 2-3 Расположение и нивелировка Электрическое подсоединение Технические данные Описание изделия, 4 Общии вид Панель управления Включение и эксплуатация, 5-9 Включение духового шкафа Программы
  • Страница 2 из 29
    Установка ! Важно сохранить данное руководство для его последующих консультации. В случае продажи, передачи или переезда проверьте, чтобы данное руководство сопровождало изделие. Выравнивание При необходимости выровнять изделие вкрутите в специальные отверстия по углам в основании кухоннои плиты
  • Страница 3 из 29
    расположена в нижнеи части зажимнои коробки. 3. подсоедините провода N и 6 в соответствии со схемои (см. рисунок) и до упора закрутите винты зажимов. 4. подсоедините оставшиеся провода к зажимам 1-2-3 и закрутите винты. 5. закрепите кабель электропитания в специальном кабельном сальнике. 6.
  • Страница 4 из 29
    Описание изделия RS Общии вид Панель управления Ðóêîÿòêè ÝËÅÊÒÐÈ×ÅÑÊÈÕ ÊÎÍÔÎÐÎÊ * * *Имеется только в некоторых моделях 4
  • Страница 5 из 29
    Включение и эксплуатация ! При первом включении духового шкафа рекомендуем прокалить его примерно в течение 30 минут при максимальнои температуре с закрытои дверцеи. Затем выключите духовои шкаф, откроите дверцу и проветрите помещение. Запах, которыи вы можете почувствовать, вызван испарением
  • Страница 6 из 29
    RS Программы приготовления ! Для всех программ можно задать температуру от 50°C до МАКС кроме: • ГРИЛЬ и ДВОИНОИ ГРИЛЬ (рекомендуется устанавливать только МАКС. температуру); • ДВОИНОИ ВЕНТИЛИРОВАННЫИ ГРИЛЬ (рекомендуется не превышать температуру 200°C). Выбор различных функций кухонной плиты
  • Страница 7 из 29
    Положение рукоятки термостата Между 50°C и Макс. Включаются нагревательные элементы и вентилятор. Так как жар является постоянным и однородным во всем духовом шкафу, воздух обеспечивает однородное приготовление и зажаривание продукта. Кроме того можно одновременно приготовить разные виды продуктов,
  • Страница 8 из 29
    RS Электронныи таимер* Вертел Показывает время и выполняет функцию таимера с обратным отсчетом. ! Все функции включаются примерно через 7 секунд после их выбора. Порядок включения вертела (см. рисунок): 1. установите противень на 1-ыи уровень; 2. установите держатель вертела на 4-ыи уровень и
  • Страница 9 из 29
    Таблица приготовления в духовом шкафу RS 9
  • Страница 10 из 29
    Электрическая варочная панель RS ! на стекляннои поверхности варочнои панели могут быть видны сальные следы от клея, нанесенного на прокладки. Перед началом эксплуатации изделия следует удалить следы клея при помощи специального неабразивного моющего средства. В первые часы работы вы можете
  • Страница 11 из 29
    Предосторожности и рекомендации ! Изделие спроектировано и изготовлено в соответствии с международными нормативами по безопасности. Необходимо внимательно прочитать настоящие предупреждения, составленные в целях вашеи безопасности. Общие требования к безопасности • Не тяните за провод
  • Страница 12 из 29
    RS Экономия электроэнергии и охрана окружающеи среды • Если вы будете пользоваться духовым шкафом вечером и до раннего утра, это поможет сократить нагрузку потребления электроэнергии электростанциями. • При использовании режимов ГРИЛЬ, ДВОИНОИ ГРИЛЬ и ДВОИНОИ ВЕНТИЛИРОВАННЫИ ГРИЛЬ дверца духового
  • Страница 13 из 29
    Техническое обслуживание и уход Отключение электропитания Перед началом какои-либо операции по обслуживанию или чистке отсоедините изделие от сети электропитания. ! Никогда не используйте паровые чистящие агрегаты или агрегаты под высоким давлением для чистки изделия. Чистка духового шкафа •
  • Страница 14 из 29
    RS Мы заботимся о своих покупателях и стараемся сделать сервисное обслуживание наиболее качественным. Мы постоянно совершенствуем наши продукты, чтобы сделать Ваше общение с техникой простым и приятным. Уход за техникой Продлите срок эксплуатации и снизьте вероятность поломки техники.
  • Страница 15 из 29
    Operating Instructions COOKER AND OVEN GB RS РУССКИЙ,1 GB English, 15 Contents Installation, 16-17 Positioning and levelling Electrical connections Technical data Description of the appliance,18 Overall view Control panel Start-up and use, 19-23 Starting the oven Cooking modes Electronic timer Oven
  • Страница 16 из 29
    Installation ! Before operating your new appliance please read this instruction booklet carefully. It contains important information concerning the safe installation and operation of the appliance. The legs* provided with the appliance fit into the slots on the underside of the base of the cooker.
  • Страница 17 из 29
    5. Fix the power supply cable in place by fastening the cable clamp screw. 6. Close the terminal board cover by tightening the screws V. Connecting the supply cable to the mains Install a standardised plug corresponding to the load indicated on the data plate located on the appliance. The appliance
  • Страница 18 из 29
    Description of the appliance GB Overall view Glass ceramic hob GUIDE RAILS for the sliding racks position 5 position 4 position 3 position 2 position 1 Control panel GRILL rack DRIPPING PAN Adjustable foot Adjustable foot Control panel THERMOSTAT knob THERMOSTAT indicator light ACTIVE HOTPLATE
  • Страница 19 из 29
    Start-up and use ! The first time you use your appliance, heat the empty oven with its door closed at its maximum temperature for at least half an hour. Ensure that the room is well ventilated before switching the oven off and opening the oven door. The appliance may emit a slightly unpleasant
  • Страница 20 из 29
    GB Cooking modes ! A temperature value can be set for all cooking modes between 50°C and Max, except for the following modes • GRILL (recommended: set only to MAX power level). • FAN-ASSISTED GRILL (recommended: do not exceed 200°C). The various features of cooker may be controlled using the knobs
  • Страница 21 из 29
    TOP OVEN mode Turn the thermostat knob between 50°C and Max. The top heating element comes on. This mode can be used to brown food at the end of cooking. GRILL mode Position the thermostat knob between 50°C and Max. The central top heating element and the turnspit will be activated. The extremely
  • Страница 22 из 29
    GB Cooking on several shelves simultaneously If it is necessary to use two racks, use the FAN OVEN cooking mode b, as this is the only cooking mode suited to this type of cooking. We also recommend that: • Positions 1 and 5 are not used. This is because excessive direct heat can burn temperature
  • Страница 23 из 29
    Oven cooking advice table GB Selector knob Food to be cooked setting Weight (in kg) Cooking rack position from bottom Preheating time (minutes) Thermostat knob setting Cooking time (minutes) 1 1 1 1 3 3 3 3 3 15 15 15 15 15 200 200 200 180 180 65-75 70-75 70-80 15-20 30-35 1 1 1 1 1 1 0.5 0.5 0.5
  • Страница 24 из 29
    Using the glass ceramic hob GB !The glue applied on the gaskets leaves traces of grease on the glass. Before using the appliance, we recommend you remove these with a special nonabrasive cleaning product. During the first few hours of use there may be a smell of rubber which will disappear very
  • Страница 25 из 29
    Precautions and tips ! This appliance has been designed and manufactured in compliance with international safety standards. The following warnings are provided for safety reasons and must be read carefully. General safety • The glass ceramic hob is resistant to temperature fluctuations and shocks.
  • Страница 26 из 29
    GB Respecting and conserving the environment • You can help to reduce the peak load of the electricity supply network companies by using the oven in the hours between late afternoon and the early hours of the morning. • Always keep the oven door closed when using the GRILL, DOUBLE GRILL and
  • Страница 27 из 29
    Care and maintenance Switching the appliance off Disconnect your appliance from the electricity supply before carrying out any work on it. ! Never use steam cleaners or pressure cleaners on the appliance. Cleaning the oven • The stainless steel or enamel-coated external parts and the rubber seals
  • Страница 28 из 29
    05/2011 - 195079726.04 XEROX FABRIANO GB 28
  • Страница 29 из 29