20
GB
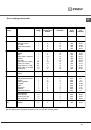
Cooking modes
!
A temperature value can be set for all cooking modes
between 50°C and Max, except for the following modes
• GRILL (recommended: set only to MAX power
level).
• FAN-ASSISTED GRILL (recommended: do not
exceed 200°C).
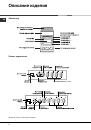
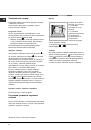
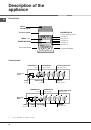
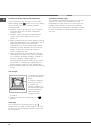
The various features of cooker may be controlled
using the knobs and buttons located on the control
panel.
! B
! B
! B
! B
! Before using the oven and grill for the first time,
leave it to heat up for approximately 30 minutes.
Check that the oven is empty, the thermostat is set
to maximum, the door is shut and that the room is
well-ventilated. The oven may emit a slightly
unpleasant odour during this time due to the
evaporation of the protective substances applied to
the oven and grill at the end of the manufacturing
process.
!
! !
!
! Only use the lowest shelf when cooking with the
turnspit (if provided). Never use the lowest shelf for
any other type of cooking, and never place any
objects on the bottom of the oven while it is
operating, as this could damage the enamel coating.
Always place cookware (dishes, aluminium trays,
etc.) on the rack provided, ensuring the rack is
correctly positioned using the guide rails inside the
oven.
DEFROSTING
DEFROSTING
DEFROSTING
DEFROSTING
DEFROSTING mode
Turn the thermostat knob to any position
The fan at the bottom of the oven circulates room-
temperature air around the food. This programme is
suitable for defrosting any type of food, especially
delicate items that should not be heated, for
example: ice-cream cakes or cakes made with
custard, cream or fruit. The defrosting time will be
approximately halved. When defrosting meat, fish or
bread, the process may be accelerated by using the
“multi-cooking” mode and setting a temperature
between 80°C and 100°C.
STATIC OVEN
STATIC OVEN
STATIC OVEN
STATIC OVEN
STATIC OVEN mode
Position the thermostat knob between 50°C and
Max. This position activates both the top and
bottom heating elements. This is the classic
traditional oven that has been modified to ensure an
exceptional level of heat distribution while limiting
the amount of energy consumed. The static oven
remains unsurpassed in the cooking of dishes with
ingredients consisting of two or more elements,
which are combined to make a single dish, for
example: cabbage with pork ribs, Spanish-style
dried cod, Ancona-style stockfish, tender veal with
rice, etc... This cooking mode is the best way of
cooking beef or veal-based dishes, for example:
braised meat, stews, goulash, game meat, pork leg
and loin, etc... as these must be cooked slowly, with
liquid added regularly. It is also the best way of
cooking deserts, fruit and dishes that require
covered recipients designed for use in the oven.
When using the oven in static mode, use only one
shelf (using more than one shelf may adversely
affect heat distribution). By using the different
shelves available, the heat distribution between the
top and bottom of the oven may be balanced as
desired. If a dish requires more heat at the top or
bottom of the oven, use the lower or upper shelves
respectively.
FAN-ASSISTED
FAN-ASSISTED
FAN-ASSISTED
FAN-ASSISTED
FAN-ASSISTED mode
Turn the thermostat knob between 50°C and Max.
The heating elements and the fan are activated.
Because the heat is distributed evenly throughout
the oven, the air cooks and browns food in a uniform
manner. You may also cook different dishes at the
same time, provided that the cooking temperatures
are similar. It is possible to use a maximum of 2
racks at the same time, following the instructions
given in the paragraph entitled “Cooking on several
shelves simultaneously”.
This function is particularly suitable for cooking
dishes “au gratin”, or for dishes requiring a
reasonably long cooking time, for example: lasagne,
pasta bake dishes, roast chicken and potatoes,
etc... There are substantial advantages to this mode
when cooking roast meats, as the improved
temperature distribution enables lower temperatures
to be set, thus reducing the amount of juices that
escape from the meat, making it less likely to shrink
in the oven and more tender to eat. The fan-assisted
mode is particularly useful when cooking fish, which
can be cooked in this way with a minimal amount of
liquid added, therefore maintaining its original taste
and appearance.
Dessert: this mode is completely safe to use when
cooking leavened cakes.
The “fan-assisted” function may also be used for
defrosting red or white meat or bread quickly, by
setting the temperature to 80°C. To defrost more
delicate foods, set the temperature to 60°C or use
the cold air circulation by setting the temperature
knob to 0°C.