12
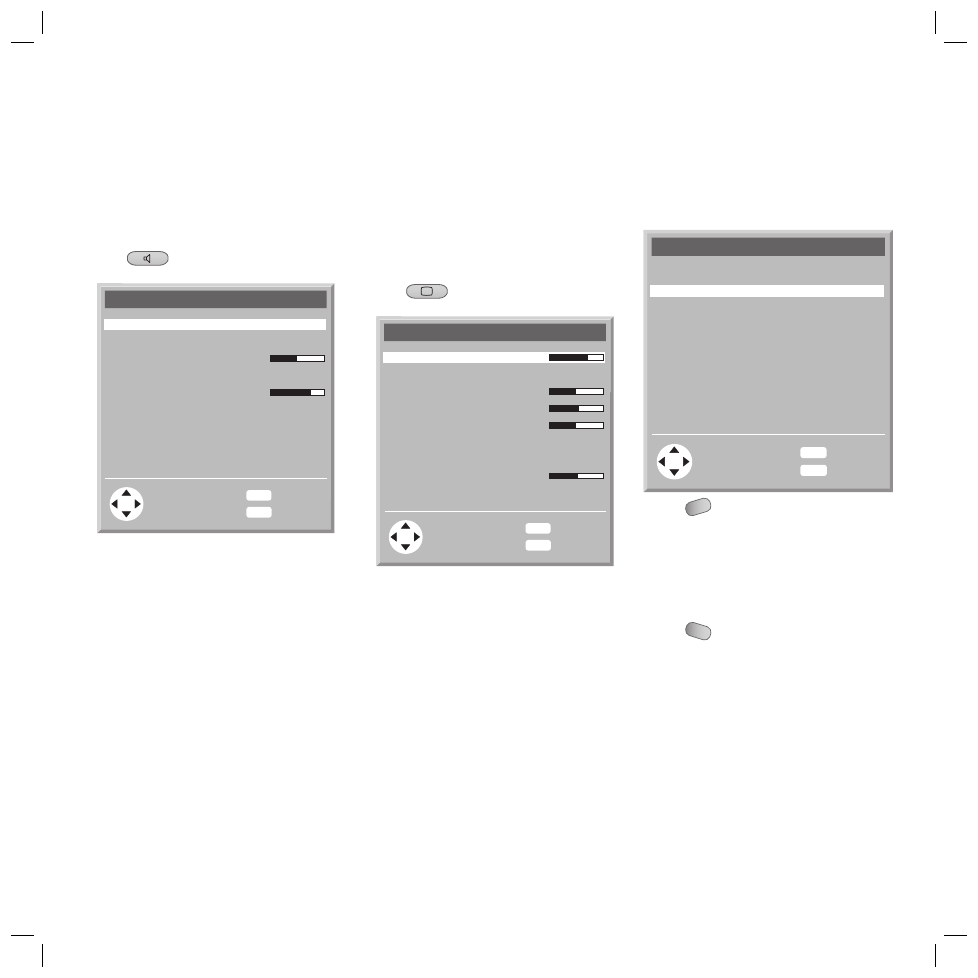
Sound Menu
You can make settings relating to the sound
in the “Sound” menu (exception: volume and
personal sound).
Press
.
The “Sound” menu is displayed.
OK
MENU
END
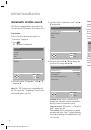
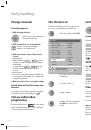
Sound
Listening mode
Sound adjust
Balance
Auto. Volume Control
Max. startup volume
End
Back
Panorama
Personal sound
0
On
4
Select an option with
v
/
V
and change the
selection if necessary with
b
/
B
Listening mode:
You can choose the fol-
lowing:
“Stereo”, “Panorama” or “Sound1”,
“Sound2” or “Mono”, “Pseudo-Stereo”.
Sound adjust
: You can choose the following:
“Normal”, “Pop”, “Classic”, “Vocal”,
“Rock”, “Jazz”, “Personal sound”.
Balance
: Setting of loudspeaker balance.
Auto. Volume Control
: Reduction of the
volume differences (dynamic) between differ-
ent stations (on / off).
Max. startup volume
: Limiting of the
maximum volume when switching on.
Note
: The settings in the menus are saved
automatically when exiting.
1.
2.
Picture Menu
The settings relating to the picture in the TV,
AV1...AV7 mode can be made in the “Picture”
menu (exception: user tint). The settings are then
saved separately for the respective operating
mode.
Press
.
The “Picture” menu is displayed.
OK
MENU
END
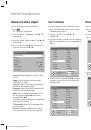
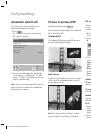
Picture
Contrast
Picture adjust
Colour
Brightness
Sharpness
Tint
Picture format
DNC
Photo CD
End
Back
78
Normal
14
62
4
Warm
Panorama
6
Off
Select an option with
v
/
V
and change the
selection if necessary with
b
/
B
Contrast:
Setting the picture contrast.
Picture adjust
: You can choose the follow-
ing: “Normal”, “Soft” and “Intensive”.
Colour
: Setting the colour saturation.
Brightness
: Setting the brightness.
Sharpness
: Setting the picture sharpness.
Tint
: Setting the tint.
You can choose the following: “Normal”,
“Warm”, Cold”, “Personal Tint”.
Picture format:
You can select
“4:3”,“16:9”, “Personal Zoom”, “Panorama”,
“Zoom”, when the “Auto Zoom” function
is switched off. Otherwise this setting is not
available.
DNC
: Setting the “Dynamic Noise Control” to
improve the picture when the signal is weak.
Photo CD
: Picture improvement for freeze
frames (on / off).
1.
2.
Call up factory settings
You can call up the sound and picture settings
set ex-factory.
OK
MENU
END
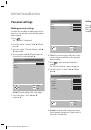
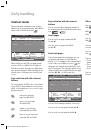
Settings
End
Back
Sleep Timer
Call up factory settings
Personal settings
System info
Language
Off
English
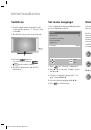
Press
MENU
. The “TV menu” is displayed.
Press
v
/
V
, to select the “Settings” option
and press
B
.
Select the “Call up factory settings” option
with
v
/
V
.
Press
OK
. The factory settings are reset.
Press
END
to exit the menu.
1.
2.
3.
4.
5.
Initial installation
32241 Concept L42_Buch_GB.indd 12
32241 Concept L42_Buch_GB.indd 12
11.02.2005 14:09:26 Uhr
11.02.2005 14:09:26 Uhr