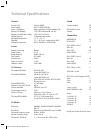
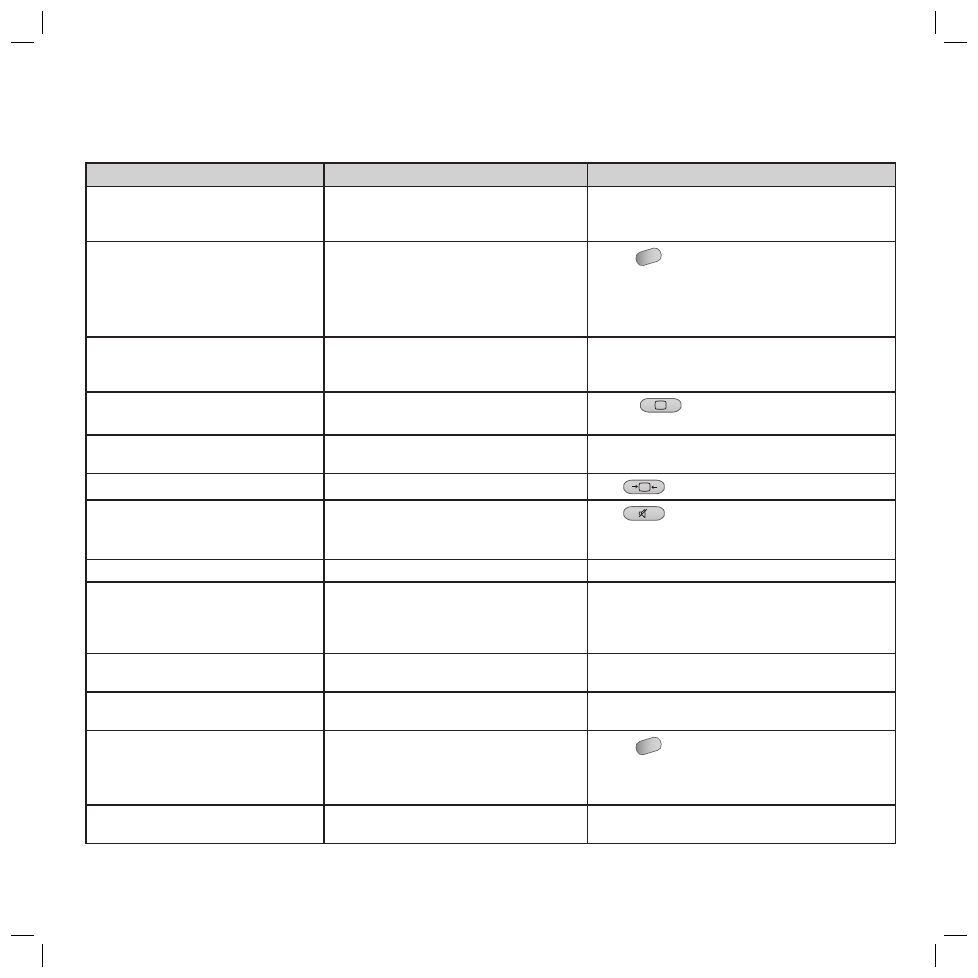
Инструкция для Loewe Concept L42

(скачивание инструкции бесплатно)
Формат файла: PDF
Доступность: Бесплатно как и все руководства на сайте. Без регистрации и SMS.
Дополнительно: Чтение инструкции онлайн
background image

23

What to do when ...

Problem

Possible cause

Remedy

No picture and no sound

1.) Power cable not plugged in.
2.) Power “OFF”
3.) Defective power cable

1.) Plug the power cable fi rmly into a socket.
2.) Switch power switch “ON”.
3.) Contact your Loewe service partner.

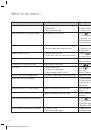
All menus appear in the wrong language

Menu language set incorrectly.
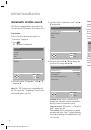
1. Press 

MENU

. The “TV menu" is displayed.

2. Select “Settings” *) and press 

B

.

3. Select the “Language” option with 

V

.

4.Select the desired language with


v

 / 

V

.

*) last option in the menu.

Screen dark

1.) Contrast set too low
2.) No input signal, wrong input selected

1.) Set brightness and/or contrast correctly.
2.) Check the connecting cable; assign the source unit to 
the right input.

Weak or overrich colours

1.) Colour not set correctly
2.) 

Connecting cable not connected correctly

1.) Press 

 and set the colour.

2.) Connect the cable correctly.

The picture is cut off in the PC mode

Picture position not set correctlyt

Correct the picture position with the “Auto 
adjust” function in the “AV6-PC RGB” menu.

The picture is too large or too small

Image format set incorrectly

Press 

 several times until the format is correct.

No sound

1.) Sound switched off
2.) Volume set to minimumt
3.) “Max. start-up volume” set to 0

Press 
Press 

V+

Increase “Max. start-up volume” in the Sound menu.

Remote control not working properly

The batteries of the remote control are used up

Replace the old batteries with new ones..

Signal at V6 socket not displayed

1.) Set the phase position correctly.
2.) Check the setting of the picture width.
3.) Execute the “Auto adjust” function in the “AV6-PC 
RGB” menu..

Horizontal stripes in TV or video signals

Signal source placed in front of screen

Place the signal source at the side of or behind the 
screen.

Insuffi cient shielding of the video cable

Only use high quality signal cables with high shield at-
tenuation.

Sound and signal parameters misadjusted
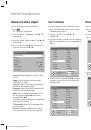
1. Press 

MENU

. The “TV menu" is displayed.

2. Select “Settings” *) and press 

B

.

3. Select the option “Call up the factory settings” with 

v


V

 and press 

OK

.

The set switches automatically to standby

1.) Screen is too hot
2.) No standard input signal

1.) Improve the ventilation
2.) Standard signal at the input socket.

32241 Concept L42_Buch_GB.indd   23

32241 Concept L42_Buch_GB.indd   23

11.02.2005   14:09:44 Uhr

11.02.2005   14:09:44 Uhr

1
2
3
4
5
6
7
8
9
10
11
12
13
14
15
16
17
18
19
20
21
22
23
24
Оглавление инструкции
  • Страница 1 из 25
    Operating instructions TV 233–32241.020 Concept L 42 32241 Concept L42_Buch_GB.indd 1 11.02.2005 14:09:02 Uhr
  • Страница 2 из 25
    Contents Remote control RC4 – TV operation 3 Operating Concept L 42 4 Connections Concept L 42 Rearpanel 5 Welcome 6 Scope of delivery Unpacking Set up Please note! Cleaning Disposal Cardboard box and packaging The unit For your safety Initial installation Installation possibilities Initial Remote
  • Страница 3 из 25
    Remote control RC4 – TV operation Sound off/on (mute) Switch on / off – to standby ✳ Switching over to operate VCRs Switching over to operate the TV VCR TV DVD Switching over to operate DVD players Picture menu on/off T-C Sleep Timer menu Sound menu on/off DISC-MENU Personal settings on/off Set
  • Страница 4 из 25
    Operating Concept L 42 S o IR-Receiver On/Stand-by LED 4 32241 Concept L42_Buch_GB.indd 4 11.02.2005 14:09:17 Uhr
  • Страница 5 из 25
    Connections Concept L 42 Rearpanel RF IN/OUT with Patch Cord connected Sound input Sound input AV3 AV4/5 left/right left/right Not connected AV5YUV sockets Antenna socket VHF/ UHF/cable AV3S-VIDEO socket AV2SCARTsocket 2 Socket for power cable 120-240V 50/60Hz LINE IN NC NC L LINE OUT AV4/5 AV6/7
  • Страница 6 из 25
    Welcome Thank you Set up for choosing a Loewe product. • Place the TV set on a firm, level base. • Install the TV with enough room for ventilation. The vents may not be covered by any objects. Keep a distance of at least 10 cm away from adjacent objects. At Loewe we combine the highest standards of
  • Страница 7 из 25
    Welcome the whole screen. • Use your screen in a full screen format (16:9). • Always activate the screen saver when using as a PC screen. • Always switch off the screen when not in use. • Reduce contrast and brightness as far as possible. Cleaning Clean the components of the system, only using a
  • Страница 8 из 25
    Initial installation Installation possibilities You can install the Loewe Concept L 42 in two ways: • As a desktop unit with the pre-assembled stand • as a wall unit which you can hang on the wall like a picture. See also the enclosed mounting instructions. Initial Remote Control Setup Connection
  • Страница 9 из 25
    Initial installation Switch-on 1. Flick the toggle switch on the back of the socket strip into position “1”. The set is now on standby. 2. The LED in the ring on the front glows red. Set menu Language Navigation in the menu Select a language for menus and dialogs which are to be displayed by the
  • Страница 10 из 25
    Initial installation Automatic station search This TV set is equipped with a tuner which can store the various TV channels on 99 station slots. 3. Select the option “Automatic Search” with v / V and press B. Tuner settings 5. Select “Start Search” and press OK to start the station search. The tuner
  • Страница 11 из 25
    Initial installation Manual station adjust Sort stations Delete stations You can also adjust a station manually. You can change the order of stations later on. You can also delete stations. 1. Press . The “TV menu” is displayed. 1. Proceed as described under section 1 and 2 “Manual station adjust”.
  • Страница 12 из 25
    Initial installation Sound Menu Picture Menu Call up factory settings You can make settings relating to the sound in the “Sound” menu (exception: volume and personal sound). The settings relating to the picture in the TV, AV1...AV7 mode can be made in the “Picture” menu (exception: user tint). The
  • Страница 13 из 25
    Initial installation Personal tint Personal settings Making personal settings Call up personal settings Red 115 Blue 128 Green 128 Press during TV mode to activate the personal settings. Press again to restore the previous settings. You have the possibility of making personal settings for zoom,
  • Страница 14 из 25
    Daily handling Change channels The Station List Setting volume Selecting channels The station list helps you select a station. You can select a station directly from this list. P+ V– 1. With the ring buttons Show the station list with OK. OK OK V+ You set the volume with V+ / V-. P– P+ V– OK V+
  • Страница 15 из 25
    Daily handling Automatic switch-off Picture in picture (PIP) You can pre-select a time at which the set switches automatically to standby. Show/hide PIP picture with 1. Press . The “Settings” menu opens and the “Auto Off” option is selected. Settings Sleep Timer Off PIP Picture in picture can be
  • Страница 16 из 25
    Daily handling Teletext mode Page selection with the numeric buttons Teletext transmits information such as News, Weather, Sport, Program Previews and Subtitles. Switch on the Teletext mode with TEXT . You can enter the three-digit page number of the teletext pages directly with the numeric butAV
  • Страница 17 из 25
    Displaying PC images (DVI/VGA) Your TV set has a combined analog-digital video interface (Digital Visual Interface (DVI) and VGA - RGB analog). You can use this to show PC pictures with the TV set for example. Connecting the PC Note: Switch off the PC and the TV before connecting the cables.
  • Страница 18 из 25
    Operation of additional equipment You will find various sockets for auxiliary equipment on the back of the TV set. For example you can connect: video recorders and camcorders of the systems VHS, 8mm Video, SVHS and Hi8, Pay-TV-Decoder, SET-TOP-Box, satellite receivers, video cameras, DVD players
  • Страница 19 из 25
    Operation of additional Connecting a DVD player/ VCR via AV cable Settings at the AV sockets AV1 - 5 For playing video equipment such as VCRs, DVD players or camcorders, the AV sockets AV-1 ... AV5 are provided and the AV station slots allocated accordingly. For example, connect a VCR to the AV1
  • Страница 20 из 25
    Operation of additional equipment Connecting a decoder Select decoder stations 120-240V 50/60Hz LINE IN NC L LINE OUT AV4/5 AV6/7 Patch Cord RF IN AV3 AV 2 RF OUT PC (RGB / DVI) SUB OUT ANTENNA IN V R AV5 AV4 U CVBS/Y AV 1 AV3 (RGB) S-VIDEO I 0 SERVICE AV6 / 7 TV RF-IN RF-OUT VCR / DVD-Recorder Pay
  • Страница 21 из 25
    Operation of additional equipment Operating Loewe DVDs/ VCRs with the RC4 remote control VCR You can switch over the remote control of the TV set to operate Loewe video recorders and Loewe DVD players. You can operate these units directly. DVD Functions for Loewe video recorders TV Sound off/on
  • Страница 22 из 25
    Technical Specifications General Concept L 42 Power supply Power consumption Dimensions (Display). Dimensions (with table stand). Weight (approx.) Operating temperature Humidity Atmospheric pressure Sound Item No. 64403 AC 115-240V, 50/60 Hz During operation: 350 W, standby: 5 W 1167 x 628 x 94 mm
  • Страница 23 из 25
    What to do when ... Problem Possible cause Remedy No picture and no sound 1.) Power cable not plugged in. 2.) Power “OFF” 3.) Defective power cable 1.) Plug the power cable firmly into a socket. 2.) Switch power switch “ON”. 3.) Contact your Loewe service partner. All menus appear in the wrong
  • Страница 24 из 25
    Service Addresses Australia International Dynamics Australasia Pty Ltd. 129 Palmer Street AUS - Richmond, Victoria 3121 Tel. 03–94 29 08 22 Fax 03–94 29 08 33 Benelux Loewe Opta Benelux NV/SA Uilenbaan 84 B–2160 Antwerpen Tel. 0902–88 00 2 Tel. 03–270 99 30 Fax 03–271 01 08 Loewe Opta Nederland
  • Страница 25 из 25