Инструкция для ARISTON CI6V E97

(скачивание инструкции бесплатно)
Формат файла: PDF
Доступность: Бесплатно как и все руководства на сайте. Без регистрации и SMS.
Дополнительно: Чтение инструкции онлайн
background image

26

GB

Switching the appliance off

Disconnect your appliance from the electricity supply
before carrying out any work on it.

Cleaning the oven

!

 Never use steam cleaners or pressure cleaners on

the appliance.
• Clean the glass part of the oven door using a

sponge and a non-abrasive cleaning product,
then dry thoroughly with a soft cloth. Do not use
rough abrasive material or sharp metal scrapers
as these could scratch the surface and cause the
glass to crack.

• The stainless steel or enamel-coated external

parts and the rubber seals may be cleaned using
a sponge which has been soaked in lukewarm
water and neutral soap. Use specialised products
for the removal of stubborn stains. After cleaning,
rinse and dry thoroughly. Do not use abrasive
powders or corrosive substances.

• The inside of the oven should ideally be cleaned

after each use, while it is still lukewarm. Use hot
water and detergent, then rinse well and dry with
a soft cloth. Do not use abrasive products.

• The accessories can be washed like everyday

crockery, and are even dishwasher safe.

• Dirt and grease should be removed from the control

panel using a non-abrasive sponge or a soft cloth.

Stainless steel can be marked by hard water that

has been left on the surface for a long time, or by
aggressive detergents that contain phosphorus.
We recommend that the steel surfaces are rinsed
well then dried thoroughly.

Inspecting the oven seals

Check the door seals around the oven regularly. If the
seals are damaged, please contact your nearest After-
sales Service Centre. We recommend that the oven is
not used until the seals have been replaced.

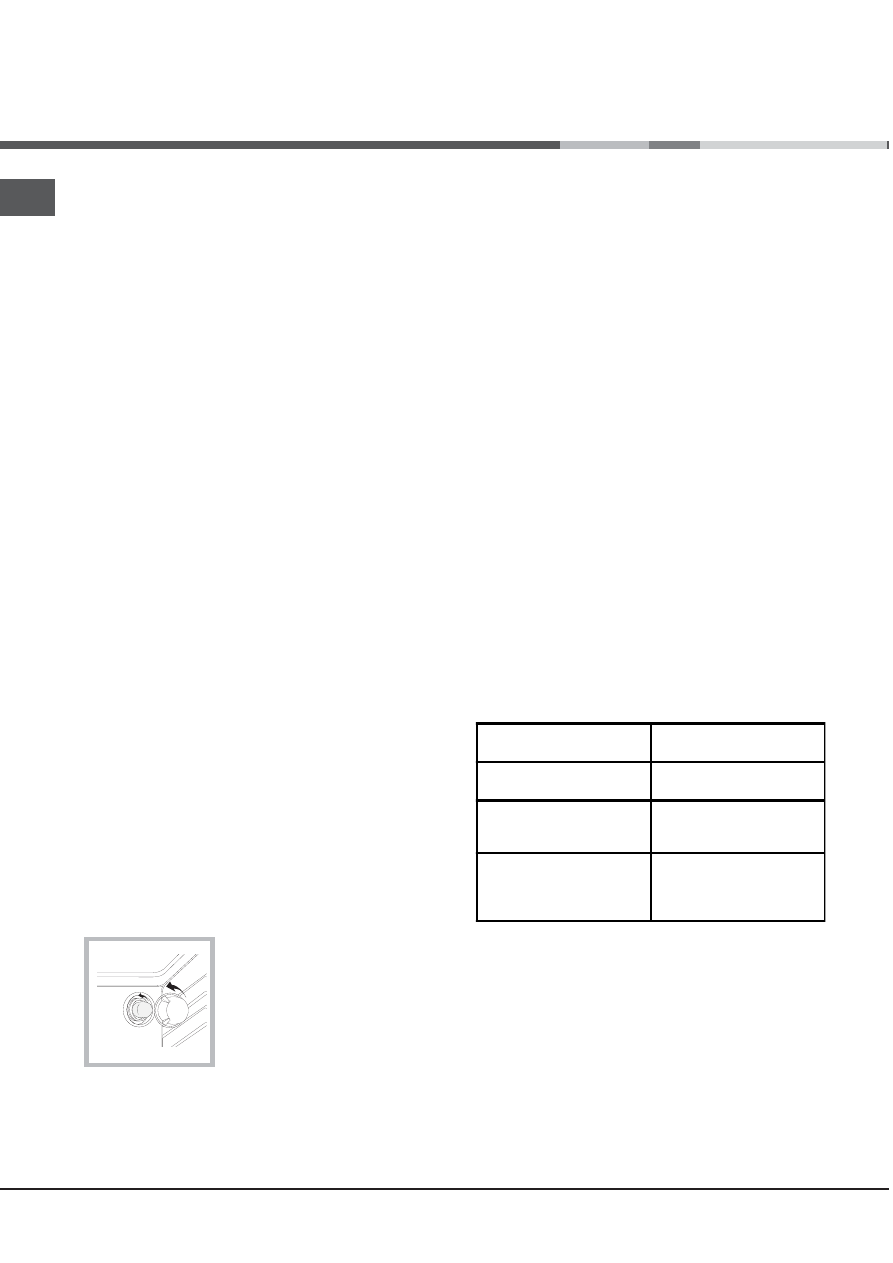
Replacing the oven light bulb

1. After disconnecting the oven
from the electricity mains,
remove the glass lid covering
the lamp socket (

see figure).

2. Unscrew the light bulb and
replace it with a similar one:
voltage 230 V, wattage 25 W, cap
E 14.
3. Replace the lid and reconnect

the oven to the electricity supply.

Cleaning the glass ceramic hob

!

 Do not use abrasive or corrosive detergents (for

example, products in spray cans for cleaning barbecues
and ovens), stain removers, anti-rust products, powder
detergents or sponges with abrasive surfaces: these
may scratch the surface beyond repair.

• It is usually sufficient simply to wash the hob using a

damp sponge and dry it with absorbent kitchen roll.

• If the hob is particularly dirty, rub it with a special

glass ceramic cleaning product, then rinse well and
dry thoroughly.

• To remove more stubborn dirt, use a suitable scraper

(this is not supplied with the appliance). Remove
spills as soon as possible, without waiting for the
appliance to cool, to avoid residues forming crusty
deposits. You can obtain excellent results by using a
rustproof steel wire sponge - specifically designed for
glass ceramic surfaces - soaked in soapy water.

• If plastic or sugary substances have accidentally

been melted on the hob, remove them immediately
with the scraper, while the surface is still hot.

• Once it is clean, the hob may be treated with a special

protective maintenance product: the invisible film left
by this product protects the surface from drips during
cooking. This maintenance should be carried out
while the appliance is warm (not hot) or cold.

• Always remember to rinse the appliance well with

clean water and dry it thoroughly: residues can
become encrusted during subsequent cooking
processes.

Glass


ceramic


hob


cleaners Available


from

W

indow


scraper

 R

a

z

or


blade

scrapers

DIY 

Stores

R

eplacement


blades

DIY 

Stores,

supermarkets,

chemists

COLLO 

luneta

HOB BRI

T

E

H

ob

 C

lean

S

WI

SS

CLEANER

B

oots,

 C

o

-

op


stores,

department


stores,

 R

egional

E

lectricity

 C

ompany


shops,

supermarkets

Care and maintenance

*

Only available in certain models.

1
2
3
4
5
6
7
8
9
10
11
12
13
14
15
16
17
18
19
20
21
22
23
24
25
26
27
28
Оглавление инструкции
  • Страница 1 из 29
    Руководство по эксплуатации RS РУССКИЙ, 1 GB English,15 КУХОННАЯ ПЛИТА С ДУХОВЫМ ШКАФОМ Содержание Монтаж, 2-3 Расположение и нивелировка Электрическое подключение Таблица характеристик Описание изделия, 4 Общий вид Консоль управления Дисплей Включение и эксплуатация, 5-9 CI 6V E97 RU /HA Настройка
  • Страница 2 из 29
    Монтаж Рекомендуем прочистить духовой шкаф перед началом его эксплуатации, следуя инструкциям, приведенным в параграфе «Обслуживание и уход». Расположение и нивелировка ! Изделие может быть установлено рядом с кухонными элементами, высота которых не превышает поверхность варочной панели. !
  • Страница 3 из 29
    400V 2N~ H05RR-F 4x4 CEI-UNEL 35363 H05VV-F 4x4 CEI-UNEL 357 46 N L2 L1 1 3 5 2 4 400V 3N~ H05RR-F 5x2.5 CEI-UNEL 35363 H05VV-F 5x2.5 CEI-UNEL 35746 N случае замените розетку или вилку; не используйте удлинители или тройники. RS ! Изделие должно быть установлено таким образом, чтобы сетевой шнур и
  • Страница 4 из 29
    Описание изделия RS Общий вид Стеклокерамическая варочная панель Панель управления РЕШЕТКА ПРОТИВЕНЬ Регулируемая ножка Консоль управления Дисплей * Имеется только в некоторых моделях. 4 НАПРАВЛЯЮЩИЕ для противеней и решеток положение 5 положение 4 положение 3 положение 2 положение 1 Регулируемая
  • Страница 5 из 29
    Включение и эксплуатация Настройка часов ! Часы можно настроить как при выключенном духовом шкафу, так и при включенном, при условии, что не было задано время окончания приготовления. 1. Нажмите несколько раз кнопку до тех пор, пока на ДИСПЛЕЕ не замигает символ и первые два цифровые значения; 2.
  • Страница 6 из 29
    RS Программы приготовления ! Каждая программа имеет заданную температуру приготовления. Температура может быть настроена вручную от 40°C до 250°C. Программа РАЗМОРАЖИВАНИЕ Вентилятор, расположенный снизу духовки, производит циркуляцию воздуха комнатной температуры вокруг приготавливаемого продукта.
  • Страница 7 из 29
    Программирование приготовления ! Программирование возможно только после выбора программы приготовления. Порядок настройки продолжительности приготовления 1. Нажмите несколько раз кнопку до тех пор, пока на ДИСПЛЕЕ не замигает символ и три цифровые значения; 2. поверните регулятор НАСТРОЙКА ЧАСОВ в
  • Страница 8 из 29
    Таблица приготовления RS ПРОДУКТЫ Несладки торты и тарталетки (песочное или слоеное тесто) Высокие пиццы с замесом теста (или мороженные) ПРИМЕРЫ РЕЖИМ ТЕМПЕРАТУРА ТИП ПРОТИВЕНЯ французская запеканка, торт с луком-пореем и т.д. Песочный торт с начинкой 220°C форма для торта, устанавливаемый на
  • Страница 9 из 29
    Таблица приготовления ПРОДУКТЫ Печенье (недрожжевое тесто) КОНДИТЕРСКАЯ ВЫПЕЧКА Бисквитный кекс и пирог «Четыре четверти» (с химическими дрожжами) Песочные торты с фруктовой начинкой (песочное или слоеное тесто, с начинкой флан и без нее) ТЕМПЕРАТУРА ТИП ПРОТИВЕНЯ 200°C форма для торта,
  • Страница 10 из 29
    Стеклокерамическая варочная панель RS ! На стеклянной поверхности варочной панели могут быть видны сальные следы от клея, нанесенного на прокладки Перед началом эксплуатации изделия следует удалить следы клея при помощи специального неабразивного моющего средства. В первые часы работы вы можете
  • Страница 11 из 29
    Техническое обслуживание и уход Обесточивание изделия Перед началом какой-либо операции по обслуживанию или чистке отсоедините изделие от сети электропитания. Чистка изделия ! Не используйте паровые чистящие агрегаты или агрегаты под высоким давлением для чистки изделия. • Для чистки стекла дверцы
  • Страница 12 из 29
    Предосторожности и рекомендации RS ! Изделие спроектировано и изготовлено в соответствии с международными нормативами по безопасности. Необходимо внимательно прочитать настоящие предупреждения, составленные в целях вашеи безопасности. Общие требования к безопасности • Данные инструкции относятся
  • Страница 13 из 29
    Утилизация • Уничтожение упаковочных материалов: соблюдаите местные нормативы с целью повторного использования упаковочных материалов. • Согласно Европеискои Директиве 2002/96/СЕ касательно утилизации электронных и электрических электроприборов электроприборы не должны выбрасываться вместе с
  • Страница 14 из 29
    RS Крепление комплекта выдвижных направляющих Порядок монтажа выдвижных направляющих: A 1. Отсоедините две рамы, сняв их с распорных элементов А (см. схему). 2. Выберите уровень, на который будет установлена выдвижная направляющая. Проверив направление выкатывания самой направляющей, установите на
  • Страница 15 из 29
    Operating Instructions COOKER AND OVEN RS РУССКИЙ, 1 GB English,15 Contents Installation, 16-17 Positioning and levelling Electrical connection Table of characteristics Description of the appliance, 18 Overall view Control panel Display Start-up and use, 19-23 CI 6V E97 RU /HA Setting the clock
  • Страница 16 из 29
    Installation Levelling If it is necessary to level the appliance, screw the adjustable feet into the positions provided on each corner of the base of the cooker (see figure). ! The appliance must be installed by a qualified professional in accordance with the instructions provided. ! Any necessary
  • Страница 17 из 29
    P N L1 L2 L3 400V 2N~ H05RR-F 4x4 CEI-UNEL 35363 H05VV-F 4x4 CEI-UNEL 357 46 N ! Once the appliance has been installed, the power supply cable and the electrical socket must be easily accessible. ! The cable must not be bent or compressed. L2 L1 1 3 5 ! The cable must be checked regularly and
  • Страница 18 из 29
    Description of the appliance GB Overall view Glass ceramic hob GUIDE RAILS for the sliding racks position 5 position 4 position 3 position 2 position 1 Control panel RACK shelf DRIPPING PAN shelf Adjustable foot Adjustable foot Control panel THERMOSTAT/TIMER knob SELECTOR knob Hob BURNER and
  • Страница 19 из 29
    Start-up and use Setting the clock ! The clock may be set when the oven is switched off or when it is switched on, provided that the end time of a cooking cycle has not been programmed previously. 1. Press the button several times until the icon and the first two numerical digits on the display
  • Страница 20 из 29
    GB Cooking modes ! All cooking modes have a default cooking temperature which may be adjusted manually to a value between 40°C and 250°C as desired. DEFROST mode The fan at the bottom of the oven circulates roomtemperature air around the food. This mode is suitable for defrosting any type of food,
  • Страница 21 из 29
    Programming cooking Practical cooking advice ! A cooking mode must be selected before programming can take place. ! Do not place racks in position 1 and 5 during fanassisted cooking. This is because excessive direct heat can burn temperature sensitive foods. GB Programming the cooking duration 1.
  • Страница 22 из 29
    Oven cooking advice table GB FISH MEAT VEGETABLES CANAPES AND STARTERS DISHES 22 Savoury pies and pastries (shortcrust or puff pastry) Deep-pan pizza made with fresh bread dough (or frozen) Pizza (other dough) Savoury sponge cake made with yoghurt Country style pie EXAMPLES FUNCTION TEMPERATURE
  • Страница 23 из 29
    Oven cooking advice table SWEET BITES BAKED DESSERTS DISHES GB EXAMPLES DESSERTS SUPPORT 200 °C cake tin on dripping pan 160 °C cake tin on dripping pan Biscuit cakes (without yeast) sponge cake, sponge fingers, swirled biscuits, brownies, etc. fruit-filled sponge cake made with yoghurt, marble
  • Страница 24 из 29
    Using the glass ceramic hob GB ! The glue applied on the gaskets leaves traces of grease on the glass. Before using the appliance, we recommend you remove these with a special nonabrasive cleaning product. During the first few hours of use there may be a smell of rubber which will disappear very
  • Страница 25 из 29
    Precautions and tips ! This appliance has been designed and manufactured in compliance with international safety standards. The following warnings are provided for safety reasons and must be read carefully. General safety • These instructions are only valid for the countries whose symbols appear in
  • Страница 26 из 29
    Care and maintenance GB Switching the appliance off Cleaning the glass ceramic hob Disconnect your appliance from the electricity supply before carrying out any work on it. ! Do not use abrasive or corrosive detergents (for example, products in spray cans for cleaning barbecues and ovens), stain
  • Страница 27 из 29
    Assistance Assembling the sliding rack kit To assemble the sliding racks: 1. Remove the two frames, lifting them away from the spacers A (see figure). A Warning: The appliance is fitted with an automatic diagnostic system which detects any malfunctions. Malfunctions are displayed by messages of the
  • Страница 28 из 29
    05/2011 - 195085199.02 XEROX FABRIANO GB 28
  • Страница 29 из 29