-
8
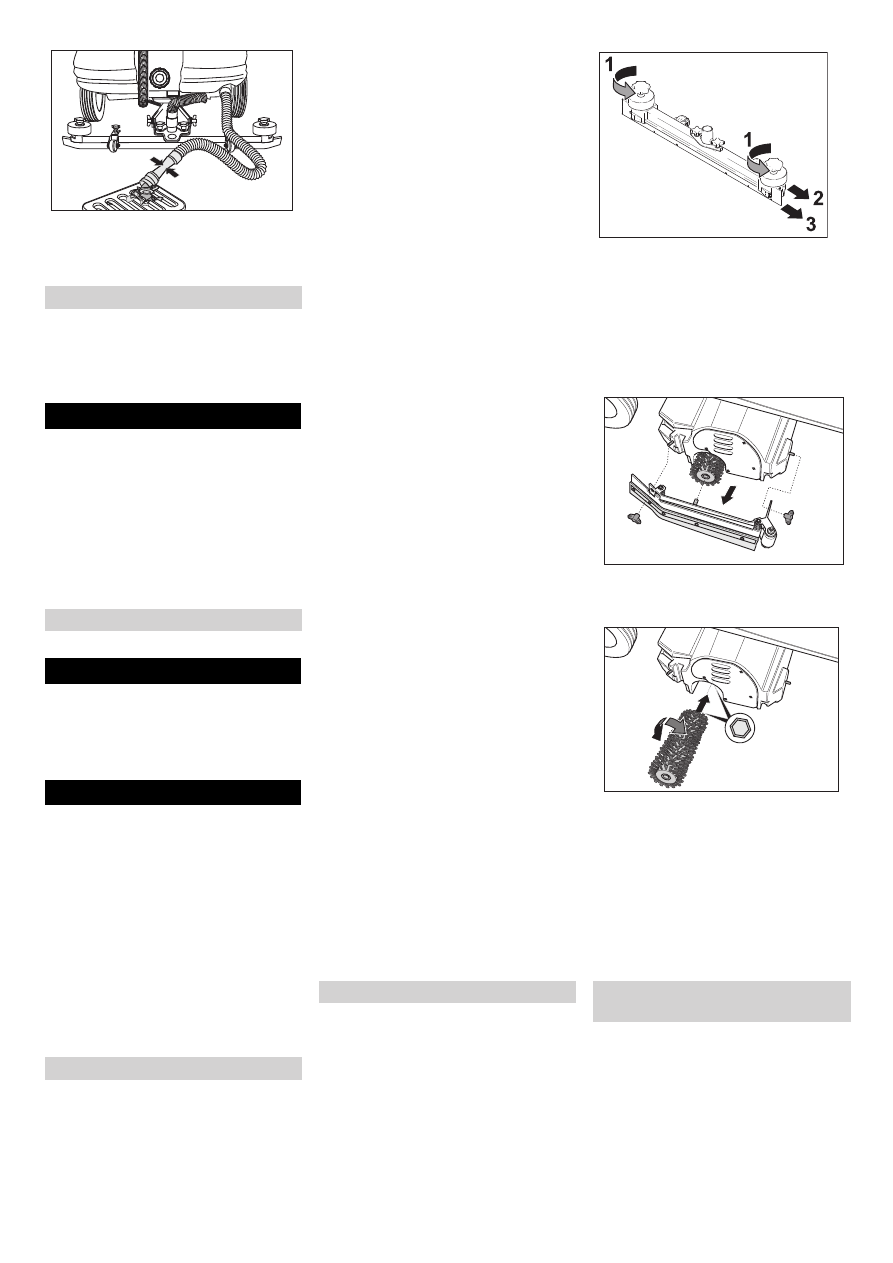
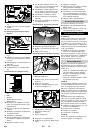
Let off water by opening the dosage de-
vice at the discharge hose.
Then rinse the dirt water tank with clear
water.
In case of danger of frost:
Empty the fresh and dirt water reser-
voirs.
Store the appliance in a frost-protected
room.
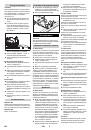
Danger
Risk of injury! When loading or unloading
the machine, it may only be operated on
gradients of max. 15%. Drive slowly.
Risk of injury and damage! Observe the
weight of the appliance when you transport
it.
When transporting in vehicles, secure
the appliance according to the guide-
lines from slipping and tipping over.
Remove brushes from the brush head.
Caution
Risk of injury and damage! Note the weight
of the appliance in case of storage.
This appliance must only be stored in inte-
rior rooms.
Danger
Risk of injury if the machine is left running
in an unattended state. Before carrying out
any tasks on the machine, set the main key
to "0" and remove it. Press emergency-stop
button. Remove the battery plug.
Note
Suction turbine, side brushes and filter
cleaner continue to run for a while after
switching off. Carry out maintenance tasks
only after these components have come to
a halt.
Drain and dispose of the dirt water and
the residual fresh water.
Caution
Risk of damage. Do not wash down the ap-
pliance with water and do not use aggres-
sive detergents.
Drain off dirt water.
Check the flat folded filter, clean if re-
quired
Only BR model: Remove bulk waste
container and empty it.
Clean the outside of the appliance with
a damp cloth which has been soaked in
mild detergent.
Clean the vacuum lips and the wiping
lips, check for wear and replace if re-
quired.
Check the brushes for wear, replace if
required.
Charge battery.
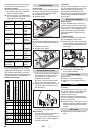
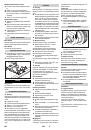
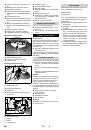
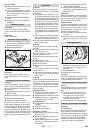
If the dirt water tank is very dirty:
Remove the vacuum bar.
Unscrew the cover of the cleaning
opening of the dirt water tank.
Rinse the dirt water tank with clear wa-
ter.
Clean the edges of the cleaning open-
ing and replace the lid.
Install the vacuum bar.
Further, for BR/BD...RI models:
Pull out both the waste containers and
empty them.
Check the roller brush and the side
brush for wear, foreign bodies and
wrapped belts
Check battery pole for oxidation; brush
it if required and lubricate it using pole
grease. Ensure that the connection ca-
ble sits firmly.
Clean the seals between dirt water res-
ervoir and cover and check for tight-
ness, replace if required.
Check the acid density of the cells if the
batteries are not maintenance-free bat-
teries.
Clean the brush tunnel (only BR mod-
el).
Further, for BR/BD...RI models:
Check for smooth running of the Bow-
den cables and the moveable parts
Check the sealing strips of the sweeper
for settings and wear.
Only for BR/BD...RI models:
Check tension, wear and function of
drive belts of the sweeper (V-belt and
circular belt).
Have the prescribed inspection carried
out by the customer service.
To ensure a reliable operation of the appli-
ance maintenance contracts can be con-
cluded with the competent Kärcher sales
office.
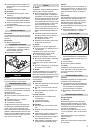
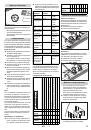
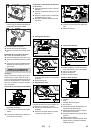
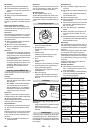
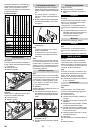
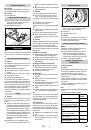
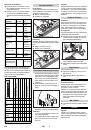
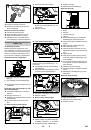
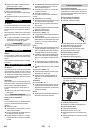
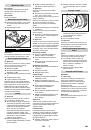
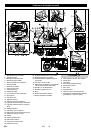
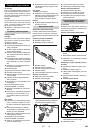
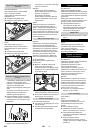
Remove the vacuum bar.
Loosen cross-handles.
Remove the plastic parts.
Remove the vacuum lips.
Insert new vacuum lips.
Insert the plastic parts.
Tighten the cross-handles.
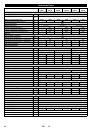
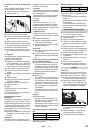
Release the wing nuts.
Remove bearing lid.
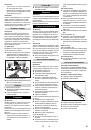
Take out the brush roller, insert a new
one (pay attention to the hexagonal in-
take of the brush rollers).
Place bearing lid.
Tighten the wing nuts.
Repeat process on the opposite side.
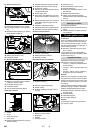
Raise the disk brushes.
Turn the disk brushes by approximately
45°.
Remove the disk brushes at the bottom.
Insert the new disk brushes in reverse
sequence.
Danger!
Risk of injury on account of belt drives. The
sweeper hood must compulsority be closed
and locked before recommissioning the
machine after maintenance tasks.
Frost protection
Transport
BD model
Storage
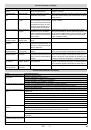
Maintenance and care
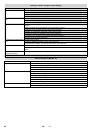
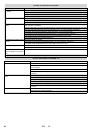
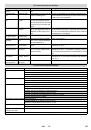
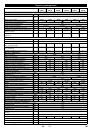
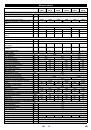
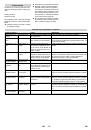
Maintenance schedule
After the work
Monthly
Quarterly
Yearly
Maintenance Works
Maintenance contract
Replacing the vacuum lips
Replacing the brush rollers
Replacing the Disk Brushes
Additional maintenance tasks for
BR/BD...RI models:
Checking drive belt
23
EN
 1
1
 2
2
 3
3
 4
4
 5
5
 6
6
 7
7
 8
8
 9
9
 10
10
 11
11
 12
12
 13
13
 14
14
 15
15
 16
16
 17
17
 18
18
 19
19
 20
20
 21
21
 22
22
 23
23
 24
24
 25
25
 26
26
 27
27
 28
28
 29
29
 30
30
 31
31
 32
32
 33
33
 34
34
 35
35
 36
36
 37
37
 38
38
 39
39
 40
40
 41
41
 42
42
 43
43
 44
44
 45
45
 46
46
 47
47
 48
48
 49
49
 50
50
 51
51
 52
52
 53
53
 54
54
 55
55
 56
56
 57
57
 58
58
 59
59
 60
60
 61
61
 62
62
 63
63
 64
64
 65
65
 66
66
 67
67
 68
68
 69
69
 70
70
 71
71
 72
72
 73
73
 74
74
 75
75
 76
76
 77
77
 78
78
 79
79
 80
80
 81
81
 82
82
 83
83
 84
84
 85
85
 86
86
 87
87
 88
88
 89
89
 90
90
 91
91
 92
92
 93
93
 94
94
 95
95
 96
96
 97
97
 98
98
 99
99
 100
100
 101
101
 102
102
 103
103
 104
104
 105
105
 106
106
 107
107
 108
108
 109
109
 110
110
 111
111
 112
112
 113
113
 114
114
 115
115
 116
116
 117
117
 118
118
 119
119
 120
120
 121
121
 122
122
 123
123
 124
124
 125
125
 126
126
 127
127
 128
128
 129
129
 130
130
 131
131
 132
132
 133
133
 134
134
 135
135
 136
136
 137
137
 138
138
 139
139
 140
140
 141
141
 142
142
 143
143
 144
144
 145
145
 146
146
 147
147
 148
148
 149
149
 150
150
 151
151
 152
152
 153
153
 154
154
 155
155
 156
156
 157
157
 158
158
 159
159
 160
160
 161
161
 162
162
 163
163
 164
164
 165
165
 166
166
 167
167
 168
168
 169
169
 170
170
 171
171
 172
172
 173
173
 174
174
 175
175
 176
176
 177
177
 178
178
 179
179
 180
180
 181
181
 182
182
 183
183
 184
184
 185
185
 186
186
 187
187
 188
188
 189
189
 190
190
 191
191
 192
192
 193
193
 194
194
 195
195
 196
196
 197
197
 198
198
 199
199
 200
200
 201
201
 202
202
 203
203
 204
204
 205
205
 206
206
 207
207
 208
208
 209
209
 210
210
 211
211
 212
212
 213
213
 214
214
 215
215
 216
216
 217
217
 218
218
 219
219
 220
220
 221
221
 222
222
 223
223
 224
224
 225
225
 226
226
 227
227
 228
228
 229
229
 230
230
 231
231
 232
232
 233
233
 234
234
 235
235
 236
236
 237
237
 238
238
 239
239
 240
240
 241
241
 242
242
 243
243
 244
244
 245
245
 246
246
 247
247
 248
248
 249
249
 250
250
 251
251
 252
252
 253
253
 254
254
 255
255
 256
256
 257
257
 258
258
 259
259
 260
260
 261
261
 262
262
 263
263
 264
264
 265
265
 266
266
 267
267
 268
268
 269
269
 270
270
 271
271
 272
272
 273
273
 274
274
 275
275
 276
276
 277
277
 278
278
 279
279
 280
280
 281
281
 282
282
 283
283
 284
284
 285
285
 286
286
 287
287
 288
288
 289
289
 290
290
 291
291
 292
292
 293
293
 294
294
 295
295
 296
296
 297
297
 298
298
 299
299
 300
300
 301
301
 302
302
 303
303
 304
304
 305
305
 306
306
 307
307
 308
308
 309
309
 310
310
 311
311
 312
312
 313
313
 314
314
 315
315
 316
316
 317
317
 318
318
 319
319
 320
320
 321
321
 322
322
 323
323
 324
324
 325
325
 326
326
 327
327
 328
328
 329
329
 330
330
 331
331
 332
332
 333
333
 334
334
 335
335
 336
336
 337
337
 338
338
 339
339
 340
340
 341
341
 342
342
 343
343
 344
344
 345
345
 346
346
 347
347
 348
348
 349
349
 350
350
 351
351
 352
352
 353
353
 354
354
 355
355
 356
356
 357
357
 358
358
 359
359
 360
360
 361
361
 362
362
 363
363
 364
364
 365
365
 366
366
 367
367
 368
368
 369
369
 370
370
Инструкции и руководства похожие на KARCHER BD 100/250 R I BP


Другие инструкции и руководства из категории Поломоечная машина


