6
English
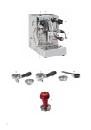
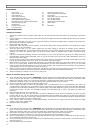
COMPONENTS :
1.
Power cord
2.
Main switch on/off
3.
LED machine on
4.
LED Heating element
5.
Coffee distribution lever
6.
Boiler/Steam pressure gauge
7.
Distribution pump pressure/coffee gauge
8.
Drip tray with cup rack
9.
Steam knob
10.
No-burn steam wand
11.
Hot water knob
12.
No burn hot water nozzle
13.
Coffee distribution grouphead
14.
Cup warmer
15.
Removable cover for water tank
16.
One cup filter holder
17.
Two cup filter holder
18.
LELIT stainless steel tamper
19.
Coffee doser
20.
-
21.
Blind Filter
USER INSTRUCTIONS:
Starting the machine:
1.
Remove the machine from its packing and make sure all packing parts have been taken off (including the protection
bags).
2.
Lay the machine on a flat and steady surface far away from hot places and from the water taps. Be careful: the machine
weights 19kg!
3.
Remove the water tank cover (15) on the top of the machine; extract all the plastic tubes, included the one that has a
filter attached; extract the water tank.
4.
Fill the tank with cold water.
5.
Replace the water tank back into the machine; insert all the plastic tubes and pay attention not to bend them; replace
the cover (15) in its right position.
6.
Insert the power cord (1) in the mains. (Make sure the mains voltage is the same as indicated on the machine’s
technical data plate/label. The espresso machine should be well and safely grounded. Please have the power system
checked if you have any doubts). Make sure that the power system is equipped with a safety cut-off that works
properly.
7.
Turn on the machine by switching the main on/off switch (2); The Led (3) and the Led (4) will go on. Without inserting
the filterholder, pull the coffee distribution lever (5) up, let the water come out from the coffee distribution group (13)
and then pull it down again.
8.
As soon as the Led (4) goes off, open the steam knob (9) by turning it anti-clockwise. Keep the steam wand on the drip
tray (8) and let the steam come out for about 10-15 seconds. Then close it again.
9.
Before making an espresso, it’s advisable (especially if the machine has been left on and has not been used for a long
time) to do a cooling flush. Without inserting the filterholder, pull the coffee distribution lever (5) up, let the water
come out from the coffee distribution group (13) for a few seconds. This will pull the excess heat from the grouphead to
avoid getting a burn or sour coffee shot. Lower the lever (5).
10.
Wait 3-4 minutes until the machine reaches the right pressure (the led 4 goes off). When you turn on the machine for
the first time, it’s better to wait 10/20 minutes so that the machine reaches the optimal temperature.
11.
When the machine is ready for use, the Led (4) will go off.
Making an espresso with ground coffee:
12.
Check that the tank contains water.
ATTENTION
: the internal tank has a special floating device that controls the water
level. In case of lack of water, e the sound alarm buzzes. Please fill the water tank with water (as described under
Starting the machine, points 3-5): this will shut the buzzer, confirming that the water level is suitable.
13.
Follow the instruction at point 7 in case the above written operations have not been yet done.
14.
As soon as the led (4) goes off, the machine is ready for use.
15.
Place the desired quantity of coffee in the filterholder (#16: 1 cup filterholder, #17: 2 cup filterholder). One doser (19)
corresponds to 1 coffee dose; to get 2 coffee cups pour 2 dosers of ground coffee in the filter holder and after that press
it properly with the pressing tool/tamper (18). Lock the filter in the coffee distribution group (13) turning it from the left
to the right to block it in place. It’s advisable to always use fresh coffee and to grind it just before you make your
espresso.
16.
Place the espresso cup/s on the cup rack (8).
17.
Push the coffee lever (5) up. Coffee will come out from the filterholder. Lower the lever completely (5) when you have
enough coffee in your cup. The excess water in the filterholder will be released to the drip tray (8) due to the opening of
the 3-way valve. You’ll hear a noise that confirms that the excess pressure in the filterholder has been released with the
water. Now it’s possible to remove the filterholder.
18.
If you wish to make more coffees, remove the filterholder by turning it from right to left and throw away the coffee
grounds. Clean it with a damp cloth.
19.
Repeat the above operations.
Steam:
20.
Check that the tank contains water.
ATTENTION
: the internal tank has a special floating device that controls the water
level. In case of lack of water, the sound alarm buzzes. Please fill the water tank with cold water (as described under
Starting the machine, points 3-5): this will shut the buzzer, confirming that the water level is suitable.
21.
Never place your hands or other body parts under the steam wand. This may cause serious burns.
22.
Verify that the machine is ready for use. As soon as the led (4) goes off, the machine is ready.
23.
Open the steam knob (9) by turning it anti-clockwise with the tip of the steam wand (10) directed on the drip tray (8).
At the beginning some water will flow out.
24.
As soon as steam comes out, place a stainless steel recipient/container under the steam nozzle (10) with the drink you
intend to froth in it.
25.
Turn the steam knob (9) clockwise.