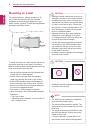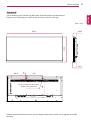
40
ENG
ENGLISH
CONTROLLING THE MULTIPLE PRODUCT
E2: Erase the second Off Timer setting
E3: Erase the third Off Timer setting
E4: Erase the fourth Off Timer setting
Data2 FF
Data3 FF
* To read or delete the Off Timer list you set, [Data2]
[Data3] must be set to FFH.
3. 02h to 0Ch (Sets weekday for Off Timer)
Data1 00: Repeat off
02. Daily
03: Mon. - Fri.
04: Mon. - Sat.
05: Sat. - Sun.
06. Every Sunday
07. Every Monday
08. Every Tuesday
09. Every Wednesday
0A. Every Thursday
0B. Every Friday
0C. Every Saturday
Data2 00-17: 00-23 hours
Data3 00-3B: 00-59 minutes
** This function is available only when Clock 1 and
Clock 2 are set.
Example 1: fe 01 f1 ff ff – Reads the 1st index data in
Off Timer.
Example 2: fe 01 e1 ff ff – Erases the 1st index data
in Off Timer.
Example3: fe 01 04 02 03 - Sets Off Timer to 02:03
for Monday-Saturday.
* This function is available only when Clock 1 (year/
month/day) and Clock 2 (hour/minute/second) are
set.
Acknowledgement
[e][ ][Set ID][ ][OK/NG][Data1][Data2][Data3][x]
14. On Timer (repeat mode/time) (Command: f d)
* Sets the On Timer (repeat mode/time).
Transmission
[f][d][ ][Set ID][ ][Data1][ ][Data2][ ][Data3][Cr]
Data1
1. f1h to f4h (Read data)
F1: Reads the first On Timer data
F2: Reads the second On Timer data
F3: Reads the third On Timer data
F4: Reads the fourth On Timer data
Data2 FF
Data3 FF
* Checks On Timer (repeat mode/hour/minute).
Transmission
[f][d][ ][Set ID][ ][Data][ ][f][f][ ][f][f][Cr]
Data f1-f4: First to fourth index number in the On
Timer list
Acknowledgement
[d][ ][Set ID][ ][OK/NG][Data1][Data2][Data3][Data4]
[x]
Data1 f1-f4: First to fourth index number in the On
Timer list
Data2 00: Repeat off
02. Daily
03: Mon. - Fri.
04: Mon. - Sat.
05: Sat. - Sun.
06. Every Sunday
07. Every Monday
08. Every Tuesday
09. Every Wednesday
0A. Every Thursday
0B. Every Friday
0C. Every Saturday
Data3 00-17: 00-23 hours
Data4 00-3B: 00-59 minutes
2. e1h-e4h (delete one index), e0h (delete all
indexes)
Data1
E0: Erase all On Timer settings
E1: Erase the first On Timer setting
E2: Erase the second On Timer setting
E3: Erase the third On Timer setting
E4: Erase the fourth On Timer setting
Data2 FF
Data3 FF
3. 01h to 0Ch (sets weekday for On Timer)
Data1 00: Repeat off
02. Daily
03: Mon. - Fri.
04: Mon. - Sat.
05: Sat. - Sun.
06. Every Sunday
07. Every Monday
08. Every Tuesday
09. Every Wednesday
0A. Every Thursday
0B. Every Friday
0C. Every Saturday
Data2 00-17: 00-23 hours
Data3 00-3B: 00-59 minutes
* To read or delete an On Timer list you have set,
[Data2][Data3] must be set to FFH.
Example 1: fd 01 f1 ff ff - Reads the first index data in
On Timer.
Example 2: fd 01 e1 ff ff - Erases the second index
data in On Timer.
Example 3: fd 01 04 02 03 - Sets On Timer to 02:03
for Monday-Saturday.
* This function is available only when Clock 1 (year/
month/day) and Clock 2 (hour/minute/second) are
set.
* To ensure the On Timer schedule is set correctly,
you must execute the On Timer Input command after
executing this command.
Acknowledgement
[d][ ][Set ID][ ][OK/NG][Data1][Data2][Data3][x]
15. On Timer Input (Command: f u)