27
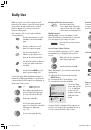
You can also start a channel or
frequency search by pressing
the blue button.
The search stops when a broadcasting station
has been found.
Note that only broadcasting stations with the
set “TV Standard”, e.g. B/G, are displayed
correctly.
If you want to locate broadcasting stations
with a different TV standard, you must first set
the corresponding TV standard and set the
“Colour Standard” to automatic, or set the
colour standard and then start the search.
The channel name is displayed automatically if
the broadcasting station also transmits
Teletext.
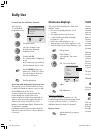
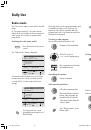
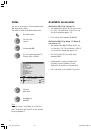
Saving Settings:
Press the red button.
This will display the channel
preview. A channel, i.e. a
channel number, is highlighted
in blue.
You now have two options for saving:
1. If you have altered settings for a channel
that has already been saved, then
“overwrite” the old settings by pressing the
red button.
2. You can “insert” the channel into the
channel list by pressing the yellow button.
To remove channel preview.
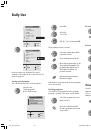
Setting Manually
The menu enables you to subsequently alter
channels that have already been saved, or to
search for others, add them to the channel
preview and save them, provided that you
know the transmission modalities of the
broadcasting station.
The following functions can be performed:
1. Selecting TV reception range.
2. Setting channel number.
3. Directly entering frequency for a
broadcasting station.
4. Entering channel names.
5. Selecting TV standard.
6. Selecting colour standard.
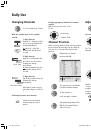
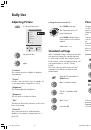
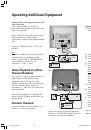
Calling up “Set Manually” menu:
Press button.
Select the line “Programmes”.
Confirm with
OK
.
Select the line “Setting
manually”.
Confirm with
OK
.
Select the “Range” in which
you want to search for a
broadcasting station.
Select the line “Channel”
or ...
“Frequency” and ...
enter the numbers, if known.
Setting Channels Manually
Note on TV Standards
Entering the TV location for the automatic
channel search automatically sets the normal
TV standard for this country.
If you can receive broadcasting stations from
other countries, you may have to select the
correct standard
under “TV Standard” in the “Set manually”
menu.
Select a TV standard and confirm with
OK
; the
colour standard is then assigned automatically.
If the quality of the colour picture is poor, the
corresponding colour standard must be set
manually.
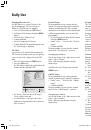
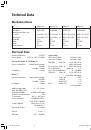
Standard
Country
PAL-B/G
D, DK, S, NL, A, I, E, P, N, B, etc.
SECAM-L
France
SECAM-B/G
Greece, Lebanon, Tunisia
SECAM-D/K
Russia, Hungary
PAL-D/K
CR, SR, Hungary, China, Poland
NTSC-M
Japan, USA, US military
transmitters in Europe
PAL-I
GB, Ireland, South Africa
PAL-M
PAL / 60 Hz
PAL-N
Argentina
Standard Coulor
PAL
SECAM
NTSC-V
Special standard for NTSC
video recorders with 4.43 MHz
colour carrier frequency.
PAL-V
PAL / 60 Hz standard for
videorecorders
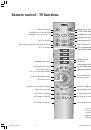
MENU
OK
OK
OK
OK
OK
AV
wxyz
OK
END
LCD_023_RC4_GB
10.08.2004, 14:08 Uhr
27