Инструкция для ROTEL RB-1510

(скачивание инструкции бесплатно)
Формат файла: PDF
Доступность: Бесплатно как и все руководства на сайте. Без регистрации и SMS.
Дополнительно: Чтение инструкции онлайн
background image

6

RB-1510 Stereo Power Amplifi er

About Rotel

Our story began nearly 50 years ago. Over the decades, we have 
received hundreds of awards for our products and satisfi ed hundreds 
of thousands of people who take their entertainment seriously - like 
you! 

Rotel was founded by a family whose passionate interest in music 
led them to manufacture high-fi delity components of uncompromising 
quality. Through the years, that passion has remained undiminished 
and the family goal of providing exceptional value for audiophiles 
and music lovers, regardless of their budget, is shared by all Rotel 
employees. 

Rotel’s engineers work as a close team, listening to, and fi ne tuning, 
each new product until it reaches their exacting musical standards. 
They are free to choose components from around the world in order to 
make that product the best they can. You are likely to fi nd capacitors 
from the United Kingdom and Germany, semiconductors from Japan or 
the United States, while toroidal power transformers are manufactured 
in Rotel’s own factory.   

We all have concerns about our environment. And, as more and more 
electronics are produced and later discarded, it is especially important 
for a manufacturer to do all it can to engineer products that have a 
minimum negative impact on landfi ll sites and water tables. 

At Rotel, we are proud to do our part. We have reduced the lead 
content in our electronics by using special ROHS solder, while our new 
Class D (not digital) amplifi ers are up to fi ve times more effi cient than 
our legacy designs and still deliver power and performance. These 
products run cool, give minimum wasted energy, are good for the 
environment and give better sound too. 

Finally, we have printed this brochure on recycled paper stock. 

While we understand that these are small fi rst steps, they are still 
important ones. And we continue to pursue new methods and 
materials for a cleaner and greener manufacturing process. 

All of us at Rotel thank you for buying this product. We are sure it will 
bring you many years of enjoyment.

A Word About Watts

This amplifi er’s power output is quoted as 65 watts for each channel, 
when both channels are operating together at full power. 

Rotel has chosen to specify the power output in this way because, in 
Rotel’s experience, it gives the truest value of the receiver or amplifi er’s 
power capability. 

When comparing specifi cations for different products, you should be 
aware that power output is often specifi ed in other ways, so you may 
not be comparing like with like. 

For example, the power output may be quoted with only one channel 
operating, giving a higher maximum fi gure. The highly regulated 
power supplies of the Rotel Class D amplifi ers ensures that they will 
produce the full specifi ed power output to one or both channels. 

A loudspeaker’s impedance rating indicates the electrical resistance 
or load it offers when connected to the amplifi er, usually 8 ohms or 
4 ohms. The lower the impedance, the more power the speaker will 
need. In effect, a 4 ohm speaker will require twice as much power as 
an 8 ohm speaker. 

So ideally, the amplifi er should be give double the power into a 4 ohm 
load – a rating of 65 watts into an 8 ohm load should become 130 
watts into 4 ohms. Using lower impedance speakers makes greater 
demands on the amplifi er’s power supply, because it will be drawing 
more current and giving off more heat. 

Contents

Important Safety Instructions . . . . . . . . . . . . . . . . . . . . . . . . . . . . . . . . . . . . . . .  2

Figure 1:   Controls and Connections 

3

Figure 2:   Preamp Input and Speaker Output Connections 

3

Important Notes 

5

About Rotel . . . . . . . . . . . . . . . . . . . . . . . . . . . . . . . . . . . . . . . . . . . . . . . . . . . .  6
A Word About Watts . . . . . . . . . . . . . . . . . . . . . . . . . . . . . . . . . . . . . . . . . . . . .  6
Getting Started . . . . . . . . . . . . . . . . . . . . . . . . . . . . . . . . . . . . . . . . . . . . . . . . .  7

A Few Precautions 

7

Placement  

7

Cables  

7

AC Power and Control  . . . . . . . . . . . . . . . . . . . . . . . . . . . . . . . . . . . . . . . . . . . .  7

AC Power Input 

-


7

Power Switch and Power Indicator 

1


8

Protection Indicator 

2


8

Auto Turn On/Off Mode Selector 

8


8

12V Trigger Input and Output 

7


8

Input Signal Connections 

56

56

  . . . . . . . . . . . . . . . . . . . . . . . . . . . . . . . . . . . .  8

Input Mono Switch 

4


8

Front Panel Level Controls 

3


8

Signal Output Link Connectors 

6


9

Speaker Connections  . . . . . . . . . . . . . . . . . . . . . . . . . . . . . . . . . . . . . . . . . . . . .  9

Speaker Selection 

9

Speaker Wire Selection 

9

Polarity and Phasing 

9

Speaker Wire Connection  

9

Binding Post Connection 

9


9

Plug-in Connection 

0


9

Troubleshooting . . . . . . . . . . . . . . . . . . . . . . . . . . . . . . . . . . . . . . . . . . . . . . . .  10

Front Panel Power Indicator Is Not Lit 

10

No Sound   

10

Protection Indicator Is Lit 

10

Specifi cations . . . . . . . . . . . . . . . . . . . . . . . . . . . . . . . . . . . . . . . . . . . . . . . . . .  10

51

êÛÒÒÍËÈ

Разъемы - разветвители выходного сигнала 

6

 - Signal Output Link

Входной сигнал поступает не только на нормальные входы 

5

 , но еще 

и на разъемы разветвители выходного сигнала 

6

 - Signal Output Link. 

Обычно они используются тогда, когда когда усилитель является частью 
мультирумной системы. Сигналы с Output Link можно подать на другие 
усилители в системе.

Подсоединение акустических систем

Выбор акустических систем

Мы рекомендуем использовать с RB-1510 комплект АС с импедансом 4 
Ома или выше. Вы должны быть осторожны, подключая две пары колонок  
параллельно, т.к. для усилителя их эффективный импеданс уменьшается 
вдвое. Например, если будут одновременно работать два комплекта 
АС с импедансом 8 Ом, нагрузка для усилителя окажется равной 4 Ом. 
Когда работают несколько громкоговорителей в параллель, выбирайте 
громкоговорители с номинальным сопротивлением 8 Ом или выше. 
Паспортные значения импеданса АС, как правило, очень приблизительны. 
Тем не менее, на практике только очень немногие АС могут представлять 
проблему для RB-1510. Проконсультируйтесь с вашим авторизованным 
дилером Rotel, если у вас возникли вопросы.

Выбор колоночного кабеля

Для подсоединения АС к RB-1510 используйте изолированный 
многожильный кабель с двумя проводниками. Размер и качество кабеля 
могут заметно влиять на звучание системы. Стандартный колоночный 
кабель тоже подойдет, но его влияние может выразиться в снижении 
звукового выхода или ухудшении басовой характеристики, особенно при 
большой длине кабеля. Обычно чем толще провод, тем лучше звук. Для 
наилучшего результата используйте специальные высококачественные 
колоночные кабели. Обратитесь к вашему авторизованному дилеру Rotel 
за советами по выбору самых лучших кабелей для использования в вашей 
аудио системе.

Полярность и фаза

Полярность – подключение проводника к положительной или 
отрицательной клемме – на всех АС и усилителе должна быть одинакова. 
Тогда сигнал на всех АС будет иметь одинаковую фазу. Если полярность 
одного из соединений перепутана, то существенно снижается выход 
баса и портится стерео образ. Чтобы можно было отличить один 
проводник от другого, все колоночные кабели имеют маркировку: 
изоляция одного проводника может быть ребристой, полосатой и т.п. 
Также бывают кабели с прозрачной изоляцией и проводниками разного 
цвета (медный и посеребренный). Иногда на изоляцию наносится знак 
полярности. Установите, какой проводник будет положительным, а какой 
– отрицательным, и придерживайтесь этого правила при подсоединении 
всех АС.

Подсоединение колоночных проводов

Проложите провода от RB-1510 к колонкам. Оставьте некоторый запас 
длины, чтобы можно было повернуть компоненты для обеспечения доступа 
к клеммам. 

Два комплекта клемм 

9

. на задней панели RB-1510 имеют цветную 

кодировку для каждого канала. Они допускают подсоединение 
зачищенных концов кабеля, наконечников “лопатка” и “банан” (кроме 
стран ЕС, где их использование запрещено). 

RB-1510 оснащен также зажимными гнездами для колоночных проводов 

0

, которые упрощают подключение колонок в заказных инсталляциях. Вы 

можете заранее подсоединить такие разъемы до того, как будет установлен 
сам усилитель. Гнезда для проводов подключены на выход в параллель с 
колоночными основными клеммами.

Примечание:

 Ниже описывается подсоединение как к клеммам, так 

и к зажимными гнездам. НИ В КОЕМ СЛУЧАЕ НЕ ИСПОЛЬЗУЙТЕ 
одновременно оба способа, например, чтобы подключить несколько 
пар колонок.

Подсоединение проводов к колоночным клеммам 

9


Если используются наконечники «бананы», закрепите их на концах 
проводников и вставьте в отверстия клемм. Головки клемм должны быть 
закручены до упора (по часовой стрелке).

Если используются наконечники «лопатки», закрепите их на концах 
проводников. Если используются зачищенные концы кабеля, разделите 
проводники и скрутите жилы. Старайтесь не перерезать жилы 
проводников. Отверните головки клемм (против часовой стрелки). 
Наденьте «лопатки» на штыри клемм или оберните концы провода вокруг 
штырей. Плотно закрутите головки клемм, чтобы обеспечить прочное 
соединение.

Примечание:

 Убедитесь, что не осталось «разлохмаченных» жил, 

которые могут замкнуться между собой, на соседнюю клемму или на 
корпус.

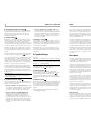
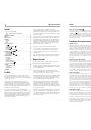
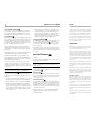
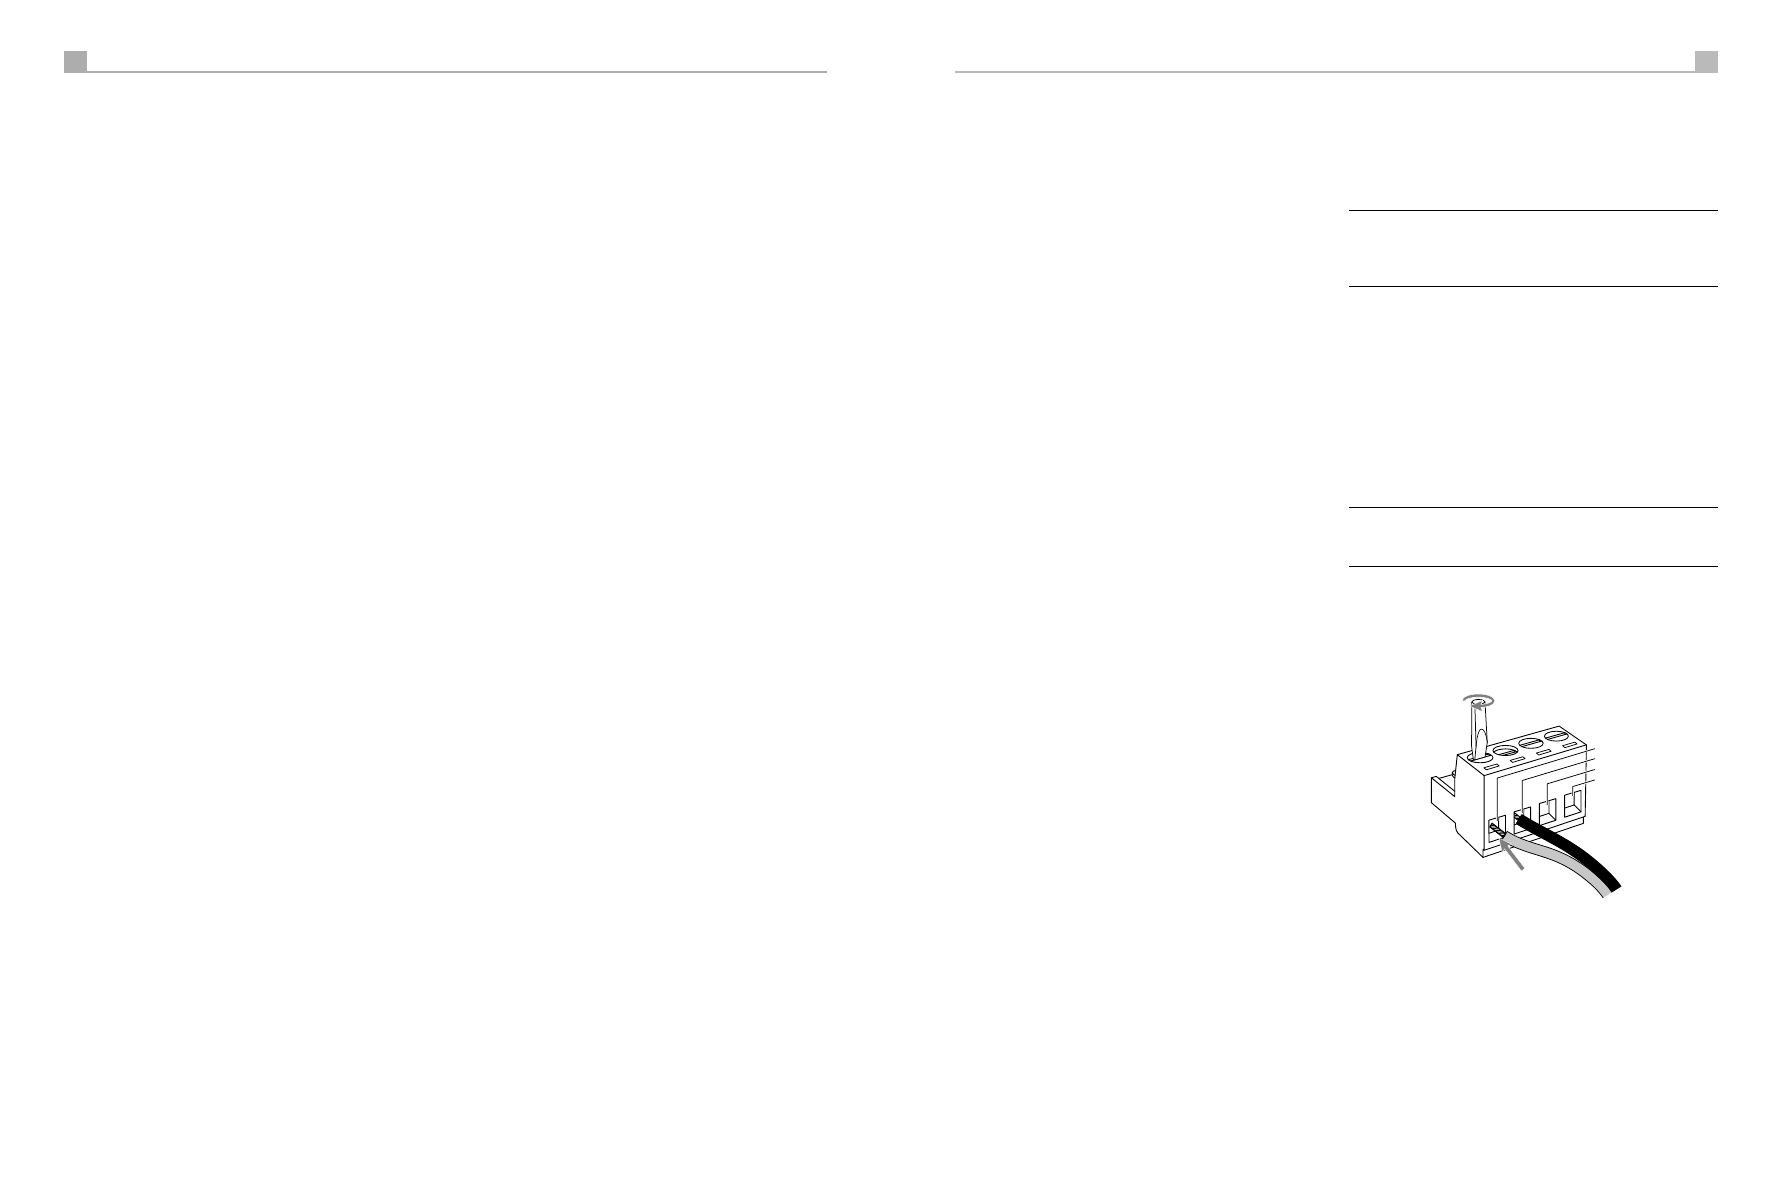
Подсоединение проводов к зажимным гнездам 

0


Подсоедините колоночные провода так, как показано на рисунке. Вставьте 
зачищенные концы кабеля в открытые отверстия и поверните винты так, 
чтобы зафиксировать проводники на месте.

Убедитесь, что полярность подключения правильная.

R+

R–

L–

L+

1
2
3
4
5
6
7
8
9
10
11
12
13
14
15
16
17
18
19
20
21
22
23
24
25
26
27
28
29
30
31
32
33
34
35
36
37
38
39
40
41
42
43
44
45
46
47
48
49
50
51
Оглавление инструкции
  • Страница 1 из 52
    RB-1510 Stereo Power Amplifier 2 Important Safety Instructions WARNING: There are no user serviceable parts inside. Refer all servicing to qualified service personnel. Keep the component away from radiators, heat registers, stoves, or any other appliance that produces heat. WARNING: To reduce the
  • Страница 2 из 52
    RB-1510 Stereo Power Amplifier 2 Important Safety Instructions WARNING: There are no user serviceable parts inside. Refer all servicing to qualified service personnel. Keep the component away from radiators, heat registers, stoves, or any other appliance that produces heat. WARNING: To reduce the
  • Страница 3 из 52
    RB-1510 Stereo Power Amplifier 3 Figure 1: Controls and Connections Commandes et branchements Bedienelemente und Anschlüsse Controles y Conexiones De bedieningsorganen en de aansluitingen Controlli e connessioni Kontroller och anslutningar Органы управления и разъемы RB-1510 Stereo Power Amplifier
  • Страница 4 из 52
    RB-1510 Stereo Power Amplifier 3 Figure 1: Controls and Connections Commandes et branchements Bedienelemente und Anschlüsse Controles y Conexiones De bedieningsorganen en de aansluitingen Controlli e connessioni Kontroller och anslutningar Органы управления и разъемы RB-1510 Stereo Power Amplifier
  • Страница 5 из 52
    RB-1510 Стерео усилитель мощности 52 Диагностика и устранение неисправностей 5 Important Notes When making connections be sure to: ✔ Turn off all the components in the system before hooking up any components, including loudspeakers. ✔ Turn off all components in the system before changing any of the
  • Страница 6 из 52
    6 Contents Important Safety Instructions . . . . . . . . . . . . . . . . . . . . . . . . . . . . . . . . . . . . . . . 2 Figure 1: Controls and Connections 3 Figure 2: Preamp Input and Speaker Output Connections 3 Important Notes 5 About Rotel . . . . . . . . . . . . . . . . . . . . . . . . . . . .
  • Страница 7 из 52
    50 Выключатель питания и индикатор питания 1 RB-1510 Стерео усилитель мощности Выключатель питания находится на передней панели вашего усилителя. Чтобы включить усилитель, нажмите кнопку выключателя питания. Загорится кольцо вокруг выключателя, означая, что усилитель включен. Чтобы выключить
  • Страница 8 из 52
    RB-1510 Stereo Power Amplifier 8 Power Switch and Power Indicator 1 The power switch is located on the front panel of your amplifier. To turn the amplifier on, push the switch in. The ring around the switch button will light, indicating that the amplifier is turned on. To turn the amplifier off,
  • Страница 9 из 52
    48 Содержание Рис. 1: Органы управления и разъемы 3 Рис. 2: Подсоединение предусилителя на вход и акустических систем на выходы 4 èÂ‰ ÔÓ‰ÒÓ‰ËÌÂÌËÂÏ 5 Важные инструкции по безопасности . . . . . . . . . . . . . . . . . . . . . . . . . . . . . . . . . . . . . . . 47 Содержание . . . . . . . . . .
  • Страница 10 из 52
    RB-1510 Stereo Power Amplifier 10 êÛÒÒÍËÈ 47 Troubleshooting Важные инструкции по безопасности Most difficulties in audio systems are the result of poor or wrong connections, or improper control settings. If you encounter problems, isolate the area of the difficulty, check the control settings,
  • Страница 11 из 52
    RB-1510 Stereoslutsteg 46 Français 11 Felsökning Remarques importantes concernant la sécurité De flesta problem som kan uppstå i en anläggning beror på felaktiga anslutningar eller inställningar. Om du stöter på problem försöker du lokalisera felet och kontrollerar dina anslutningar. Försök hitta
  • Страница 12 из 52
    RB-1510 Amplificateur de puissance stéréo 12 Sommaire Figure 1: Commandes et branchements Figure 2: Entrée préamplificateur et sorties enceintes acoustiques Remarques importantes Remarques importantes concernant la sécurité . . . . . . . . . . . . . . . . . . . . . . . . . . Au sujet de Rotel . . .
  • Страница 13 из 52
    RB-1510 Stereoslutsteg 44 Strömbrytare och strömindikator 1 In- och utgångar för 12 V-styrsignal 7 Strömbrytaren sitter på din förstärkares front. Tryck in strömbrytaren för att slå på förstärkaren. Ringen kring brytarknappen börjar då lysa, vilket talar om att förstärkaren är påslagen. Slå av
  • Страница 14 из 52
    14 Interrupteur de mise sous tension et indicateur de fonctionnement 1 L’interrupteur de mise sous tension se trouve sur la face avant de l’amplificateur. Il suffit d’appuyer dessus pour mettre l’amplificateur sous tension. L’anneau lumineux placé juste autour s’allume alors. Une nouvelle pression
  • Страница 15 из 52
    RB-1510 Stereoslutsteg 42 Innehåll Figur 1: Kontroller och anslutningar Figure 2: Ingång för förförstärkare och högtalarutgångar Viktigt Viktiga säkerhetsinstruktioner . . . . . . . . . . . . . . . . . . . . . . . . . . . . . . . . . . . . . Om Rotel . . . . . . . . . . . . . . . . . . . . . . . .
  • Страница 16 из 52
    RB-1510 Amplificateur de puissance stéréo 16 Svenska Problèmes de fonctionnement Viktiga säkerhetsinstruktioner La majorité des problèmes survenant dans une installation haute fidélité est due à de mauvais branchements, ou à une mauvaise utilisation d’un ou de plusieurs maillons. Si le problème est
  • Страница 17 из 52
    RB-1510 Finale di potenza stereo 40 Deutsch Risoluzione dei problemi Wichtige Sicherheitshinweise La maggior parte dei problemi nei sistemi audio è dovuta a collegamenti non effettuati a dovere o sbagliati, o impostazioni di controllo errate. Se riscontrate problemi, isolate l’area interessata,
  • Страница 18 из 52
    RB-1510 Stereo-Endstufe 18 Inhaltsverzeichnis Figure 1: Bedienelemente und Anschlüsse Figure 2: Anschlussdiagramm Wichtige Hinweise Wichtige Sicherheitshinweise . . . . . . . . . . . . . . . . . . . . . . . . . . . . . . . . . . . . . . Die Firma Rotel . . . . . . . . . . . . . . . . . . . . . . .
  • Страница 19 из 52
    38 Interruttore di accensione e LED indicatore 1 L’interruttore di accensione si trova sul pannello frontale del vostro amplificatore. Per attivare l’amplificatore, premetelo. L’anello attorno all’interruttore si illuminerà, indicando lo stato di attivazione dell’amplificatore. Per spegnere
  • Страница 20 из 52
    RB-1510 Stereo-Endstufe 20 Netzschalter und Betriebsanzeige 1 Der Netzschalter befindet sich an der Gerätefront der RB-1510. Zum Einschalten drücken Sie den Netzschalter. Der Ring um den Schalter beginnt zu leuchten und zeigt an, dass die Endstufe eingeschaltet ist. Drücken Sie zum Ausschalten der
  • Страница 21 из 52
    RB-1510 Finale di potenza stereo 36 Indice Figura 1: Controlli e connessioni Figura 2: Collegamenti ingresso preamp ed uscita per diffusori Note importanti Importanti informazioni di Sicurezza . . . . . . . . . . . . . . . . . . . . . . . . . . . . . . . . . Indice . . . . . . . . . . . . . . . . .
  • Страница 22 из 52
    RB-1510 Stereo-Endstufe 22 Italiano 35 Bei Störungen Importanti informazioni di Sicurezza Tritt eine scheinbare Fehlfunktion auf, sollten zuerst die nachstehend aufgeführten Punkte überprüft werden. Viele Probleme beruhen auf falschen Einstellungen der Bedienelemente oder fehlerhaften Anschlüssen.
  • Страница 23 из 52
    RB-1510 Stereo-eindversterker 34 Español 23 Wat te doen bij problemen? Información Importante Relacionada con la Seguridad De meeste problemen in geluidsinstallaties ontstaan door slechte aansluitingen of het verkeerd gebruik van de knoppen en toetsen. Als u problemen tegenkomt probeer ze dan te
  • Страница 24 из 52
    RB-1510 Etapa de Potencia Estereofónica 24 Contenido Figura 1: Controles y Conexiones Figura 2: Conexión al Preamplificador y las Cajas Acústicas Notas Importantes Información Importante Relacionada con la Seguridad . . . . . . . . . . . . . . . . . . . . Contenido . . . . . . . . . . . . . . . . .
  • Страница 25 из 52
    32 De aan/uitschakelaar met bijbehorende indicator 1 RB-1510 Stereo-eindversterker Español • Met deze schakelaar in de “12V TRIG” positie wordt de versterker automatisch aangeschakeld wanneer er een 12 volt signaal verschijnt op de 3.5mm “12 TRIG IN” mini-jackaansluiting links van deze schakelaar.
  • Страница 26 из 52
    26 RB-1510 Etapa de Potencia Estereofónica Su RB-1510 ha sido configurada en fábrica para que funcione con la tensión eléctrica alterna correcta que corresponda al país en que ha sido comprada (120 voltios/60 Hz en Estados Unidos o 230 voltios/50 Hz en Europa). Dicha configuración está indicada en
  • Страница 27 из 52
    RB-1510 Stereo-eindversterker 30 Inhoud Figuur 1: De bedieningsorganen en de aansluitingen Figuur 2: De aansluitingen voor de voorversterker en de luidsprekers Héél belangrijk Belangrijke Veiligheidsinstructies . . . . . . . . . . . . . . . . . . . . . . . . . . . . . . . . . . . Wij van Rotel . .
  • Страница 28 из 52
    RB-1510 Stereo-eindversterker 30 Inhoud Figuur 1: De bedieningsorganen en de aansluitingen Figuur 2: De aansluitingen voor de voorversterker en de luidsprekers Héél belangrijk Belangrijke Veiligheidsinstructies . . . . . . . . . . . . . . . . . . . . . . . . . . . . . . . . . . . Wij van Rotel . .
  • Страница 29 из 52
    26 RB-1510 Etapa de Potencia Estereofónica Su RB-1510 ha sido configurada en fábrica para que funcione con la tensión eléctrica alterna correcta que corresponda al país en que ha sido comprada (120 voltios/60 Hz en Estados Unidos o 230 voltios/50 Hz en Europa). Dicha configuración está indicada en
  • Страница 30 из 52
    32 De aan/uitschakelaar met bijbehorende indicator 1 RB-1510 Stereo-eindversterker Español • Met deze schakelaar in de “12V TRIG” positie wordt de versterker automatisch aangeschakeld wanneer er een 12 volt signaal verschijnt op de 3.5mm “12 TRIG IN” mini-jackaansluiting links van deze schakelaar.
  • Страница 31 из 52
    RB-1510 Etapa de Potencia Estereofónica 24 Contenido Figura 1: Controles y Conexiones Figura 2: Conexión al Preamplificador y las Cajas Acústicas Notas Importantes Información Importante Relacionada con la Seguridad . . . . . . . . . . . . . . . . . . . . Contenido . . . . . . . . . . . . . . . . .
  • Страница 32 из 52
    RB-1510 Stereo-eindversterker 34 Español 23 Wat te doen bij problemen? Información Importante Relacionada con la Seguridad De meeste problemen in geluidsinstallaties ontstaan door slechte aansluitingen of het verkeerd gebruik van de knoppen en toetsen. Als u problemen tegenkomt probeer ze dan te
  • Страница 33 из 52
    RB-1510 Stereo-Endstufe 22 Italiano 35 Bei Störungen Importanti informazioni di Sicurezza Tritt eine scheinbare Fehlfunktion auf, sollten zuerst die nachstehend aufgeführten Punkte überprüft werden. Viele Probleme beruhen auf falschen Einstellungen der Bedienelemente oder fehlerhaften Anschlüssen.
  • Страница 34 из 52
    RB-1510 Finale di potenza stereo 36 Indice Figura 1: Controlli e connessioni Figura 2: Collegamenti ingresso preamp ed uscita per diffusori Note importanti Importanti informazioni di Sicurezza . . . . . . . . . . . . . . . . . . . . . . . . . . . . . . . . . Indice . . . . . . . . . . . . . . . . .
  • Страница 35 из 52
    RB-1510 Stereo-Endstufe 20 Netzschalter und Betriebsanzeige 1 Der Netzschalter befindet sich an der Gerätefront der RB-1510. Zum Einschalten drücken Sie den Netzschalter. Der Ring um den Schalter beginnt zu leuchten und zeigt an, dass die Endstufe eingeschaltet ist. Drücken Sie zum Ausschalten der
  • Страница 36 из 52
    38 Interruttore di accensione e LED indicatore 1 L’interruttore di accensione si trova sul pannello frontale del vostro amplificatore. Per attivare l’amplificatore, premetelo. L’anello attorno all’interruttore si illuminerà, indicando lo stato di attivazione dell’amplificatore. Per spegnere
  • Страница 37 из 52
    RB-1510 Stereo-Endstufe 18 Inhaltsverzeichnis Figure 1: Bedienelemente und Anschlüsse Figure 2: Anschlussdiagramm Wichtige Hinweise Wichtige Sicherheitshinweise . . . . . . . . . . . . . . . . . . . . . . . . . . . . . . . . . . . . . . Die Firma Rotel . . . . . . . . . . . . . . . . . . . . . . .
  • Страница 38 из 52
    RB-1510 Finale di potenza stereo 40 Deutsch Risoluzione dei problemi Wichtige Sicherheitshinweise La maggior parte dei problemi nei sistemi audio è dovuta a collegamenti non effettuati a dovere o sbagliati, o impostazioni di controllo errate. Se riscontrate problemi, isolate l’area interessata,
  • Страница 39 из 52
    RB-1510 Amplificateur de puissance stéréo 16 Svenska Problèmes de fonctionnement Viktiga säkerhetsinstruktioner La majorité des problèmes survenant dans une installation haute fidélité est due à de mauvais branchements, ou à une mauvaise utilisation d’un ou de plusieurs maillons. Si le problème est
  • Страница 40 из 52
    RB-1510 Stereoslutsteg 42 Innehåll Figur 1: Kontroller och anslutningar Figure 2: Ingång för förförstärkare och högtalarutgångar Viktigt Viktiga säkerhetsinstruktioner . . . . . . . . . . . . . . . . . . . . . . . . . . . . . . . . . . . . . Om Rotel . . . . . . . . . . . . . . . . . . . . . . . .
  • Страница 41 из 52
    14 Interrupteur de mise sous tension et indicateur de fonctionnement 1 L’interrupteur de mise sous tension se trouve sur la face avant de l’amplificateur. Il suffit d’appuyer dessus pour mettre l’amplificateur sous tension. L’anneau lumineux placé juste autour s’allume alors. Une nouvelle pression
  • Страница 42 из 52
    RB-1510 Stereoslutsteg 44 Strömbrytare och strömindikator 1 In- och utgångar för 12 V-styrsignal 7 Strömbrytaren sitter på din förstärkares front. Tryck in strömbrytaren för att slå på förstärkaren. Ringen kring brytarknappen börjar då lysa, vilket talar om att förstärkaren är påslagen. Slå av
  • Страница 43 из 52
    RB-1510 Amplificateur de puissance stéréo 12 Sommaire Figure 1: Commandes et branchements Figure 2: Entrée préamplificateur et sorties enceintes acoustiques Remarques importantes Remarques importantes concernant la sécurité . . . . . . . . . . . . . . . . . . . . . . . . . . Au sujet de Rotel . . .
  • Страница 44 из 52
    RB-1510 Stereoslutsteg 46 Français 11 Felsökning Remarques importantes concernant la sécurité De flesta problem som kan uppstå i en anläggning beror på felaktiga anslutningar eller inställningar. Om du stöter på problem försöker du lokalisera felet och kontrollerar dina anslutningar. Försök hitta
  • Страница 45 из 52
    RB-1510 Stereo Power Amplifier 10 êÛÒÒÍËÈ 47 Troubleshooting Важные инструкции по безопасности Most difficulties in audio systems are the result of poor or wrong connections, or improper control settings. If you encounter problems, isolate the area of the difficulty, check the control settings,
  • Страница 46 из 52
    48 Содержание Рис. 1: Органы управления и разъемы 3 Рис. 2: Подсоединение предусилителя на вход и акустических систем на выходы 4 èÂ‰ ÔÓ‰ÒÓ‰ËÌÂÌËÂÏ 5 Важные инструкции по безопасности . . . . . . . . . . . . . . . . . . . . . . . . . . . . . . . . . . . . . . . 47 Содержание . . . . . . . . . .
  • Страница 47 из 52
    RB-1510 Stereo Power Amplifier 8 Power Switch and Power Indicator 1 The power switch is located on the front panel of your amplifier. To turn the amplifier on, push the switch in. The ring around the switch button will light, indicating that the amplifier is turned on. To turn the amplifier off,
  • Страница 48 из 52
    50 Выключатель питания и индикатор питания 1 RB-1510 Стерео усилитель мощности Выключатель питания находится на передней панели вашего усилителя. Чтобы включить усилитель, нажмите кнопку выключателя питания. Загорится кольцо вокруг выключателя, означая, что усилитель включен. Чтобы выключить
  • Страница 49 из 52
    6 Contents Important Safety Instructions . . . . . . . . . . . . . . . . . . . . . . . . . . . . . . . . . . . . . . . 2 Figure 1: Controls and Connections 3 Figure 2: Preamp Input and Speaker Output Connections 3 Important Notes 5 About Rotel . . . . . . . . . . . . . . . . . . . . . . . . . . . .
  • Страница 50 из 52
    RB-1510 Стерео усилитель мощности 52 Диагностика и устранение неисправностей 5 Important Notes When making connections be sure to: ✔ Turn off all the components in the system before hooking up any components, including loudspeakers. ✔ Turn off all components in the system before changing any of the
  • Страница 51 из 52
    RB-1510 Stereo Power Amplifier 2 Important Safety Instructions WARNING: There are no user serviceable parts inside. Refer all servicing to qualified service personnel. Keep the component away from radiators, heat registers, stoves, or any other appliance that produces heat. WARNING: To reduce the
  • Страница 52 из 52