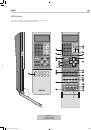
20
21
English
RSX-1560 Surround Sound Receiver
20
21
English
RSX-1560 Surround Sound Receiver
Note:
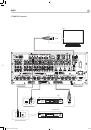
When using digital connections, you may also want to
make the analog audio input connections described previously.
The analog connection is necessary to record to an analog
recorder in some circumstances or for ZONE 2–4 operation.
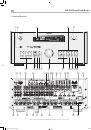
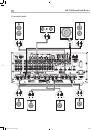
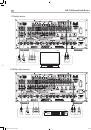
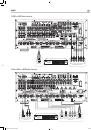
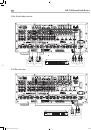
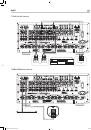
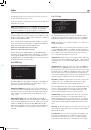
Digital Outputs
[
The receiver has two digital outputs (one coaxial and one optical) to send
the digital signal from any of the digital inputs to a digital recorder or
outboard digital processor. When a digital input source signal is selected
for listening, that signal is automatically sent to both digital outputs for
recording.
CD Inputs
�
A left/right pair of RCA analog audio inputs for connecting a CD player.
TAPE Inputs
x
A pair of RCA inputs, labeled TAPE IN, for connecting the left/right
analog audio signals from an audio tape deck or recording device.
TAPE Outputs
x
A pair of RCA inputs, labeled TAPE OUT, for sending left/right line level
analog audio signals for recording on a tape deck or recording device.
Note:
These outputs should be connected to the inputs of the
same tape deck connected to the TAPE IN inputs.
VIDEO 1–5 Audio Inputs
i
Five pairs of RCA inputs (VIDEO IN 1–5) provide connections for
left/right analog audio signals from five additional source components.
These inputs have corresponding video inputs and are used for VCRs,
satellite TV tuners, DVD players, etc. However, they may also be used for
additional audio only components, simply by omitting the corresponding
video connections.
VIDEO 1–2 Audio Outputs
p
Two pairs of RCA jacks (VIDEO OUT 1–2) provide connections for
sending line level left and right analog audio signals for recording to a
VCR.
These connections correspond to the VIDEO IN 1–2 connections. Make
sure that you are consistent. If you hook up a particular VCR to the
VIDEO 1 inputs, hook up the VIDEO 1 outputs to the same VCR.
Note:
There are no analog audio outputs for VIDEO 3, 4, & 5.
Therefore, in an elaborate system, hook up all of the VCRs and
recording devices to VIDEO 1–2 and use VIDEO 3, 4 & 5 for
playback only components.
Note:
Video 1–2 can be used for audio-only tape decks, simply
omitting the corresponding video connections.
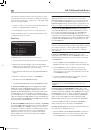
MULTI Inputs
]
A set of RCA inputs accept up to 7.1 channels of analog signals from
a DVD-A or SACD player. There are inputs for FRONT L & R, CENTER,
SUB, REAR L & R, and CENTER BACK 1 & 2.
These inputs bypass all digital processing in the receiver and are routed
directly to the Volume control and preamp outputs.
There are two subwoofer options for the MULTI input. Normally, the .1
channel input is passed through directly to the subwoofer output. An
optional bass redirect feature duplicates the seven main channels, sums
them, and sends this mono signal through a 100 Hz analog low filter to
the subwoofer output. This provides an unaltered analog bypass for the
seven main channels along with a subwoofer signal derived from those
channels.
Speaker Outputs
m
The receiver has seven built-in amplifiers, two for the front (left and
right), one for the center channel, two for the rear surround speakers
(left and right) and two for center back speakers (1 & 2). There are
seven pairs of binding post connections (one pair for each speaker)
which accept bare wire, spade lugs, or banana plug connectors (in some
markets).
Note:
The RSX-1560 has a speaker redirect feature which allows
you to use either the Front channel amplifiers or the Center Back
channel amplifiers to drive speakers in remote Zone 2, 3 or 4,
when these amplifier channels are not needed for the main room.
Alternatively, the Center Back channels can be redirected to
‘Front’, for bi-amping front speakers. This feature is configured in
the Default Setup menu. See the Setup Section in this manual.
Preamp Outputs
f
A group of ten RCA analog audio outputs sends the receiver’s line level
output signals to external amplifiers and powered subwoofers. These
outputs are variable level, adjusted by the receiver’s volume control.
The ten connectors provide output for: FRONT L & R, CENTER 1 & 2,
SURROUND (REAR) L & R, CENTER BACK CB1 & CB2, and SUBWOOFER
1 & 2.
Note:
Depending on your system configuration, you may use
some or all of these connections. For example, if you only have
one center channel, connect it to the CENTER 1 output. If you only
have one center back channel, connect it to the CB1 output.
ZONE 2–4 Audio Outputs
j
Three pair of RCA jacks, labeled ZONE OUT send analog audio signals
to audio systems in up to three remote zones. These outputs can be
configured as either fixed or variable level using the ZONE SETUP menu.
Note:
Only analog input signals are available at the Zone 2, 3,
and 4 outputs. Source components connected to only the digital
inputs are not available in the remote zones.
To configure your system for remote zone operation, connect the left
and right Zone 2 , 3, or 4
outputs
on the receiver to the left and right
channel
inputs
of the amplifier powering the remote zone speakers,
using standard RCA audio cables. There are also Composite video and
S-Video outputs for each of the zones.
Other Connections
AC Input
h
Your Rotel receiver is configured at the factory for the proper AC line
voltage in the country where you purchased it (USA: 120 volts/60Hz AC
or CE: 230 volts/50 Hz AC ). The AC line configuration is noted on a
decal on the back of your unit. Plug the supplied cord into the AC INPUT
receptacle on the back of the unit.
RSX-1560 English v2.indd 20
29/9/08 15:15:56