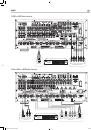
38
39
English
RSX-1560 Surround Sound Receiver
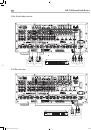
38
39
English
RSX-1560 Surround Sound Receiver
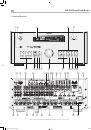
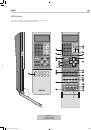
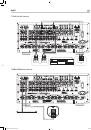
TUNE Button
F
PRESET Button
G
P-TUN Button
Z
These remote control buttons are used to change between FREQUENCY
tuning mode and PRESET tuning mode. In frequency tuning mode, the
TUNING buttons (CH UP/DOWN on the remote ) advance to the next
station frequency. In preset tuning mode, the TUNING buttons advance
to the next memorized station preset.
Select the FREQUENCY tuning mode by pressing the TUNE button on the
remote. Select the PRESET tuning mode by pressing the PRESET button on
the remote. Toggle between the two modes by pressing the P-TUN button.
A PRESET indicator appears in the display when PRESET TUNING is
activated.
SCAN Button
M
This button activates a preset scanning feature. When you press the
button, the tuner begins scanning through all memorized station presets,
playing each for 5 seconds before moving to the next. To stop the station
scanning when the desired station preset is reached, press the button
again.
Note:
If a PRESET station is currently tuned when the PRESET
SCAN button is pressed, scanning will start with the next higher
preset number and continue through all presets, stopping on the
initial preset. If a PRESET station is not currently tuned when the
button is pressed, scanning will start from PRESET 1 and continue
to PRESET 30.
RDS and RBDS Tuning
This Rotel receiver is equipped with RDS (Radio Data Systems) reception
capabilities for Europe and RBDS (Radio Broadcast Data Service)
capabilities for the United States. These broadcast systems provide
additional functionality to FM radio reception by transmitting encoded
information along with the radio signal. This signal is decoded by an
RDS or RBDS receiver and can provide a range of informational features
including:
1. A display of the station’s identifying name (e.g. BBC1).
2. A display of the station’s program content (e.g. ROCK or NEWS).
3. Traffic information broadcasts.
4. A scrolling text display for announcements or information.
In addition, RDS provides several advanced search features including:
1. Search for a station with the desired program content (PTY).
2. Search for traffic information (TP).
3. Search for stations broadcasting special traffic announcements (TA).
RDS broadcasting has been widely available in many European markets
for years. There are a large number of RDS stations and most users will
be familiar with the features and operation. In the USA, implementation
of the RBDS system is more recent. Fewer stations are broadcasting RBDS
signals and the features may be less familiar to many users. Consult
your authorized Rotel dealer for more information on RDS or RBDS
broadcasting in your area.
Note:
The RDS and RBDS features are entirely dependent on
the broadcaster sending encoded signals. Thus, they will only
be available in markets where RDS or RBDS is implemented and
where stations are broadcasting these data signals. If there are
no RDS or RBDS stations, the unit will function as a standard radio
receiver.
Note:
RDS and RBDS services are only available on FM
broadcasts. The features and buttons described below are only
operational in FM mode.
DISP Button
There are five display options when the currently tuned station is
broadcasting RDS information and the RDS indicator in the front-panel
display is lit. Press the DISP button on the remote (in the DVD control
section) to step through the five display options:
1. Standard FREQUENCY display.
2. PROGRAM SERVICE name. This is typically the station’s call letters,
such as BBC1. If the current station is not broadcasting an RDS
signal, the display will show “NO NAME DATA”.
3. PROGRAM TYPE. This is a description of the station’s content from
a standardized list of program types in each market. If the current
station is not broadcasting an RDS signal, the display will show “NO
PTY DATA”.
4. CLOCK TIME. A time and date display broadcast by the station. If
the current station is not broadcasting an RDS signal, the display will
show “NO TIME DATA”.
5. RADIO TEXT. Additional scrolling text messages broadcast by the
station. If the current station is broadcasting radio text data, an RT
indicator lights in the display and the scrolling text appears. If the
current station is not broadcasting an RDS signal, the display will
show “NO TEXT DATA”.
PTY Button
The PTY search function permits you to scan available broadcasts for
RDS stations broadcasting a particular type of program content.
1. Press the PTY button. The current RDS program type will appear in
the display.
2. If desired, change to a different PROGRAM TYPE using the TUNING
UP/DOWN buttons to scroll through the list.
3. Press the PTY button a second time within 10 seconds. The tuner
will attempt to find an RDS station broadcasting the selected type of
program. If the button is not pressed within 10 seconds after selecting
a program type, the PTY function will be cancelled.
4. If no station is located for the desired content type, the tuner will
return to the last previously tuned station.
5. Cancel the PTY function by pressing any other button.
RSX-1560 English v2.indd 38
29/9/08 15:16:07