28
29
English
RSX-1560 Surround Sound Receiver
28
29
English
RSX-1560 Surround Sound Receiver
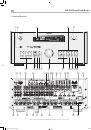
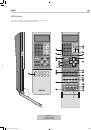
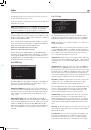
MENU/OSD Button
S
Push this button on the remote to turn on the OSD menu system. If the
menu system is already visible, push this button to cancel the display.
Press and hold the button to turn off the front-panel display.
ENTER Button
T
The ENTER button is used to confirm and memorize various settings in
the setup and operation of the receiver. Its use is described in detail in
the relevant sections.
BAND Buttons
-
I
Press either BAND button to toggle between AM and FM reception.
TUNING Buttons
8
P
The TUNING buttons (labeled CH UP/DOWN on the remote control)
provide three different tuning functions, depending on the mode of
operation: frequency tuning, preset tuning, or selection of an RDS/RBDS
program type.
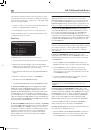
MEM Button
0
B
The front-panel MEMORY button or remote control MEM button (also
labeled “X”) is used with the NUMERIC buttons to store station presets.
NUMERIC Buttons
6
B
The NUMERIC buttons on the front panel or the remote are used to enter
the number of a memorized station preset or for direct entry of a station
frequency.
DIRECT Button
7
FRQ DIRECT Button
D
The front-panel DIRECT and remote control FRQ DIRECT buttons are used
in conjunction with the NUMERIC buttons for direct entry of a station
frequency in AM/FM tuning.
MONO Button
9
FM MONO Button
H
The front-panel MONO and remote control FM MONO buttons change
the FM mode from stereo reception to mono reception.
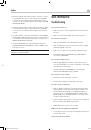
TUNE Button
F
PRESET Button
G
P-TUN Button
Z
The TUNE, PRESET, and P-TUN buttons on the remote are used to select
FREQUENCY tuning or PRESET tuning modes. The TUNE and PRESET
buttons select the modes directly. The P-TUN button toggles between the
two modes.
SCAN Button
M
Preset scan tuning automatically scans through the memorized station
presets, playing each for 5 seconds. Press the SCAN button on the
remote to begin preset scanning. Press the button again to stop the
scanning and listen to the desired preset.
RDS/RBDS Buttons
Four remote control buttons (DISP, PTY, TP, TA) are used to activate
various RDS/RBDS tuning features. See the
RDB/RBDS Tuning
section of
the manual for detailed information.
Output Button
Press the OUTPUT button to cycle through available monitor resolutions.
PIP Button
POP Button
These two buttons can be used to set the HDMI AUDIO mode (See the
Video/HDMI
menu in the
Setup
section of this manual.) Press the PIP
button to select AMP MODE, to prevent audio signals being sent to the
TV, or press the POP button to select TV mode.
Basic Operations
This section covers the basic operating controls of the receiver and the
remote.
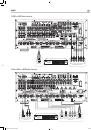
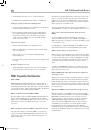
Power and Standby On/Off
tg
NO
The rear panel POWER switch is a master power switch. The button
must be in the ON position for the unit to operate. When it is in the OFF
position, the unit is fully off and cannot be activated from the front panel
or remote control.
In normal operation, the rear panel POWER switch is always left in the
ON position. The receiver is activated and deactivated using the front-
panel STANDBY button, the remote control POWER button, or the remote
ON/OFF buttons. When activated, the unit is fully functional and the
front-panel display illuminated. When deactivated, the unit goes into a
standby mode, with minimal power applied to the microprocessor.
Note:
When the unit has AC power applied and the rear
panel POWER switch is on, the front-panel STANDBY LED lights,
regardless of whether the unit is in standby mode or activated.
The front-panel STANDBY button and the remote control POWER button
function as toggle switches. Press either button to activate the unit. Press
either button again to put the unit in standby mode.
The ON/OFF buttons on the remote serve the same function, but provide
discrete ON (active) or OFF (standby) commands.
Note:
When using the Zone room capability of the receiver, the
standby activation is completely independent for the main room
and the zones. ON/OFF commands sent from the remote in
the main room will not affect Zones 2–4. Pressing the ON/OFF
buttons on a remote located in Zone 2, 3 or 4 will only affect that
zone and not the main room. When the unit is activated in one of
the zones, that zone’s icon is lit in the front-panel FL display.
There are four available power mode options, which may be useful in
configuring the receiver for special system configurations. See the Other
Options menu in the Setup section of this manual for additional details
on changing the default standby behavior.
‘
Resume’
retains the last power configuration when the main power is
switched OFF and then switched ON again. For example, if the receiver
is in operation and the main power is switched OFF, when the main
power is switched ON, the unit will be in operation mode again.
All OFF command:
A long press of the OFF button (more than 3
seconds), from any room, sets the receiver to standby.
Volume Adjustments
=
Q
The listening volume of the receiver can be adjusted from the front panel
or the remote.
RSX-1560 English v2.indd 28
29/9/08 15:16:01